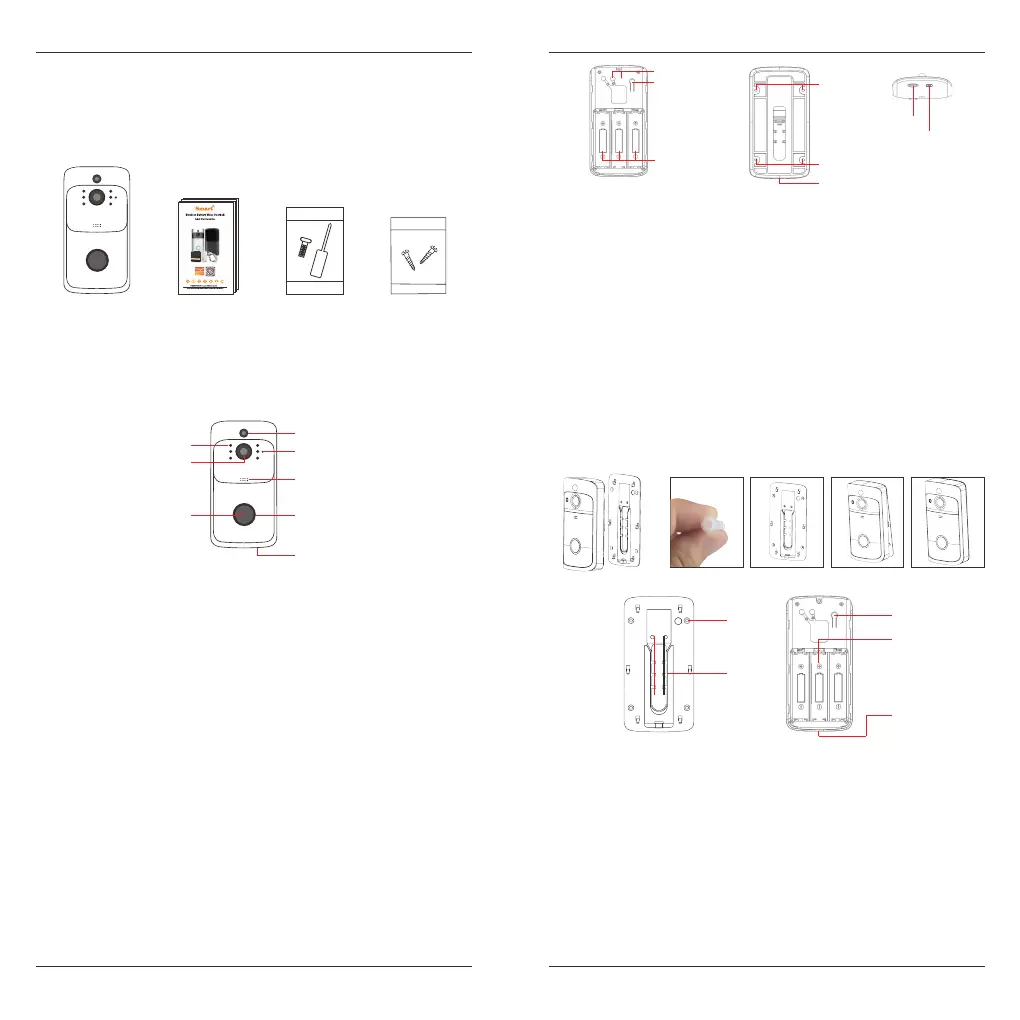
Packing list
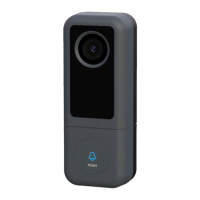
Appearance Introduction
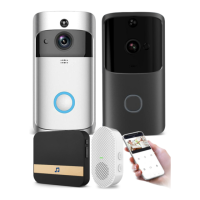
Installation
After opeing the package, please make sure the doorbell is in good condition
verify parts below is complete.
As shown in the figure.
Doorbell
User Guide
IR Leds
IR Leds
Button
Button
PIR
PIR
Light Sensor
Light Sensor
Indicator Light
TF Card
TF Card
Fixed hole
Fixed hole
Security screw hole
Security
Screw hole
Fixed hole
Reset Button
Reset Button
Battery
Comartment
Battery
Comartment
AC Input
AC Input
USB
USB
Indicator Light
Speaker
Speaker
MIC
MIC
Lens
Lens
Security Screw Screw bag
The ambient light is not enough, to enable the infared
light, increase the environmental brightness.
Used to collect environmental brightness value, when
the intensity of illumination is lesss than 2 Lux, enable
the IR LEDs.
Audio capture.
The doorbell button.
When human body movement in front of the doorbell,
the doorbell could be made the notification to your
mobile phone.
Video image capture.
Blinking blue: configuration status.
Long red light: failed to connect WIFI.
Blue light is on: the device is connected successfully.
Red and blue light together: The device is connected to
WIFI.
Make a sound of the doorbell, and voice intercom.
Support AC power supply input for doorbell.
Doorbell working status, long press 5 seconds to restore factory
settings.
Mounting 18650 specification battery.
Fit the support on the wall with the mounting screws for the mounting
kit. Mounting the doorbell onto the bracket.
Mounting the security screw on the fittings to prevent the doorbell
from being removed.
TF card maximum support 64GB.
Charge the battery
1
3
2
4
5
1. Use the screws in the mounting kit to fit the bracket on the wall.
2. The conductive screws in the accessories pack are used to connect the
AC (16-24V) wire to the AC input hole (If no AC power adaptor is available,
this step can be omitted).
3. Press the reset button for 5 seconds, waitting for the indicator light to
slow down (The doorbell should be in working condition, long press, sleep
state is invalid).
4. Mounting three 18650 specification batteries.
5. Cover the battery cover, align the doorbell and the bracket, push down
and lock the security screws to complete the installation.
English English
1
2