9
VERA10 Operating Manual
4. Setting up the loudspeaker
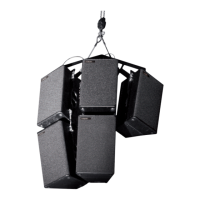
The VERA10 loudspeaker is designed for horizontal operation in a suspended or stand-
ing position. A variety of accessories is available from TW AUDiO to securely attach the
loudspeaker, e.g. on stands or suspended from trusses and chain/motor hoists. Vertical
operation is not intended.
Depending on the variant, either the 80° × 10° or the 120° × 10° horn (see section 2.2.1)
is built into the VERA10 loudspeaker. For some applications, it may be advantageous to
exchange the horn for the other variant in order to change the horizontal coverage. Pro-
ceed as follows.
1. Place the VERA10 loudspeaker on its back with the front grill facing up. Ensure
that you are working on a clean and non-slip surface.
2. To remove the front grill of the loudspeaker, use a 3 mm hex key. Remove the four
fastening screws on the left and right of the loudspeaker enclosure (two on each
side).
3. Release the four screws of the horn using a 3 mm hex key. Pull the horn upward
out of the loudspeaker enclosure.
4. Check that the sealing lip between the waveguide and horn is properly seated.
5. Insert the new horn in the opening. Screw it onto the enclosure using medium-
strength thread locker.
6. Screw the front grill back on.
4.1 Setup
WARNING
Ensure that the loudspeakers are securely attached to prevent personal injury and prop-
erty damage. Secure stacked loudspeakers properly so that they can be tipped by 10° in
any direction without toppling.
NOTE
TW AUDiO recommends using only the accessories specified by TW AUDiO to secure
the loudspeakers.
4.2 Exchanging the horn