TFP910
Page 17 of 22
TINT)
(GREEN
2
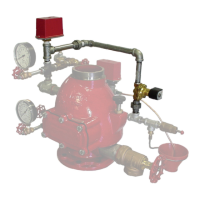
RETARD
CHAMBER
MODEL RC-1
PRESSURE
SWITCH
3
(ROUTE TO
DRAIN)
1
1
2
3
. . . . . . . . . .
. . . . . . . . .
. . . . . . . . . .
3/32" Vent
3/4" x 1/4" Hex
Fitting
Bushing
92-032-1-002
CH
DESCRIPTIONNO. P/N
1/4" x 5'-0"
Tubing CH
1
1
QTY.
1
Trim kit is ordered separately when a
Water Motor Alarm (P/N 52-201-2-012)
is not installed.
FIGURE 8
ALARM VENT TRIM KIT
Setting
Procedure
Steps 1 through 11 are to be per-
formed when initially setting the Mod-
el AV-1-300 Alarm Check Valve or af-
ter system operation due to a fire.
NOTICE
Filling the system with water will result
in operation of the associated alarms.
Consequently, notification must first
be given to the owner and fire depart-
ment, central station, or other sig-
nal station to which the alarms are
connected.
Notify the proper authorities and all
personnel who may be affected that
an alarm test is to be performed.
After placing a fire protection system
in service, notify the proper authorities
and advise those responsible for mon-
itoring proprietary and/or central sta-
tion alarms.
Step 1. Open the 1/4 inch Gauge Test
Valves for the Supply and System
Pressure Gauges.
Step 2. Check to see that the Hand-
hole Cover bolts are tight. If not, cross-
tighten them.
Step 3. Close the Alarm Test Valve.
Step 4. Open the remote cross main
or branch line vent connection. (Refer
to Step 7 in the Installation section.)
Step 5. Slowly open the main control
valve until the sound of flowing water
just begins and then open the valve
one more turn.
Step 6. Close the remote branch line
vent connection after the discharge of
aerated water ceases, and the outlet
has flowed full for at least 15 seconds.
Step 7. Fully open the main control
valve.
Step 8.
Open the end-of-line Inspec-
tor’s Test Connection (or Alarm Test
Valve, if acceptable to the authority
having jurisdiction) and verify that the
system alarms operate.
Step 9.
Close the end-of-line Inspec-
tor’s Test Connection (or Alarm Test
Valve).
Step 10. Verify that water ceases to
flow from the alarm line drain. If water
continues to flow, follow the corrective
procedure described in the Care and
Maintenance section.
The Restriction Assembly has a 1/8
inch (3,2 mm) diameter drain orifice.
Sufficient time must be allowed for
drainage of the Retard Chamber and
the piping to the water motor alarm.
Step 11. After verification that the flow
of water out of the alarm line drain has
stopped, the alarm valve is set and is
ready for service.
Care and
Maintenance
The following procedures and inspec-
tions should be performed as indi-
cated, in addition to any specific
re quirements of the NFPA. Any impair-
ment must be immediately corrected.
NOTICE
Performing the care and maintenance
procedures will result in operation of
the associated alarms. Consequently,
notification must first be given to the
owner and fire department, central
sta tion, or other signal station to which
the alarms are connected.
Before closing a fire protection system
main control valve for maintenance
work on the fire protection system that
it controls, obtain permission to shut
down the affected fire protection sys-
tem from the proper authorities and
notify all personnel who may be af-
fected by this decision.
Responsibility lies with the owner for
the in spection, testing, and mainte-
nance of their fire protection system
and de vices in compliance with this
docu ment, as well as with the appli-
cable standards of the National Fire
Protec tion Association (for example,
NFPA 25), in addition to the standards
of any authority having jurisdiction.
Contact the installing contractor or
product manufac turer regarding any
questions.
Automatic sprinkler systems are rec-
ommended to be inspected, tested,
and maintained by a qualified Inspec-
tion Service in accordance with local
requirements and/or national codes.
The Tyco
®
Model AV-1-300 Alarm
Check Valves do not require any reg-
ularly scheduled maintenance. It is
recom mended, however, that proper
opera tion of the alarms be periodically
veri fied in accordance with a proce-
dure that is acceptable to the author-
ity hav ing jurisdiction. Any impairment
must be immediately corrected.
Inspection Procedure
It is recommended that the following
inspection procedure be performed at
least quarterly by a qualified Inspec-
tion Service.
Step 1. Notify the proper authorities
and all personnel who may be affected
that an alarm test is to be performed.
Step 2.
Open the end-of-line Inspec-
tor’s Test Connection (or Alarm Test
Valve, if acceptable to the authority
having jurisdiction) and verify that the
system alarms operate in accordance
with the requirements of the authority
having jurisdiction. Verify that the wa-
ter motor alarm and/or the pressure
alarm switch properly actuate and
within the elapsed time required by
the authority having jurisdiction.
Step 3. Verify that water is flowing out
of the alarm line drain at a rate consis-
tent with the 1/8 inch (3,2 mm) diame-
ter drain orifice in the Restriction As-
sembly.
Step 4.
Close the end-of-line Inspec-
tor’s Test Connection (or Alarm Test
Valve).
Step 5. Verify that water ceases to
flow from the alarm line drain.
Step 6. Clean the 1/2 inch Strainer (lo-
cated in the valve trim) as well as the
3/4 inch Strainer (located at the con-
nection to the water motor alarm, as
applicable). Be sure to replace the
strainer baskets and tighten the caps
securely.
NOTICE
Cleaning of the Strainers after each
operation of the alarms is especially
important in the case of water sup-
plies (such as lakes and rivers) having
a large quantity of suspended mat-
ter. A clogged alarm line can prevent
opera tion of the alarms.

 Loading...