Valve Setting Procedure
1. Close System Main Control Valve (B) and Diaphragm Supply Valve (P).
2. Open Main Drain Valve (D), System Drain Valve (E), and all auxiliary drains in the system.
Close auxiliary drain valves and System Drain Valve (E) after water stops discharging. Leave
the Main Drain Valve (D) open. Ensure that the Pressure Gauge Valves and the Alarm Control
Valve (H) are open.
3. Depress plunger of Automatic Drain Valve (F) to verify it is open.
4. Clean Diaphragm Supply Strainer (Q). Flush strainer by opening the Diaphragm Supply
Valve (P).
5. Reset electric detection system in accordance with manufacturer’s instructions to de-en-
ergize Solenoid Valve (N).
6. Open Manual Control Station (M) and Diaphragm Supply Valve (P). After aerated water
stops discharging, slowly close the operating lever. Do not close the hinged cover at this time.
Observe Diaphragm Gauge (K) to ensure that the valve has pressurized.
7. With diaphragm chamber pressurized, temporarily close Diaphragm Supply Valve (P) and
observe Diaphragm Gauge (K) for a drop in pressure. If a pressure drop is noted, correct any
leaks before proceeding.
8. If Diaphragm Gauge (K) indicates no drop in pressure, re-open the Diaphragm Supply
Valve (P) and proceed.
9. Partially open System Main Control Valve (B). Slowly close Main Drain Valve (D) as water
discharges from Main Drain Valve (D). Observe Automatic Drain Valve (F) for leaks. If there
are leaks, correct the leakage problem.
10. When System Main Control Valve (B) is partially opened, the pressure on DV-5
a Diaphragm
Chamber may increase. If pressure is greater than valve trim maximum pressure, relieve pres-
sure to at least valve trim pressure rating. Do not allow pressure to drop below supply pressure
shown on Water Supply Gauge (J) which may result in tripping of DV-5
a Valve.
11. Close hinged cover of Manual Control Station (M). Insert a new break rod in the small hole
through the top of the enclosing box.
12. Open System Main Control Valve (B).
13. After setting fire protection system, notify proper authorities and advise those responsible
for monitoring proprietary and/or central station alarms.
Adjusting Pilot Valve Pressure
1. To set pressure in the field, trip valve manually or electrically. It is recommended the valve
is tripped electrically to test entire system.
2. Remove Tamper Cap of Pilot Valve.
3. If surging flow occurs, attempt to bleed trapped air from system via Automatic Drain Valve.
4. Loosen Lock Nut on Adjusting Screw of Pilot Valve. Turn Adjusting Screw clockwise to
increase outlet pressure or counterclockwise to decrease outlet pressure.
5. Observe Outlet Pressure Gauge for changes. Turn Adjusting Screw until desired set point
is achieved.
7. After desired pressure is attained, tighten Lock Nut.
8. Replace Tamper Cap and tighten Set Screw.
9. Ensure that system is properly drained. DV-5
A Deluge Valve is set for service.
Drop in Water Supply Pressure Below Normal Range
1. Note water supply pressure by the Diaphragm Gauge (K) and determine if the pressure is
within normally expected range.
2. If below normal range, correct any leakage from diaphragm chamber prior to resetting the
system.
3. When water supply pressure is restored, reset DV-5
A Valve in accordance with the Valve
Setting Procedure.
Waterflow Alarm Test Procedure
1. Open Alarm Test Valve (G), allowing water to flow to Waterflow Pressure Switch (C) and/or
Water Motor Alarm. Close the Alarm Test Valve (G) when test is completed.
2. Depress plunger on Automatic Drain Valve (F) to drain alarm line.
Electric Actuation Operation Test Procedure
1. To prevent water from flowing beyond riser, close System Main Control Valve (B). Open
Main Drain Valve (D).
2. Open System Main Control Valve (B) one turn beyond position which water begins to flow
from Main Drain Valve (D). Slowly close Main Drain Valve (D).
3. Test deluge releasing panel in accordance with manufacturer’s instructions to energize
solenoid valve.
4. Verify DV-5
a Valve has tripped, indicated by flow of water into system.
5. Close System Main Control Valve (B).
6. Close Diaphragm Supply Valve (P).
7. Reset DV-5
a Valve in accordance with the Valve Setting Procedure.
Electric Actuation Solenoid Valve Test Procedure
1. Close System Main Control Valve (B).
2. Open Main Drain Valve (D).
3. Test deluge releasing panel in accordance with manufacturer’s instructions to energize
Solenoid Valve (N).
4. Verify water flow from Solenoid Valve (N) drain connection.
5. Verify Diaphragm Chamber pressure decreases to below 25% of water supply pressure.
6. Reset electric detection system in accordance with manufacturer’s instructions to de-en-
ergize Solenoid Valve (N).
7. Water should cease draining from Solenoid Valve (N).
8. Pressure will then build up in DV-5
A Diaphragm Chamber.
9. After system pressure is restored, inspect Solenoid Valve (N) for leaks at the drain tube.
Any leaks must be corrected before proceeding.
10. Partially open System Main Control Valve (B). Slowly close Main Drain Valve (D) as water
discharges from Main Drain Valve (D). Observe Automatic Drain Valve (F) for leaks. If there are
leaks, correct the leakage problem. If there are no leaks, DV-5
A Valve is ready to be placed in
service and System Main Control Valve (B) must then be fully opened.
Internal Valve Inspection
1. Ensure that Steps 1 to 4 of the Valve Setting Procedure are completed prior to proceeding
with the Internal Valve Inspection.
2. Ensure Diaphragm Supply Valve (P) is closed. If provided as part of the valve trim, close
Inverted Flare Shut-Off Valve (R).
3. Remove the Supply Line between the Diaphragm Supply Valve (P) and the System Main
Control Valve (B). If provided as part of the valve trim, remove the Supply Line between the
Diaphragm Supply Valve (P) and Inverted Flare Shut-Off Valve (R).
4. Loosen union securing Solenoid Valve (N).
5. Loosen and remove union between Diaphragm Cover and trim and remove trim.
6. Remove Diaphragm Valve Cover hardware, slowly remove Diaphragm Cover and perform
internal valve inspection. Clean valve interior and replace parts as necessary.
7. Ensure Diaphragm is properly oriented and proper hardware arrangement is utilized when
assembling Diaphragm Covers. Hardware arrangements differ depending on the size of the
DV-5
a Valve.
8. Insert Long Hex Bolts. Align Diaphragm with Valve Body, and then align Diaphragm Cover
with Valve Body. Insert Short Hex Bolts. Hand-tighten all fasteners.
9. Using crossdraw sequence, wrench-tighten Long Hex Bolts and Short Hex Bolts. Repeat
crossdraw sequence two to three times at incremental torque valves.
10. Inspect to assure all Hex Bolts are securely tightened.
11. Using the union, secure trim to Diaphragm Cover.
12. Using the union, secure solenoid Valve (N).
13. Replace the Supply Line between the Diaphragm Supply Valve and the System Main
Control Valve (B). If provided as part of the valve trim, replace Supply Line between Diaphragm
Supply Valve (P) and Inverted Flare Shut-Off Valve (R).
14. Ensure unions and flare fittings are securely tightened.
15. If provided with the valve trim, and with Diaphragm Supply Valve (P) closed, fully open
Inverted Flare Shut-Off Valve (R) stainless steel screw (approximately 1/2 in.) until resistance
is met.
16. Proceed with Step 5 of the Valve Setting Procedures.
NOTICE
The procedures provided are summary instructions of the complete procedures appearing in
Technical Data Sheet TFP1326. If problems occur, consult full document.
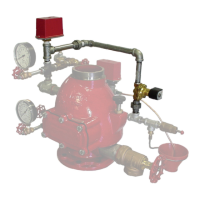
Item Description
A
B
C
D
E
F
G
H
DV-5
A Valve
System Main Control Valve
Waterow Pressure Switch
Main Drain Valve
System Drain Valve
Automatic Drain Valve
Alarm Test Valve
Alarm Control Valve (Optional)
Item Description
J
K
L
M
N
P
Q
R
Water Supply Gauge
Diaphragm Gauge
(Not Used)
Manual Control Station
Solenoid Valve
Diaphragm Supply Valve
Diaphragm Supply Strainer
Inverted Flare Shut-Off Valve
C
G
P
Q
J
B
H
M
F
N
E
A
D
K
R
Worldwide
Contacts
www.tyco-fire.com
Summary Instructions
DV-5
A Automatic Water Control Valve
Remote-Resetting, Pressure-Reducing
Deluge Fire Protection Systems
1400 Pennbrook Parkway, Lansdale, PA 19446 | Telephone +1-215-362-0700
© 2021 Johnson Controls. All rights reserved. All specifications and other information shown were current as of document
revision date and are subject to change without notice.
TFP1326 Appendix A
MARCH 2021
Valve Setting Procedure
1. Close System Main Control Valve (B) and Diaphragm Supply Valve (P).
2. Open Main Drain Valve (D), System Drain Valve (E), and all auxiliary drains in the system.
Close auxiliary drain valves and System Drain Valve (E) after water stops discharging. Leave
the Main Drain Valve (D) open. Ensure that the Pressure Gauge Valves and the Alarm Control
Valve (H) are open.
3. Depress plunger of Automatic Drain Valve (F) to verify it is open.
4. Clean Diaphragm Supply Strainer (Q). Flush strainer by opening the Diaphragm Supply
Valve (P).
5. Reset electric detection system in accordance with manufacturer’s instructions to de-en-
ergize Solenoid Valve (N).
6. Open Manual Control Station (M) and Diaphragm Supply Valve (P). After aerated water
stops discharging, slowly close the operating lever. Do not close the hinged cover at this time.
Observe Diaphragm Gauge (K) to ensure that the valve has pressurized.
7. With diaphragm chamber pressurized, temporarily close Diaphragm Supply Valve (P) and
observe Diaphragm Gauge (K) for a drop in pressure. If a pressure drop is noted, correct any
leaks before proceeding.
8. If Diaphragm Gauge (K) indicates no drop in pressure, re-open the Diaphragm Supply
Valve (P) and proceed.
9. Partially open System Main Control Valve (B). Slowly close Main Drain Valve (D) as water
discharges from Main Drain Valve (D). Observe Automatic Drain Valve (F) for leaks. If there
are leaks, correct the leakage problem.
10. When System Main Control Valve (B) is partially opened, the pressure on DV-5
a Diaphragm
Chamber may increase. If pressure is greater than valve trim maximum pressure, relieve pres-
sure to at least valve trim pressure rating. Do not allow pressure to drop below supply pressure
shown on Water Supply Gauge (J) which may result in tripping of DV-5
a Valve.
11. Close hinged cover of Manual Control Station (M). Insert a new break rod in the small hole
through the top of the enclosing box.
12. Open System Main Control Valve (B).
13. After setting fire protection system, notify proper authorities and advise those responsible
for monitoring proprietary and/or central station alarms.
Adjusting Pilot Valve Pressure
1. To set pressure in the field, trip valve manually or electrically. It is recommended the valve
is tripped electrically to test entire system.
2. Remove Tamper Cap of Pilot Valve.
3. If surging flow occurs, attempt to bleed trapped air from system via Automatic Drain Valve.
4. Loosen Lock Nut on Adjusting Screw of Pilot Valve. Turn Adjusting Screw clockwise to
increase outlet pressure or counterclockwise to decrease outlet pressure.
5. Observe Outlet Pressure Gauge for changes. Turn Adjusting Screw until desired set point
is achieved.
7. After desired pressure is attained, tighten Lock Nut.
8. Replace Tamper Cap and tighten Set Screw.
9. Ensure that system is properly drained. DV-5
A Deluge Valve is set for service.
Drop in Water Supply Pressure Below Normal Range
1. Note water supply pressure by the Diaphragm Gauge (K) and determine if the pressure is
within normally expected range.
2. If below normal range, correct any leakage from diaphragm chamber prior to resetting the
system.
3. When water supply pressure is restored, reset DV-5
A Valve in accordance with the Valve
Setting Procedure.
Waterflow Alarm Test Procedure
1. Open Alarm Test Valve (G), allowing water to flow to Waterflow Pressure Switch (C) and/or
Water Motor Alarm. Close the Alarm Test Valve (G) when test is completed.
2. Depress plunger on Automatic Drain Valve (F) to drain alarm line.
Electric Actuation Operation Test Procedure
1. To prevent water from flowing beyond riser, close System Main Control Valve (B). Open
Main Drain Valve (D).
2. Open System Main Control Valve (B) one turn beyond position which water begins to flow
from Main Drain Valve (D). Slowly close Main Drain Valve (D).
3. Test deluge releasing panel in accordance with manufacturer’s instructions to energize
solenoid valve.
4. Verify DV-5
a Valve has tripped, indicated by flow of water into system.
5. Close System Main Control Valve (B).
6. Close Diaphragm Supply Valve (P).
7. Reset DV-5
a Valve in accordance with the Valve Setting Procedure.
Electric Actuation Solenoid Valve Test Procedure
1. Close System Main Control Valve (B).
2. Open Main Drain Valve (D).
3. Test deluge releasing panel in accordance with manufacturer’s instructions to energize
Solenoid Valve (N).
4. Verify water flow from Solenoid Valve (N) drain connection.
5. Verify Diaphragm Chamber pressure decreases to below 25% of water supply pressure.
6. Reset electric detection system in accordance with manufacturer’s instructions to de-en-
ergize Solenoid Valve (N).
7. Water should cease draining from Solenoid Valve (N).
8. Pressure will then build up in DV-5
A Diaphragm Chamber.
9. After system pressure is restored, inspect Solenoid Valve (N) for leaks at the drain tube.
Any leaks must be corrected before proceeding.
10. Partially open System Main Control Valve (B). Slowly close Main Drain Valve (D) as water
discharges from Main Drain Valve (D). Observe Automatic Drain Valve (F) for leaks. If there are
leaks, correct the leakage problem. If there are no leaks, DV-5
A Valve is ready to be placed in
service and System Main Control Valve (B) must then be fully opened.
Internal Valve Inspection
1. Ensure that Steps 1 to 4 of the Valve Setting Procedure are completed prior to proceeding
with the Internal Valve Inspection.
2. Ensure Diaphragm Supply Valve (P) is closed. If provided as part of the valve trim, close
Inverted Flare Shut-Off Valve (R).
3. Remove the Supply Line between the Diaphragm Supply Valve (P) and the System Main
Control Valve (B). If provided as part of the valve trim, remove the Supply Line between the
Diaphragm Supply Valve (P) and Inverted Flare Shut-Off Valve (R).
4. Loosen union securing Solenoid Valve (N).
5. Loosen and remove union between Diaphragm Cover and trim and remove trim.
6. Remove Diaphragm Valve Cover hardware, slowly remove Diaphragm Cover and perform
internal valve inspection. Clean valve interior and replace parts as necessary.
7. Ensure Diaphragm is properly oriented and proper hardware arrangement is utilized when
assembling Diaphragm Covers. Hardware arrangements differ depending on the size of the
DV-5
a Valve.
8. Insert Long Hex Bolts. Align Diaphragm with Valve Body, and then align Diaphragm Cover
with Valve Body. Insert Short Hex Bolts. Hand-tighten all fasteners.
9. Using crossdraw sequence, wrench-tighten Long Hex Bolts and Short Hex Bolts. Repeat
crossdraw sequence two to three times at incremental torque valves.
10. Inspect to assure all Hex Bolts are securely tightened.
11. Using the union, secure trim to Diaphragm Cover.
12. Using the union, secure solenoid Valve (N).
13. Replace the Supply Line between the Diaphragm Supply Valve and the System Main
Control Valve (B). If provided as part of the valve trim, replace Supply Line between Diaphragm
Supply Valve (P) and Inverted Flare Shut-Off Valve (R).
14. Ensure unions and flare fittings are securely tightened.
15. If provided with the valve trim, and with Diaphragm Supply Valve (P) closed, fully open
Inverted Flare Shut-Off Valve (R) stainless steel screw (approximately 1/2 in.) until resistance
is met.
16. Proceed with Step 5 of the Valve Setting Procedures.
NOTICE
The procedures provided are summary instructions of the complete procedures appearing in
Technical Data Sheet TFP1326. If problems occur, consult full document.
Item Description
A
B
C
D
E
F
G
H
DV-5
A Valve
System Main Control Valve
Waterow Pressure Switch
Main Drain Valve
System Drain Valve
Automatic Drain Valve
Alarm Test Valve
Alarm Control Valve (Optional)
Item Description
J
K
L
M
N
P
Q
R
Water Supply Gauge
Diaphragm Gauge
(Not Used)
Manual Control Station
Solenoid Valve
Diaphragm Supply Valve
Diaphragm Supply Strainer
Inverted Flare Shut-Off Valve
C
G
P
Q
J
B
H
M
F
N
E
A
D
K
R
Worldwide
Contacts
www.tyco-fire.com
Summary Instructions
DV-5
A Automatic Water Control Valve
Remote-Resetting, Pressure-Reducing
Deluge Fire Protection Systems
1400 Pennbrook Parkway, Lansdale, PA 19446 | Telephone +1-215-362-0700
© 2021 Johnson Controls. All rights reserved. All specifications and other information shown were current as of document
revision date and are subject to change without notice.
TFP1326 Appendix A
MARCH 2021