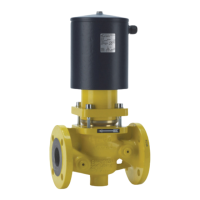
Disassembly
03/2021 221.100.002-00 15
www.uni-geraete.com
Replacing wearing parts
1. Replace the O-rings (403/1, 403/2).
2. Replace the lip-rings (404/1, 404/3).
3. Replace the guide rings (206).
Installing the valve
1. Push the balance piston (220/1) into the piston guide (221/1).
2. Screw the balance piston (220/1) with the piston guide (221/1) into the valve chamber (100).
3. Secure the solenoid core (207) with the bolt (902) and the SL-retainer (949) or split pin (912).
4. Insert the pressure spring (503) and spring bolt (210).
5. Screw on the Upper part of housing (106).
14 Disassembly
Danger of burns from hot components.
The solenoid drive can become hot during continuous operation. This poses a risk of burns.
• Allow the solenoid drive to cool down or wear suitable gloves before disassembling it.
1. Depressurise the piping system.
2. Allow the medium in the piping system to cool down.
3. Drain the system.
4. Ventilate the piping system if media with one of the following properties are used:
• Corrosive
• Flammable
• Aggressive
•Toxic
5. Disconnect the valve from the power supply and secure it against being switched on again.
6. Secure the valve against falling down.
7. Loosen the flange screw connections.
8. If the valve is to be serviced: Insert protective caps.
9. Dismantle the solenoid drive (see operating instructions for solenoid drive).
15 Troubleshooting
1. In the event of a malfunction, first check whether the valve has been mounted correctly.
2. If the valve has been mounted correctly, use the troubleshooting chart.
3. If the problem persists, contact the manufacturer.
15.1 Troubleshooting chart
The following item numbers refer to the respective valve in Fig.1–Fig.7.
Fault Possible causes Remedy
No flow Valve does not open Switch on solenoid drive (800)
Check voltage
Operating pressure too high Compare operating pressure with data
on nameplate
Protective caps have not been removed Remove the protective caps
Low flow rate Dirty strainer Clean/replace strainer
Blockage in piping system Check piping system
Valve leaking at the
seat, no internal tight-
ness
Valve disc seal (400) or valve seat (100)
damaged by foreign objects
Replace seals (See “Installing the spare
parts kit” on page 13) or valve