EasyManua.ls Logo

Utilitech UT-IO-70C - User Manual

Utilitech UT-IO-70C
32 pages
Print Icon
To Next Page IconTo Next Page
Loading...
Purchase Date
ATTACH YOUR RECEIPT HERE
1
SM20225
Serial Number
MODEL #UT-IO-70C
EspaƱol p. 17
Questions, problems, missing parts? Before returning to your retailer, call our customer
service department at 1-866-994-4148, 8 - 8 p.m., EST, Monday - Sunday. You could also
contact us at partsplus@lowes.com or visit www.lowespartsplus.com.
INDOOR/OUTDOOR
FULL MOTION TV MOUNT
ITEM #03850903
UTILITECH and logo design are trademarks or
registered trademarks of LF, LLC. All rights reserved.
Question and Answer IconNeed help?

Do you have a question about the Utilitech UT-IO-70C and is the answer not in the manual?

Utilitech UT-IO-70C Specifications

General IconGeneral
BrandUtilitech
ModelUT-IO-70C
CategoryTV Mount
Mount TypeFull Motion
MaterialSteel
ColorBlack
Swivel Range180 degrees

Summary

Package Contents

Parts List Overview

Lists all included parts with descriptions and quantities for the TV mount.

Hardware Contents

Hardware Identification

Details all screws, bolts, washers, and spacers with their specifications and quantities.

Safety Information and Preparation

Warnings and Precautions

Highlights potential dangers, weight limits, and installation requirements for safe operation.

Assembly Preparation

Outlines checks for parts, tools required, and estimated assembly time.

Specifications

Dimensions and Mounting Configurations

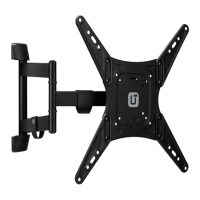
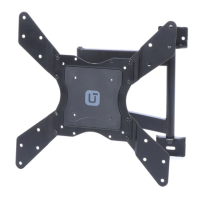
Illustrates product dimensions and compatibility patterns for various TVs.

Assembly Instructions

Initial Assembly Steps (1-3)

Detaching screws, removing the monitor plate, and determining mounting configuration.

Monitor Plate Attachment (Flat Back - 4 & 5 a)

Attaching adapters and the monitor plate to TVs with flat backs.

Monitor Plate Attachment (Curved Back - 5 b & 6)

Attaching plate for curved-back TVs and adjusting for screw length.

Wood Stud Installation (7-10)

Locating studs, marking holes, drilling pilot holes, and mounting the arm top.

Wood Stud & Concrete Installation (11-13)

Securing mounting arm for wood studs and preparing/mounting for concrete.

Concrete Installation (14-16)

Inserting anchors, mounting arm top and bottom using lag bolts.

Final Installation (17-19)

Attaching end caps, placing, and securing the monitor plate.

Post-Installation Adjustments (20-21)

Leveling the mounted panel and adjusting the tilt angle.

Warranty Information

Warranty Terms and Service

Details the 5-year warranty, service contact, and disclaimers.

Related product manuals