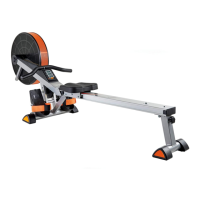
Aufbau / Assembly
Monitor is set to Kilometres and needs
changing to Miles
Remove one of the Monitor’s AA Batteries and wait for
30 seconds. Refit the Battery while holding down the
Reset Button and press again to set either M or K in
the left corner of the centre screen.
Feet are sliding out of the Footplates in use
The Footstraps (16) on your Air Rower can be set to
two different positions. Slide the Foot-straps out of the
guides in the Footplates (15) and refit using the lower
set of holes in the Footplates. This will ensure that
your ankles are pulled tightly into the Footplate and
will reduce the possibility of slipping in use.
There does not appear to be any
“drive” to the Air Fan
The Drive Chain (31) has come off the Drive Gear
Spindle (32) at the front of the Air Rower. Remove the
2 x M5 x 12mm Machine Screws (39) that are securing
the Drive Gear Cover (33) and pull it towards you.
Facing the Air Rower from the side with the Air Fan (27)
on the left and the Seat (8) on the right, with your LEFT
hand, lift the Row Arm (24) vertically and with your
right hand underneath the Main Frame (1) pull the Drive
Chain from right to left so that you can carefully feed
the Drive Chain back onto the Drive Gear Spindle at the
front of the Air Rower. When secured, slowly lower the
Row Arm into its storage location at the top of the
Exercise Monitor Console (20).
The Stokes per Minute Counter does not work
First, check the above step regarding Drive to Fanwheel.
If this does not work then check and remake the connections
between all of the Sensor Cables (21, 22, and 23). Fold
the Rowing Rail (2) over the top of the Main Frame (see
Page 24 for Folding Instructions) and slightly rotate the
Seat Sensor (22) about its fitting screw and then move
the Seat (8) up and down to check if the Exercise Monitor
(19) responds. Continue to move until the Monitor
indicates a Stroke Count or SPM figure.
The Speed Counter does not work
Unscrew the 6 (3 inside, 3 outside) x M4 x 63mm S/T
Screws holding the Fan Covers (28) together. Remove
the Outer Fan Cover and the 4 x Air Fan Cover Inserts (29).
Check to see if the Air Fan Magnet is still in place in its
location in a recess towards the centre of the Air Fan.
If it is secure, rotate the tip of the Air Fan Sensor Cable
(23) about its fixing point until spinning the Air Fan (27)
causes the Exercise Monitor to register.
The Seat “bumps” when in use
Make sure that the lower part of the Rowing Rail (2) is
always kept clean and dust / debris free as dust will
become compacted and as a consequence damage the
Rail and the Seat Carriage Wheel Assemblies (10). Clean
the groove with a clean damp cloth and if necessary
remove the complete Seat Assembly and clean each
Wheel before refitting.
Cockpit zeigt Kilometer an, soll aber
Meilen anzeigen
Entfernen Sie die Batterien des Cockpits und warten
30 Sekunden. Legen Sie die Batterien wieder ein während
Sie die Reset-Taste gedrückt halten. Drücken Sie dann
nochmals die Reset-Taste, um Kilometer oder Meilen auf
der linken Seite des mittleren Displays auszuwählen.
Füße rutschen bei Benutzung aus den
Fußplatten
Die Fußriemen (16) an Ihrem Rudergerät können in zwei
verschiedene Positionen eingestellt werden. Ziehen Sie
die Riemen aus den Fußplatten (15) und bringen Sie
ziese in der niedrigeren Position wieder an.
Der Ventilator scheint keinen
„Antrieb“ zu haben
Die Kette (31) ist am vorderen Ende des Rudergerätes
von der Antriebsradwelle (32) gesprungen. Entfernen
Sie 2 x M5 x 12mm Maschinenschrauben (39) aus der
Abdeckung des Antriebsrades (33) und ziehen Sie
diese zu sich. Stehen Sie neben dem Rudergerät mit
dem Ventilator (27) links und dem Sitz (8) rechts.
Heben Sie mit der linken Hand den Rudergriff (24)
vertikal an und mit der rechten Hand unter dem
Hauptrahmen ziehen sie die Kette von rechts nach
links, so dass Sie diese langsam wieder auf die
Antriebsradwelle führen. Danach setzen Sie den
Rudergriff langsam wieder auf der Konsole (20) ab.
Der Anschlag-pro-Minute-Zähler
funktioniert nicht
Kontrollieren Sie zuerst den Schritt zuvor bezüglich
„Antrieb“. Wirkt dies nicht, kontrollieren Sie alle
Kabelverbindungen der Sensorkabel (21, 22, und 23).
Heben Sie die Ruderschiene (2) über den Hauptrahmen,
drehen den Sitzsensor (22) etwas und bewegen nun den
Sitz vor und zurück, um zu sehen, ob der Zähler
funktioniert.
Der Geschwindigkeits-Zähler
funktioniert nicht
Lösen Sie 6 (3 innen, 3 außen) x M4 x 63mm Schraube
(28), an den Ventilator-Abdeckungen und entfernen
Sie die Ventilator-Abdeckungen. Kontrollieren Sie, ob
der Ventilator-Magnet noch fest sitzt (Richtung Mitte
des Ventilators). Ist er noch befestigt, drehen Sie die
Spitze des Ventilator-Sensorkabels (23) um sich selbst,
bis das Drehen des Ventilators (27) vom Cockpit
erkannt wird.
Der Sitz „springt“ bei Benutzung
Stellen Sie sicher, dass der untere Teil der Ruderschiene
immer sauber gehalten wird, da Staub gepresst werden
und Schaden an der Schiene und den Sitzrollen
verursachen kann. Reinigen Sie die Schiene mit einem
feuchten weichen Tuch und falls nötig, entfernen Sie
die Sitzmontur und reinigen jede Rolle.
 Loading...