7
IMPORTANT: If the unit is overheated, the overheat alarm icon and Fault Icon
will flash.
Disconnect the charger and allow the charger to cool for several minutes.
Make sure there is adequate ventilation around the unit before attempting
to charge again.
4. When the battery is completely charged, the LCD Screen displays the
following:
The Digital Display shows FLO and LI alternatively. The Clamp Icons
and the Battery Icon (with three bars) will light solid.
When disconnecting the charger, disconnect the AC cord, remove clamp
from the vehicle chassis, and then remove the clamp from the battery
terminal.
CHARGING A LEAD ACID BATTERY
WARNING: TO REDUCE THE RISK OF INJURY OR PROPERTY
DAMAGE:
• Always disconnect the AC plug from the AC outlet first before
disconnecting the charger from the battery to be charged.
• Ensure that all installation, operating instructions and safety
precautions are understood and observed; then follow the steps
outlined in the appropriate section “Charging a battery installed in
a vehicle” or “Charging a battery that has been removed from a
vehicle”.
1. Plug the battery charger’s power cord into an AC outlet.
2. The charger’s battery clamps are color-coded. Red is positive; black is
negative. Connect the battery clamps correctly to the corresponding
connectors on the battery posts following the steps outlined in the
“IMPORTANT SAFETY INSTRUCTIONS” section at the front of this
manual.
IMPORTANT: If the clamps are correctly connected with regard to polarity
and the unit is properly connected to the AC outlet, press the “LITHIUM/
LEAD ACID” button once to select LEAD ACID charge mode. The LCD
Screen will display the following (the Clamp and the Battery Icon as well as
the battery voltage):
CAUTION: Please make sure you select the proper charge mode to
charge a 12V lithium LiFePO4 battery or a 12V lead acid battery.
If the clamps are INCORRECTLY connected with regard to polarity, the
LCD Screen will display the following (the (empty) Battery Icon and the
Clamp Icons light solid, the Alarm Icon, Reverse Polarity Icons, and the
“+” and “–” signs on both the Clamp Icons and the Battery Icon flash)
and a warning will sound until the clamps are disconnected:
Unplug the charger; then remove the clamps. Reconnect the clamps
properly.
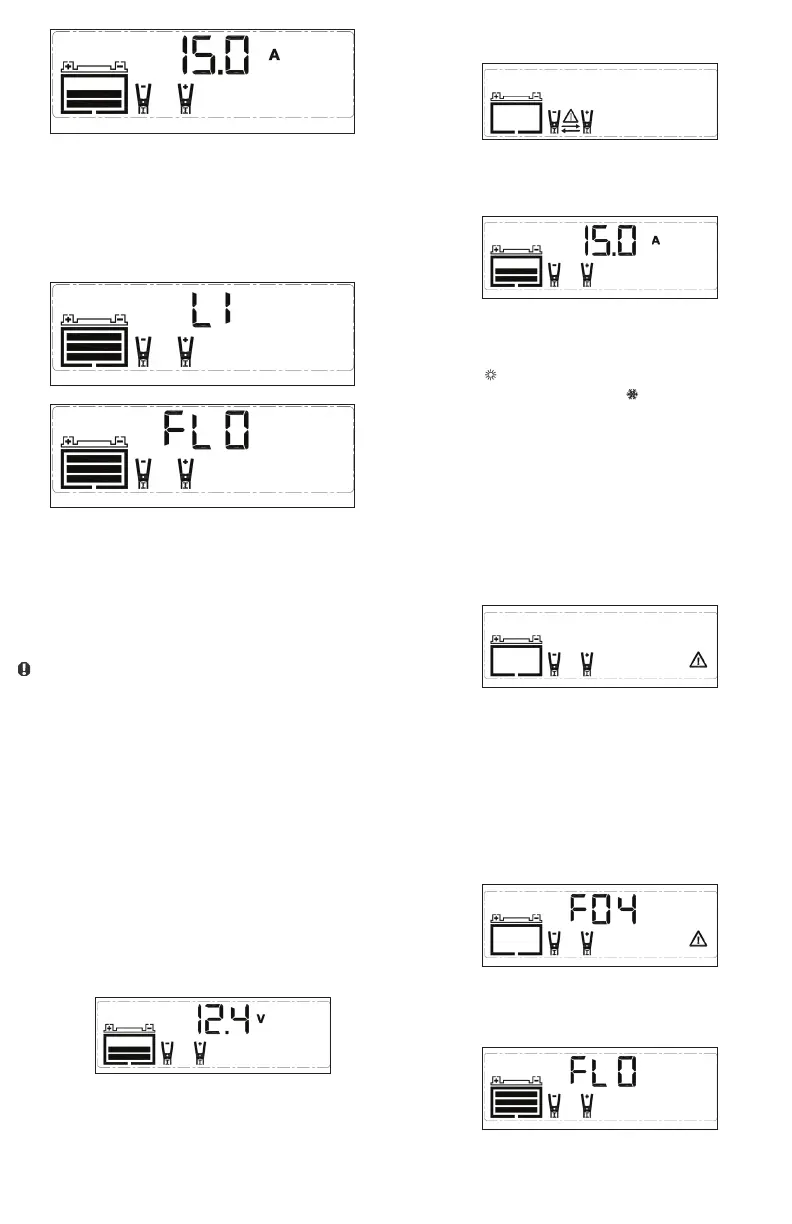
3. After 10 seconds, the unit will automatically begin to charge the battery.
The LCD Screen will display the following:
The Digital Display shows the output current that is charging the
battery. The Clamp Icons light solid and the bars on the Battery Icon
will change from empty to solid (bottom to top) to indicate the unit is
in Charging Mode.
Notes:
The “ ” icon will appear if the surrounding ambient temperature
is higher than approximate 40°C. The “ ” icon will appear if the
surrounding ambient temperature is lower than 0°C. This is not a fault
code, but indicates that the unit’s temperature compensation feature is
operating.
Important: If the unit is overheated, the overheat alarm icon and Fault
Icon will flash:
Disconnect the charger and allow the charger to cool for several
minutes. Make sure there is adequate ventilation around the unit before
attempting to charge again.
IMPORTANT: The charger will automatically detect the battery
condition. If it detects a problem with the battery, the LCD Screen will
display the following (the Fault Icon and the (empty) Battery Icon flash.
The Clamp Icons light solid):
Disconnect the charger. Have the battery checked by a qualified
technician.
IMPORTANT: If the battery is not fully charged after 18 hours of
continuous charging, the battery may have internal damage and will not
accept a charge. After 18 hours, the charging process will automatically
cut-off, the LCD Screen will display the following (the Digital Display
shows “F04”, the clamp Icons and the battery Icon. The Fault Icon
flashes):
Disconnect the charger. Have the battery checked by a qualified
technician.
4. When the battery is completely charged, the unit automatically goes
into float charge mode and the LCD Screen displays the following:
5. The Digital Display shows FLO to indicate that the unit is in float charge
mode. The Clamp Icons and the Battery Icon (with three bars) will light