8
4 Mounting
Electronics module • VEGAFLEX 80 series
43656-EN-170531
1
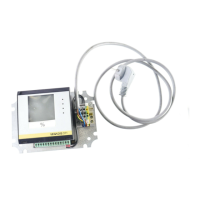
Fig. 2: Double chamber housing
1 Position electronics compartment/Electronics module
Proceed as follows:
1. Switchopowersupply
2. Unscrew the lid of the electronics compartment
3. Remove the terminal blocks according to the operating instruc-
tions manual of the respective sensor
4. Loosen the two holding screws with a screwdriver (Torx size T 10
or slotted screwdriver size 4)
2
555666777
888
111
222
(-)(-)(-)(+)(+)(+)
1
Fig. 3: Loosen the holding screws
1 Electronics module
2 Screws (2 pcs.)
5. Pull the previous electronics out with the dismounting tool.
6. Insert the new electronics module carefully.
7. Screw in the two holding screws and tighten them
8. Attach the terminal blocks according to the operating instructions
manual of the respective sensor
9. Screw the housing lid back on
Theelectronicsexchangeisnownished.
As a rule, an exchange of electronics must be documented internally
if Ex applications are involved.
 Loading...