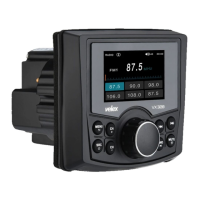
The Velex VX326 is a gauge hole receiver designed for in-dash installation, offering a range of multimedia and connectivity features for an enhanced audio experience. This quick start guide provides essential information for installation, operation, and troubleshooting, ensuring users can quickly set up and enjoy their new device.
Function Description
The VX326 functions as a versatile multimedia receiver, capable of playing audio from various sources, including FM/AM radio, USB sticks, and Bluetooth-connected devices. It also supports video playback and photo viewing from USB, making it a comprehensive entertainment hub. The unit features a TFT display for clear visual feedback and intuitive control. Its primary purpose is to provide audio and visual entertainment in a vehicle or marine environment, fitting into a standard 3-inch (77mm) gauge hole.
Usage Features
Installation:
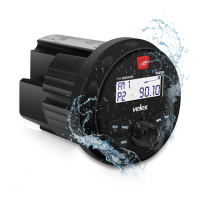
Installation of the VX326 involves choosing a suitable mounting location on the dashboard or instrument panel, ensuring enough space behind the unit for cable routing. A circular hole of 3 inches (77mm) in diameter and at least 3.75 inches in depth is required. The unit should not be mounted where it can be submerged in water. After cutting the hole, the mounting plate slides over the backside of the unit and is secured with supplied screws. Finally, the trim bezel is pressed onto the front, and all wiring harnesses and cables are connected according to the provided wiring diagram.
General Operation:
- Power On/Off: Press the power button to turn the unit on. Press and hold the power button to turn it off.
- Mode Switching: Use the 'SRC' button to switch between different modes: Radio, AUX IN, Bluetooth Music, and Media (USB).
- Menu Navigation: Press the 'MENU' button to access the main menu. Rotate the Volume Knob to select options like MEDIA, RADIO, BLUETOOTH, AUX IN, or SETTINGS. A short press of the Volume Knob confirms the selection.
- Volume Control: Rotate the Volume Knob to adjust the volume for AUX IN, MEDIA, RADIO, or Bluetooth modes.
- Audio Settings: While the volume level interface is displayed, a quick press of the Volume Knob allows access to settings for BAS (Bass), MID (Midrange), TREB (Treble), BAL (Balance), FAD (Fader), SUB (Subwoofer), LOUD OFF (Loudness off), and EQ (Equalizer). Rotate the Volume Knob to adjust these levels. Press MENU/RETURN or wait for a timeout to exit.
- Mute: A short press of the 'MUTE' button mutes the stereo.
- Button Backlight: A long press of the 'MUTE' button switches the button backlight on or off.
FM Tuner Operation:
- Country Selection: Upon initial power-up, press the MENU button, navigate to 'SETTINGS' using the Volume Knob, and then rotate the Volume Knob to select the desired Radio Region (European or USA band sets).
- Seek Tuning: Press and hold '<<' or '>>' for more than one second to automatically seek the next strong station.
- Manual Tuning: Momentarily press '<<' or '>>' to move the radio frequency up or down one step.
- Auto Programming (AMS): Press and hold the 'AMS' button for 1 second. The VX326 will search the band for radio stations and automatically store them in available preset memory locations, overwriting any previously stored stations in that band.
- Band Selection: Press 'BND >II' to cycle through FM1, FM2, and FM3 bands. Each band can store up to six presets, allowing for a total of 18 FM stations.
- Recalling Presets: Use the 'CH+' or 'CH-' buttons to cycle through the 1-6 presets in the current band.
- Radio Settings: A long press of the 'MENU' button activates radio settings such as AUTOSCAN, LOC/DX (Local/Distance), and STEREO.
MP3/WMA Operation (USB):
- USB Playback: When a USB stick is inserted, the VX326 automatically begins playing audio files from the first location.
- Media Selection: To play movies or photos, press 'MENU', select 'MEDIA', and then choose between MUSIC, MOVIE, or PHOTO using the Volume Knob.
- Pause/Resume: Press the '>II' button once to pause audio/video playback, and press it again to resume.
- Track Selection: Press '>>' to skip to the beginning of the next song. Press '<<' to skip to the beginning of the previous song.
- Song List: A short press of the Vol Knob displays the song list. Rotate the Vol Knob to select a desired song and press 'VOL' to confirm.
- Fast Forward/Reverse: Press and hold '>>' or '<<' to fast forward or reverse a track.
- Music Settings: A long press of the 'MENU' button activates Music Settings, including REPEAT, RANDOM, and INTRO SCAN.
MUSIC/MOVIE/PHOTO Operation (USB):
- Automatic Detection: When a USB stick is plugged in, the VX326 automatically detects audio files and starts playback.
- Media Type Toggle: While playing audio, press and hold the VOL knob for 1 second to toggle between MUSIC, MOVIE, and PHOTO selection. Rotate and press the VOL knob to confirm. Alternatively, press 'MENU', select 'MEDIA', and then toggle between MUSIC, MOVIE, and PHOTO.
- Video List: When MOVIE is selected, a short press of the Vol Knob displays the video list. Rotate the Vol Knob to select the desired video and press 'VOL' to confirm.
- Rear Camera: If a rear camera is installed, connect its video cable to the 'CAMERA IN' fly lead (Yellow Cap) and the green 'CAMERA' reverse cable to the reverse gear. When the vehicle is put into reverse, the video feed will instantly display on screen with guidelines for smooth and safe backing.
- Photo Slideshow: When PHOTO is selected, the VX326 automatically displays photos as a slideshow.
- Media Settings: A long press of the 'MENU' button activates MEDIA settings, which include REPEAT/RANDOM/INT for music and movies, background music on/off, and slideshow time settings for photos.
Bluetooth Operation:
- Pairing: Before use, a Bluetooth device must be paired and connected. Ensure Bluetooth is active on your smartphone. Search for new devices and connect to 'VX326'. A successful pairing is indicated by the Bluetooth icon changing from white to blue on the top title bar. Pairing can be performed in any mode.
- BT Music Playback: After pairing, select BT mode from the MENU. The BT music interface will display on screen, allowing you to play music from your smartphone or media player.
- Music Control:
- Press '>>' to skip to the next audio track.
- Press '<<' to skip to the previous audio track.
- Press '>II' to toggle between play and pause.
- Unpairing: A long press of the 'MENU' button activates the 'UNPAIR' setting, allowing you to unpair the current Bluetooth device.
Maintenance Features
Troubleshooting:
The manual includes a troubleshooting section to address common issues:
The VX326 is designed for user-friendly operation and straightforward maintenance, with clear instructions for installation and a helpful troubleshooting guide to resolve common problems. Regular checks of wiring connections and proper fuse usage are key to ensuring the device's longevity and optimal performance.