Do you have a question about the Velux KLR 200 and is the answer not in the manual?
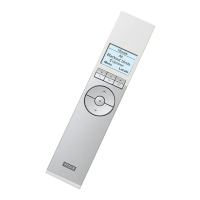
Explanation of icons, buttons, and indicators on the VELUX KLR 200 control pad.
Instructions for fundamental operations like opening, closing, and stopping windows and blinds.
How to use, create, edit, and manage automated programs for VELUX products.
Features for organizing and managing products, including groups, rooms, and favorites.
Procedures for manually operating windows without the control pad, e.g., during power failure.
Steps for the first-time setup and registration of VELUX INTEGRA® products.
Instructions on adding products, controls, and enabling joint operation with other devices.
Configuration options for time, date, language, and silent mode operation.
Procedures for resetting the control pad, setting passwords, and managing security keys.
Methods for mounting the control pad on the wall, with or without a holder.
Guidance on moving the rain sensor during retrofitting of VELUX products.
| Type | Remote Control |
|---|---|
| Display | Color touch screen |
| Power Source | Battery |
| Wireless Protocol | io-homecontrol |
| Radio Frequency | 868 MHz |
| Operating Temperature | 0°C to +50°C |
| Weight | 150 g |
| Protection Class | IP20 |
| Operating range | 30 meters |