Do you have a question about the Viking 57085 and is the answer not in the manual?
Explains hazard levels like Danger, Warning, Caution, and Notice.
General safety advice and precautions for product use.
Guidelines for maintaining a safe and clean work environment.
Precautions related to electrical hazards and product handling.
Personal protective measures and health considerations during operation.
Identifies and explains the main functions and components of the device.
Information on powering DC appliances and wattage calculations.
How to operate the integrated work light.
Step-by-step guide for jump starting a vehicle.
Specific steps for inflating tires using the compressor.
Instructions for attaching and using air hose adapters.
Guidelines for the proper disposal of the lead-acid battery.
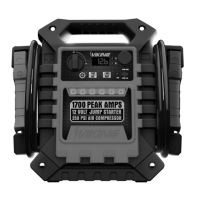
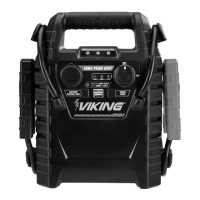
The VIKING 12 Volt Jump Starter Plus Air Compressor is a versatile portable power unit designed for jump starting vehicles, inflating tires, and powering various DC and USB devices. It features a robust design with integrated cables and an air hose, making it a convenient tool for automotive emergencies and outdoor activities.
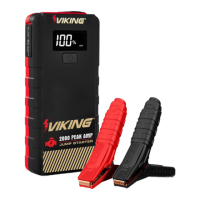
The primary function of this device is to jump start lead-acid batteries in vehicles. It provides 1700 peak amps, making it suitable for a wide range of cars and light trucks. The unit is equipped with heavy-duty battery clamps (red for positive, black for negative) that connect directly to the vehicle's battery terminals. A Clamp Power Switch controls the flow of power for safe connection and disconnection. The device includes safety features such as an alarm and error codes (Er1 for incorrect connection, Er2 for high battery voltage) to prevent misuse and damage.
Beyond jump starting, the VIKING unit incorporates a 250 PSI air compressor, enabling users to inflate tires, sports equipment, and other inflatables. The air compressor features an Air Pressure Gauge for monitoring inflation levels and a Compressor Switch to activate and deactivate the compressor. It comes with three adapters to suit various inflation needs. The compressor operates on a duty cycle of 15 minutes on, 30 minutes off, to prevent overheating.
The device also serves as a portable power supply. It has a 12VDC outlet that can power 12VDC appliances drawing 15 amps (180 watts) or less. This allows users to run various DC-powered tools and accessories, such as fluorescent lights, cell phone chargers, radios, depth finders, video recorders, spotlights, small power tools, bilge pumps, and electric coolers. Additionally, it includes a 5VDC 2.4A USB port for charging USB-powered devices like smartphones and tablets.
For illumination, the unit features an LED Work Light with multiple modes: bright, low, flashing, rapid flashing, and SOS. This light is useful for working in low-light conditions or signaling for help during emergencies.
The device's internal sealed lead-acid battery is rechargeable via a 120VAC charging input plug and port. A digital display provides information on battery level (percentage and voltage), charging status (CHA for charging, FUL for full), and error codes.
Before first use, and after every jump start or every 30 days, the unit must be fully charged to maintain its battery health and warranty. Charging is done by plugging the included charging cord into a grounded 120VAC outlet and then into the unit's charging port. The display will show "CHA" during charging and "FUL" when fully charged. It is crucial to charge the unit on a non-flammable surface.
To check the battery level, press the TEST/AIR Button. The display will alternately flash the battery percentage and voltage. The battery should be charged if its level is 50% or lower.
When jump starting a vehicle, it is essential to first turn off the vehicle's ignition and all accessories. The Clamp Power Switch on the jump starter should be in the OFF position. Connect the red positive clamp to the vehicle's positive battery terminal and the black negative clamp to a non-moving metal part of the vehicle's chassis, away from the battery. Never connect the negative clamp directly to the negative terminal of the battery, and never touch the positive and negative clamps together. Once connected correctly, the external battery voltage will appear on the display. Turn the Clamp Power Switch ON and attempt to start the vehicle. If the vehicle doesn't start within 5 seconds, turn the Clamp Power Switch off, wait 3 minutes, and try again. After the vehicle starts, turn the Clamp Power Switch off, remove the black negative cable first, then the red positive cable, and recharge the jump starter.
For air compression, open the Air Hose Compartment, pull out the air hose, and attach the appropriate adapter if needed. For tire inflation, position the tire inflator over the valve stem and push down firmly. The desired PSI can be preset using the plus (+) and minus (-) buttons. Activate the compressor by pushing the Compressor Switch to the "I" (ON) position. The compressor will automatically shut off when the preset pressure is reached. Monitor the Air Pressure Gauge to prevent overinflation. After inflation, push the Compressor Switch to "O" (OFF), press the TEST/AIR Button to deactivate the compressor, lift the lever, and remove the air hose.
To power DC appliances, ensure the unit's battery is charged and the appliance's wattage is within the unit's capacity. Turn off the Clamp Power Switch and the appliance. Plug the appliance into the 12VDC outlet, then turn on the appliance. When finished, turn off the appliance and unplug it.
To charge USB devices, ensure the unit's battery is charged. Plug the device into the USB Port and press the LIGHT/USB Button to illuminate the USB Indicator. When finished, press the LIGHT/USB Button again and remove the device.
The Work Light is activated by pressing and holding the LIGHT/USB Button for approximately 3 seconds. Repeated presses cycle through different light modes. Press the button again to turn the light off.
Regular maintenance is crucial for the safe and efficient operation of the VIKING Jump Starter. Procedures not explicitly detailed in the manual should only be performed by a qualified technician.
Before each use, inspect the general condition of the unit. Check for loose hardware, cracked or broken parts, damaged electrical wiring or cable insulation, and any other condition that might affect its safe operation.
Keep the unit clean and ensure the clamps are free of dirt, debris, or grease. After each use, wipe the external surfaces of the Jump Starter with a clean cloth.
For longer working life, protect the unit from sunlight and moisture. Store it in a safe, dry place, out of reach of children.
The unit contains a non-spillable, sealed lead-acid battery. This battery must be recycled or disposed of properly according to local hazardous waste disposal standards. To remove the battery for disposal, all screws from the case must be removed, the case opened, and the wires cut from the battery with insulated wire clippers.
It is important to maintain all labels and nameplates on the Jump Starter, as they carry important safety information. If any labels are unreadable or missing, contact Harbor Freight Tools for a replacement.
| Model | 57085 |
|---|---|
| Type | Remote Starter |
| Range | Up to 1 mile |
| Channels | 5 |
| Keyless Entry | Yes |
| Alarm Integration | Yes |
| Number of Buttons on Remote | 5 |
| Compatibility | Universal |
| Engine Start | Yes |
| Engine Stop | Yes |
| Lock/Unlock | Yes |
| Trunk Release | Yes |
| Security System | Yes |
| Battery Life | 1 year |
| Transmitter | 2-way |
| Operating Range | Up to 5280 ft |
| Installation | Professional installation recommended |