The document provided is an installation guide for the Viking 5 Series Outdoor Gas Grills. It covers various models, including 30", 36", 42", and 54" wide grills, and provides detailed instructions for installation, safety, and initial setup.
Function Description
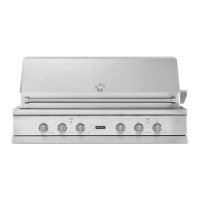
The Viking 5 Series Outdoor Gas Grills are designed for outdoor cooking, offering a range of sizes and features for built-in installations. These appliances are intended for use with either natural gas or LP/Propane, depending on the model and conversion kit used. They feature multiple burners for grilling and some models include a rotisserie system for additional cooking versatility. The grills are built for permanent outdoor installation, requiring specific clearances and ventilation for safe operation.
Important Technical Specifications
Dimensions (Widths vary by model):
- 30" W. Grill (VGBQ53024/CVGBQ53024):
- Overall Width: 30-1/16" (76.4 cm)
- Overall Depth: 29" (73.6 cm)
- Height (from counter to top of lid): 17-1/4" (43.8 cm)
- Cutout Width: 29-1/4" (74.2 cm)
- Cutout Depth: 24-3/8" (67.9 cm)
- Cutout Height: 10-1/8" (25.7 cm)
- Approximate Shipping Weight: 240 lbs. (109 kg)
- 36" W. Grill (VGBQ53624/CVGBQ53624):
- Overall Width: 35-7/8" (91.1 cm)
- Overall Depth: 29" (73.6 cm)
- Height (from counter to top of lid): 17-1/4" (43.8 cm)
- Cutout Width: 35-1/4" (89.5 cm)
- Cutout Depth: 24-3/8" (67.9 cm)
- Cutout Height: 10-1/8" (25.7 cm)
- Approximate Shipping Weight: 255 lbs. (116 kg)
- 42" W. Grill (VGBQ54224/CVGBQ54224, VGIQ54224/CVGIQ54224):
- Overall Width: 42" (106.7 cm)
- Overall Depth: 29" (73.6 cm)
- Height (from counter to top of lid): 17-1/4" (43.8 cm)
- Cutout Width: 40-1/4" (102.2 cm)
- Cutout Depth: 24-3/8" (67.9 cm)
- Cutout Height: 10-1/8" (25.7 cm)
- Approximate Shipping Weight: 255 lbs. (116 kg)
- 54" W. Grill (VGBQ55424/CVGBQ55424, VGIQ55424/CVGIQ55424):
- Overall Width: 54" (137.2 cm)
- Overall Depth: 29" (73.6 cm)
- Height (from counter to top of lid): 17-1/4" (43.8 cm)
- Cutout Width: 52-1/4" (132.7 cm)
- Cutout Depth: 24-3/8" (67.9 cm)
- Cutout Height: 10-1/8" (25.7 cm)
- Approximate Shipping Weight: 330 lbs. (149.7 kg)
Gas Requirements:
- Natural Gas: Standard residential 1/2" (1.3 cm) ID gas service line.
- Operating Pressure: 4.0" W.C.P. Nat.
- Supply Pressure: 6" to 10" W.C.P. Nat. (a step-down regulator is required if in excess of 10" W.C.P.).
- LP/Propane: Equipped with high capacity hose/regulator assembly for connection to standard 5-gallon, 20 lb. LP/Propane gas cylinder with Type 1, QCC-1 connection or standard residential 1/2" (1.3 cm) ID gas service line.
- Operating Pressure: 10.0" W.C.P. LP/Propane.
- Supply Pressure: 11" to 14" W.C.P. LP. (a step-down regulator is required if in excess of 14" W.C.P.).
- LP cylinders must be constructed and marked in accordance with DOT or CAN/CSA-B339 specifications, equipped with an OPD (overfilling protection device), and stored outdoors in a well-ventilated area.
- Gas Manifold Pressure: Natural gas - 4.0" W.C.P.; LP/Propane - 10.0" W.C.P.
Burner Ratings:
- Grill Burner: 25,000 BTU Nat./22,500 BTU LP (7.3 kW Nat./6.5 kW LP)
- TruSear™ Burner (for 42" & 54" W. Grills): 30,000 BTU Nat/LP (8.7 kW Nat/LP)
- Rotisserie Burner: 15,000 BTU Nat./13,500 BTU LP (4.4 kW Nat./4.0 kW LP)
Electrical Requirements:
- 120VAC/60 Hz, 3' (.9 m) power cord supply with 2-prong plug attached to rotisserie motor.
- The appliance is equipped with a 3-prong power cord with a grounding plug for shock hazard protection and must be plugged directly into a properly grounded receptacle.
- A Ground Fault Interrupter (GFI) must be installed by the installer.
- A separate 110/120 volt supply is required for the rotisserie motor, located on the right-hand side of the grill.
Clearance Dimensions:
- Minimum 6" (15.2 cm) from the sides, or 8" (20.3 cm) from the right side (if rotisserie motor is present) to adjacent vertical combustible construction above the cooking surface.
- Minimum 24" (61.0 cm) from the back to adjacent vertical combustible construction above the cooking surface.
- Grill should not be located under overhead unprotected combustible construction.
- A minimum of 3" (7.6 cm) clearance from the back of the grill with a canopy and 6" (15.2 cm) without a canopy to non-combustible construction is required for lid opening and ventilation.
- An insulated jacket (INJK - purchased separately) is required when installing in combustible type material.
Ventilation for Built-In Installations:
- LP-gas cylinder enclosures require ventilation openings at both upper and lower levels.
- Openings must be within 5" (127 mm) of the top and 1" (25.4 mm) or less from the floor level.
- Total free area of openings: 1 in²/lb (1.42 cm²/kg) of stored fuel capacity at the top, and 1/2 in²/lb (7.1 cm²/kg) at the bottom.
- Minimum opening dimension to permit entrance of a 1/8" (3.2 mm) diameter rod.
- Ventilation openings in side walls must not communicate directly with other enclosures of the outdoor cooking gas appliance.
Usage Features
- Outdoor Use Only: This appliance is strictly for outdoor use and must not be installed inside a home, recreational vehicle, boat, building, garage, or any other enclosed area.
- Gas Supply Management: The gas supply must be turned off at the LP gas supply cylinder when the grill is not in use.
- Pressure Regulator and Hose Assembly: The supplied pressure regulator and hose assembly must be used. Replacements must be manufacturer-specified.
- Rotisserie System: Includes a rotisserie motor, fork, and skewer for rotisserie cooking. The motor is mounted on the right side of the grill frame.
- Burner Adjustment: Burners are factory-adjusted, but local gas supply variations may require further adjustment. Flames should be blue and stable with no yellow tips, excessive noise, or lifting. Air shutters can be adjusted to achieve proper flame.
- Easy Access for Maintenance: The drip tray and landing ledge assembly can be removed to access air shutters for burner adjustment.
- Ignition System and Canopy Lights: Powered by a 110/120 volt supply outlet located on the bottom left-hand side beneath the solid bottom support.
Maintenance Features
- Leak Testing: A complete gas tightness check must be performed at installation and periodically thereafter. A soapy water solution is used to detect leaks; an open flame must never be used. If a leak is detected and cannot be stopped by tightening connections, the faulty part must be replaced by a manufacturer-recommended part or an authorized service technician/LP/Propane gas dealer.
- Burner Cleaning and Adjustment: Regular inspection of air shutters and burner ports for dirt, debris, or spider webs is recommended to ensure proper flame. Adjustments are made by loosening a lock-screw on the air shutter and turning it to allow more or less air to the burner.
- Cleaning Stainless Steel Parts: Stainless steel parts should be washed thoroughly with hot, soapy water to remove film residues, dust, and debris. Liquid cleaners designed for stainless steel can be used. Abrasive cloths, steel wool, cleansers, or powders should be avoided. For encrusted materials, soaking with hot, wet cloths and using a wool or nylon scraper is recommended. Metal knives or spatulas should not be used to avoid scratching.
- LP Cylinder Care: Place a dust cap on the cylinder valve outlet when the cylinder is not in use. Only use the type of dust cap provided with the cylinder valve to prevent propane leakage.
- Professional Servicing: Only authorized replacement parts may be used for service, and all servicing should be referred to a qualified technician.
- Performance Checklist: A checklist is provided for installers to ensure all internal packaging is removed, clearances are maintained, gas connections are correct and leak-free, and burners light satisfactorily.