This document is a Use & Care Manual for Professional Built-In Hoods, providing comprehensive instructions for their operation and maintenance. The manual emphasizes the importance of proper care to ensure years of reliable service from the Viking Range hood.
Function Description
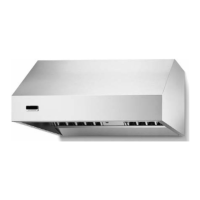
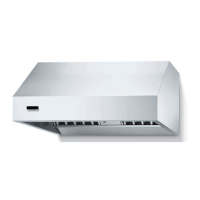
The Viking Range Professional Built-In Hoods are designed to provide efficient ventilation for kitchens, removing smoke, grease, and odors generated during cooking. The primary function of the hood is to establish and maintain good airflow in the kitchen, ensuring a cleaner air environment. Users are advised to turn on the hood before cooking to initiate airflow and to let it run for a few minutes after cooking to clear residual air.
The hood is equipped with a blower system, controlled by an ON/OFF switch and a blower speed knob. The ON/OFF switch starts and stops the blower, resuming operation at the previously set speed. The blower speed knob allows users to adjust the fan speed, increasing it clockwise and decreasing it counterclockwise, to match the intensity of cooking.
Illumination is provided by 50-watt halogen lights located at the front of the hood. These lights are controlled by a dedicated light switch and a dimmer knob. The dimmer knob allows users to brighten the halogen lights by turning it clockwise and dim them by turning it counterclockwise. Additionally, professional wall hoods may include one or two heat lamp outlets, controlled by heat lamp switches to turn them on and off. These heat lamp outlets are designed for 250-watt infrared bulbs, which are not included with the hood and must be purchased separately.
The hood can be configured for either ducted or recirculating (ductless) venting. In ducted installations, the hood exhausts air to the outdoors through metal ductwork. For recirculating hoods, charcoal filters are used to purify the air before returning it to the kitchen.
Usage Features
The manual highlights several key usage features to ensure optimal performance and safety:
- Pre-cooking Activation: Always turn on the hood before cooking to establish airflow and prevent the accumulation of smoke and grease.
- Post-cooking Operation: Allow the blower to run for a few minutes after cooking to clear any remaining air contaminants.
- Blower Speed Adjustment: The blower speed knob provides flexibility to adjust ventilation intensity based on the type of cooking, from low settings for simmering to high settings for high-heat or flaming foods.
- Lighting Control: The light switch and dimmer knob offer control over the halogen lighting, allowing users to adjust brightness for visibility and ambiance.
- Heat Lamps (Professional Wall Hoods Only): For models equipped with heat lamp outlets, the heat lamp switches allow for the use of infrared bulbs to keep food warm. Users are reminded that 250-watt infrared bulbs are not included and should be purchased locally.
- Safety Precautions: The manual includes extensive warnings regarding fire, electric shock, and injury. Users are cautioned against leaving surface units unattended at high settings, to always turn on the hood when cooking at high heat or flaming foods, and to clean ventilating fans frequently to prevent grease accumulation. Specific warnings are given against using water on grease fires and the importance of proper pan size. For general ventilation, the hood should not be used to exhaust hazardous or explosive materials and vapors.
Maintenance Features
Maintaining the hood is crucial for its longevity and efficient operation. The manual provides detailed instructions for cleaning and maintenance:
- General Cleaning: After installation and periodically thereafter, the hood surfaces should be wiped with a good household cleaner and a soft cloth, or stainless steel polish, depending on the finish. This helps maintain a protective finish.
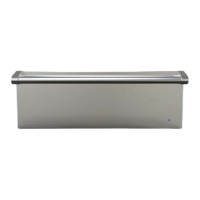
- Baffle Filters: These filters are designed to capture grease particles. They should be examined periodically and cleaned regularly to ensure maximum effectiveness. Baffle filters can be washed in a dishwasher or in a sink with hot, soapy water. Users are warned not to use caustic or abrasive detergents, nor to take the filters apart, as this could damage the finish or void the warranty. The manual provides step-by-step illustrations for removing and reinstalling baffle filters, including a specific note for 18" H. hoods to remove and clean the grease trough.
- Charcoal Filters (Recirculating Hoods Only): For recirculating hoods, charcoal filters need to be replaced every 6 months to 1 year, depending on cooking frequency and type. These filters are not dishwasher safe. The manual instructs users to remove the baffle/charcoal filter assembly and slide out the old charcoal filter for replacement.
- Hood Canopy: The enamel or stainless steel finishes are highly resistant to damage, but regular care is needed. Users should prevent excessive grease accumulation by wiping the hood clean with warm, soapy water. Abrasive cleansers, steel wool pads, or abrasive cloths should not be used. Cleansers containing chlorides can damage stainless steel. For encrusted materials, soaking with hot towels and using a wooden or nylon spatula is recommended, avoiding metal tools. A thorough cleaning every 3 months is advised, with a new coat of wax for painted surfaces or a good stainless steel cleaner and polish for stainless steel surfaces.
- Renewing Enamel Finish: If discoloration occurs, polishing the enamel finish with a good enamel, refrigerator, or automotive polish will restore its gloss and luster and remove yellowing grease residue.
- Renewing Stainless Steel Finish: Regular cleaning with lemon oil or stainless steel polish is recommended to keep the stainless steel finish bright and protected.
- Ductless Venting Chamber (Professional Hoods Only): For ductless models, the middle vent should be gently raised and pulled out for cleaning, following the same directions as for the hood canopy. After cleaning, the middle vent should be replaced.
- Replacing Light Bulbs:
- Halogen Lights: Unscrew the old 50-watt halogen bulb and replace it with a new 120-volt, 50-watt halogen bulb.
- Infrared Heat Lamp: Unscrew the old infrared bulb from its socket and replace it with a new R40, 120-volt, 250-watt infrared bulb.
- Safety during Bulb Replacement: Users are advised to wear an oven mitt to protect their hand in case a bulb breaks during removal.
- Service and Warranty: The manual includes information on how to obtain service, emphasizing the use of authorized service agencies and parts. It details the warranty coverage, including a three-year full warranty for most parts, a ninety-day cosmetic warranty, a ninety-day "Residential Plus" warranty for specific applications, and a five-year limited warranty on ventilation motors. It also outlines terms and conditions, what is not covered by the warranty, and limitations of remedies. Users are instructed to record model and serial numbers and retain proof of purchase for warranty purposes.