This document is an instruction manual for the VIVO TV Wall Mount, model SKU: MOUNT-NS80A. It provides detailed instructions for installation and use, along with important warnings and technical specifications.
Function Description
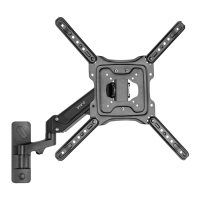
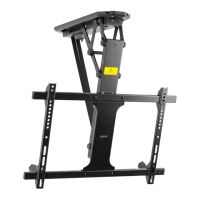
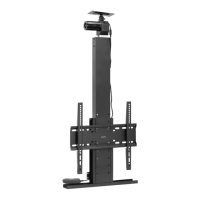
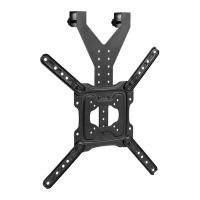
The VIVO TV Wall Mount (MOUNT-NS80A) is designed to securely mount a television to a wall. It supports various wall types including drywall, wood studs, and concrete/brick, offering flexibility for different installation environments. The mount features a low-profile design, keeping the TV close to the wall. It is compatible with VESA mounting patterns and offers options for both flat back and curved back screens, accommodating a wide range of TV models. The design includes a locking mechanism to ensure the TV is securely attached to the wall plate and can be released for maintenance or removal.
Important Technical Specifications
- SKU: MOUNT-NS80A
- Weight Capacity: DO NOT EXCEED WEIGHT CAPACITY. The mount is rated for 110lbs (49.90kg). Exceeding this weight can lead to serious injury or damage.
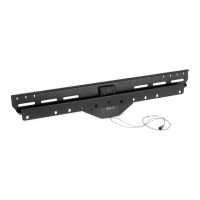
- Wall Plate Dimensions: The wall plate (A) is designed to be mounted horizontally.
- Mounting Options:
- Drywall Installation: Requires drilling 0.4" (10mm) thick holes and using x20 nails (W-D). The wall plate should be level.
- Wood Stud Installation: Requires drilling 2.2" (55mm) deep holes using a 3/16" (4.5mm) drill bit. Mount plate to wall using screws (W-A) and washers (W-C). Supports stud spacing of 406mm/450mm and 600mm.
- Concrete/Brick Installation: Requires drilling 2.4" (60mm) deep holes using a 3/8" (10mm) drill bit. Mount plate to wall using screws (W-A) and concrete anchors (W-B) and washers (W-C).
- VESA Compatibility: The mount supports various VESA mounting patterns, indicated by the different screw/spacer combinations (M-A/M-B, M-C/M-D, M-E, M-F, M-G, M-H, M-I).
- Screen Types: Compatible with both flat back screens (0° tilt) and curved back screens (-5° tilt).
- Hardware Included: The package includes a comprehensive set of hardware for various installation types and TV models:
- Wall Plate (A): x1
- VESA Plate (B): x1
- Thick Bumper (C): x2
- Thin Bumper (D): x2
- M5x14 Screws (M-A): x4
- M6x14 Screws (M-B): x4
- M6x30 Screws (M-C): x4
- M8x30 Screws (M-D): x4
- M8x50 Screws (M-E): x4
- D5 Washer (M-F): x4
- D8 Washer (M-G): x4
- Small Spacer (M-H): x8
- Big Spacer (M-I): x8
- Washer (W-C): x4
- Nail (W-D): x20
- Screw (W-A): x4
- Anchor (W-B): x4
- Tools Needed (NOT ALL HARDWARE INCLUDED WILL BE USED): Drill, Phillips Screwdriver, Level, Hammer.
Usage Features
- Easy Installation: The manual provides clear, step-by-step instructions for installing the wall plate and attaching the TV.
- Multiple Mounting Options: The mount is versatile, allowing installation on drywall, wood studs, or concrete/brick walls, catering to different home constructions.
- VESA Plate Attachment: The VESA plate (B) attaches to the back of the TV using appropriate screws and spacers, ensuring a secure fit. The manual illustrates different screw/spacer combinations for various TV types and VESA patterns.
- Screen Type Compatibility: Specific instructions are provided for both flat back and curved back screens, ensuring proper fit and alignment. For flat back screens, thin bumpers (C) are used, while for curved back screens, thick bumpers (D) are used to create the necessary clearance.
- Secure Hanging: Once the wall plate is installed and the VESA plate is attached to the TV, the TV is hung onto the raised lip on the TV plate.
- Locking Mechanism: A cord-operated locking mechanism secures the TV to the wall plate, preventing accidental dislodgement. Pulling down on the cord releases the TV from the wall plate.
- QR Code for Support: A QR code is provided on the first page, linking to helpful videos and specifications related to the product, enhancing user experience and support.
Maintenance Features
- Regular Checks: The warning section emphasizes the importance of checking the mount and all attached parts regularly for any signs of damage or loose connections.
- Proper Installation: Adhering to the installation instructions and weight capacity limits is crucial for long-term safety and performance. Improper installation can lead to damage or injury.
- Customer Support: VIVO offers dedicated customer support via email (help@vivo-us.com) and phone (309-278-5303) for immediate assistance with rapid response times. They are available Monday-Friday from 7:00 am-7:00 pm CST. They also provide average response and resolution times, indicating a commitment to timely support.
- Online Resources: The website (www.vivo-us.com/products/mount-ns80a) provides additional product information, videos, and specifications.
- Choking Hazard Warning: Small parts are included, which are not suitable for children under 3 years. Adult supervision is required during assembly and handling of these parts.