Do you have a question about the vogel's SWM 4111 Series and is the answer not in the manual?
Read safety instructions carefully before installation. Incorrect mounting poses substantial risk.
Lists all components included in the packaging for verification.
Lists all necessary tools and equipment for a successful installation.
Recommends wearing eye protection, ear protection, and safety shoes during installation.
Guides drilling and mounting for concrete or brick walls with specific drill bit sizes.
Details using a stud finder and appropriate drill bits for mounting on wooden studs.
Advice for mounting on special wall types like hollow bricks or plasterboard.
Instructions for mounting the speaker in the upright position onto the wall mount.
Instructions for mounting the speaker in the inverted position onto the wall mount.
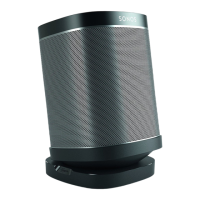
The SWM 4111 Series is a full installation guide for mounting your Sonos Era 100 speaker. This guide provides comprehensive instructions for safe and efficient installation, ensuring your speaker is securely mounted and ready for use.
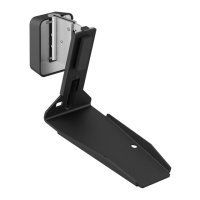
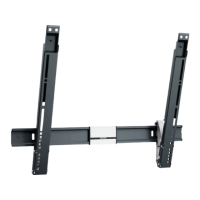
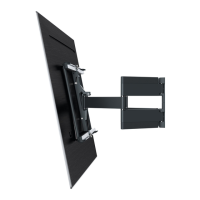
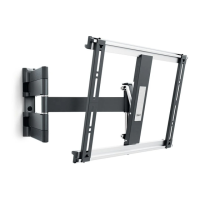
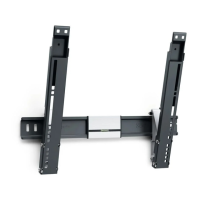
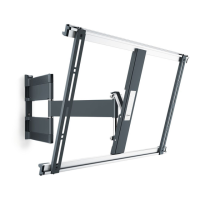
The SWM 4111 Series wall mount is specifically designed to securely hold the Sonos Era 100 speaker. It allows for both right-side up and upside-down mounting, offering flexibility in placement depending on your desired speaker orientation and control accessibility. The mount features a tilt module and tilt bracket, enabling you to adjust the speaker to your preferred angle for optimal sound projection. The wall mount is compatible with various wall types, including solid brick, solid concrete, and solid wood columns, with specific instructions provided for each.
The installation process begins with assembling the speaker mount, which involves sliding the tilt module and speaker bracket into the tilt bracket and securing them with a provided M45mm bolt. Next, the Sonos Era 100 speaker is attached to the speaker bracket using an M512mm bolt, ensuring a secure connection. The guide emphasizes connecting the speaker's plug (not provided) before attaching it to the bracket.
Attaching the wall mount to the wall is a critical step, and the guide offers detailed instructions based on wall type. For concrete/brick walls, it advises marking the drill holes, drilling to the correct depth (indicated by the screw length), and then attaching the wall mount with provided screws and Fischer plugs. A spirit level integrated into the wall mount helps ensure it is level. For walls with wooden studs, the guide stresses the importance of using a stud finder to locate studs before marking and drilling holes. It also provides specific drill bit sizes for different wall materials.
Once the wall mount is secured, the speaker can be attached. For right-side up mounting, the tilt module with the speaker is lifted and placed into the wall mount. The speaker's angle can then be adjusted by slightly lifting and tilting it, and finally fastened by tightening a setscrew on the side of the tilt module. The process for upside-down mounting is similar, offering the same flexibility in angle adjustment and fastening. The guide also includes instructions for removing the speaker, which involves lifting it out of the wall mount, unscrewing the M5*12mm bolt, and disconnecting the plug.
The SWM 4111 Series emphasizes safe handling and transport of the product. It recommends cleaning the product with a dry, lint-free cloth and explicitly advises against using detergents or other solvents to prevent damage. In case of any issues, the guide provides troubleshooting tips, such as checking drill depth and drill bit sharpness if wall screws snap during installation. It also highlights the importance of using original spare parts for any repairs and warns against alterations or technical modifications, as these will void the warranty and could lead to injuries. The product should always be stored in a dry and safe place within a specified temperature range (-10°C to +50°C) and repacked when not in use for extended periods or during transport. The guide also offers contact information for Vogel's Consumer Care team for further assistance or if the wall type is unusual or unknown.
| Type | Wall mount |
|---|---|
| Tilt | Yes |
| Rotation | No |
| Color | Black |
| Material | Steel |
| Cable Management | Yes |
| Mounting Pattern | 200 x 200 mm |