14
SHORT TERM STORAGE • RANGEMENT À COURT TERME • ALMACENAMIENTO DE CORTO PLAZO
This procedure should be used when taking
a short term break or when ending your
project for the day. If your break is longer
than 16 hours follow Cleanup instructions,
pages 15-16.
YOU WILL NEED
• Water
• Plastic bag
• Damp rags
• Stir stick
Instructions are for latex materials only! If
using oil based material follow instructions
for Cleanup on pages 15-16.
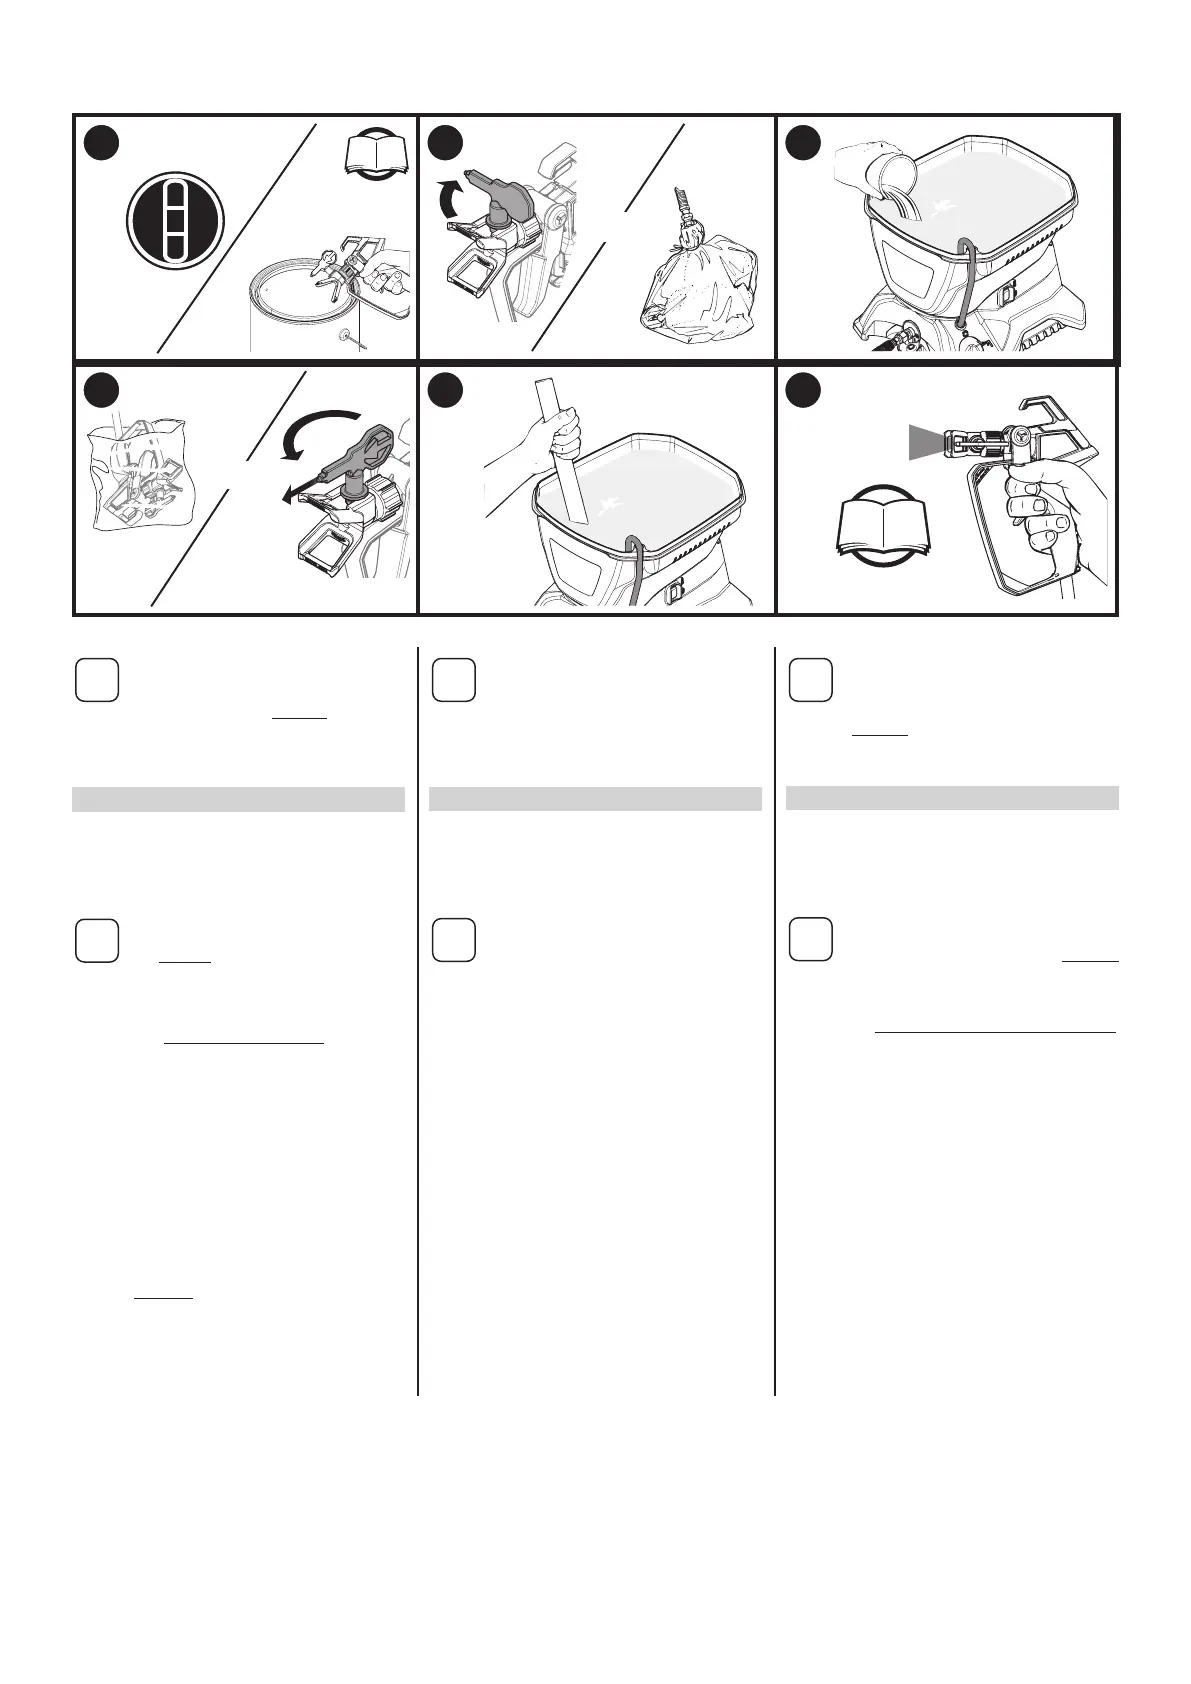
SHUTDOWN
1. Perform the Pressure Relief Procedure, page 7.
2. Turn spray tip 90˚. This will prevent air from drying
out any spray material that may be inside the spray
tip. Wrap spray tip and guard in a damp rag and then
place entire spray gun in plastic bag.
3. Pour 1/2 cup water slowly on the top of the paint to
prevent the paint from drying. Replace the hopper lid.
Place the entire spraying system out of the sun.
STARTUP
4. Remove the spray gun from the plastic bag. Turn the
spray tip back to the spraying position.
5. If water was added during shut down, stir water into
material with the stir stick.
6. Follow Spraying instructions, page 9.
Cette méthode devrait être suivie lorsque
vous faites une pause de courte durée ou
lorsque vous avez terminé votre projet
pour la journée. Si vous interrompez votre
projet pendant plus de 16 heures, suivez
les instructions de «Nettoyage» à la page
15-16.
CE DONT VOUS AUREZ BESOIN
• De l’eau
• Un sac
• Des chions
• Un bâtonnet à mélanger
Ces instructions concernent les peintures
au latex seulement! Si vous utilisez de la
peinture à l’huile, suivez les instructions de
«Nettoyage» à la page 15-16.).
PRÉPARATION POUR LE RANGEMENT
1. Suivez la «Procédure de Décompression», page 7.
2. Tournez l’embout de 90˚. Cela empêchera l’air
d’assécher le produit à pulvériser qui pourrait se
trouver à l’intérieur de l’embout. Enveloppez l’embout
et déecteur dans un chion humide et placez
l’ensemble du pistolet de pulvérisation dans un sac
de plastique.
3. Verser lentement-tasse d’eau à la surface du produit,
pour l’empêcher de sécher. Replacez le couvercle de
la réservoir.
Mettre le pulvérisateur dans un endroit sûr, à l’abri des
rayons du soleil.
PRÉPARATION EN VUE DE LA RÉUTILISATION
4. Retirez le pistolet de pulvérisation du sac en plastique.
Tournez l’embout à la position de pulvérisation.
5. Si vous avez ajouté de l’eau pendant l’arrêt du
pulvérisateur, mélangez-la avec la peinture.
6. Suivez les instructions «Pulvérisation», page 9.
Este procedimiento se debe realizar cuando
toma un descanso breve o cuando naliza
el proyecto por el día. Si su descanso dura
más de 16 horas, siga las instrucciones de
Limpieza en la página 15-16.
QUÉ NECESITARÁ
• Agua
• Bolsa de plástico
• Trapos
• Palo para revolver
Las instrucciones son sólo para el material
de látex. Si usa un material a base de
aceite, siga las instrucciones de Limpieza
página 15-16.
PARO
1. Realice el Procedimiento de Alivio de Presión,
página 7.
2. Gire la boquilla de pulverización en 90 °. Esto evitará
que el aire seque el material de pulverización que
podría estar dentro de la boquilla de pulverización.
Envuelva la boquilla y cubierta de pulverización en un
paño húmedo y coloque toda la pistola pulverizadora
en una bolsa plástica.
3. Vacíe 1/2 taza de agua lentamente sobre la parte
superior de la pintura para prevenir que la pintura se
seque. Vuelva a colocar la tapa de la tanque.
Ponga el rociador en un lugar seguro, fuera del
alcance del sol, para almacenarlo a corto plazo.
ARRANQUE
4. Quite la pistola rociadora de la bolsa de plástico.
Vuelva a girar la boquilla de pulverización en la
posición para pulverizar.
5. Si se añadió agua durante la interrupción, revuélvala
para integrarla al material.
6. Siga las instrucciones Rociado en la página 9.
1
P. 7
2
AND
3
4
AND
5
6
P. 9
 Loading...