32
W 590 Flexio
EN
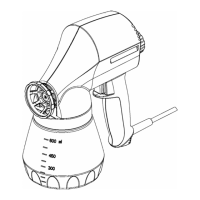
5) Insert the suction tube with container seal in the gun body.
In order to mount the gun more easily apply lubricating grease (enclosed) liberally
to the O-ring at the gun front part. (Fig. 24, 5)
21. Maintenance
Air lter
WARNING! Never operate the machine without the air filter;
dirt could be sucked in and interfere with the function of the
machine. Check the air filter after each use for contaminants.
Disconnect plug before changing parts.
1) Press both locks (Fig. 22, 1) and remove the lter cover.
2) Remove the air lter (2) and replace depending on contamination.
3) Click the lter cover in place again.
Ventilating hose / Valve
1) Pull the ventilating hose (Fig. 15, 1) at the top from the gun body. Screw o the valve
cover (2). Remove the diaphragm (3). Carefully clean all parts or replace in the
event of damage.
2) Place the diaphragm (Fig. 15, 3) with the pin facing upwards on the bottom section
of the valve. Also see the marking on the gun body.
3) Place on the valve cover (Fig. 15, 2) and screw it closed.
4) Place the ventilating hose (Fig. 15, 1) on the valve cover and on the nipple at the gun
body.
22. Spare Parts
Spare Parts List Wall Extra I-Spray spray attachment (Fig. 23)
Pos. Designation Order No.
Wall Extra I-Spray spray attachment complete with 1300 ml
container
2361 746
1 Air cap 2382 753
2 Union nut and nozzle 2382 751
3 O-ring of spray attachment 2362 875
4 Ventilating hose, valve cover, diaphragm 2382 754
5 Suction tube 2389 021
6 Container seal 2389 023
7 Container with cover 1300 ml (only for Wall Extra I-Spray spray
attachment)
2305 155
 Loading...