PEDAL INSTALLATION
1. CLEAN CRANK ARM THREADS AND APPLY A SMALL AMOUNT OF GREASE
Use a cloth or brush to remove old grease before applying new grease.
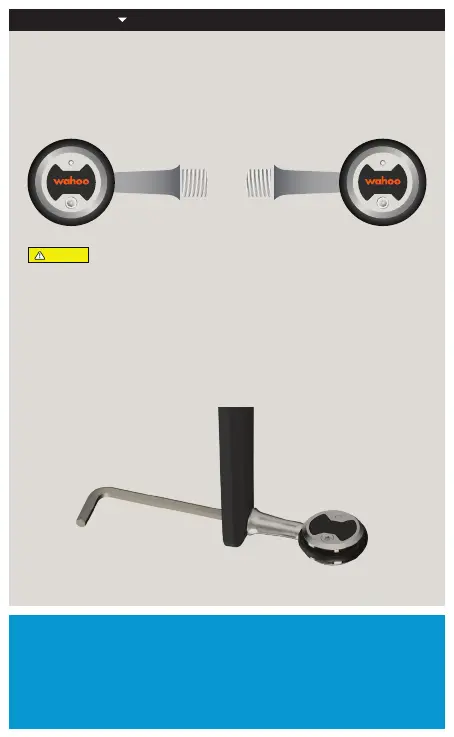
2. IDENTIFY THE LEFT AND RIGHT PEDALS
The “wahoo” logo reads le-to-right to help identify each pedal (shown below).
Right pedals install clockwise and le pedals install counterclockwise.
Improper installation or cross threading can cause damage to your pedals
or crank arms.
CAUTION
V.1
Le Pedal
Right Pedal
3. THREAD THE PEDALS ONTO THE CORRECT CRANK ARM
Use an 8mm Allen Wrench to ensure a snug fit. Titanium spindles will
require a 6mm.
Recommended tightening torque:
30 Nm.
FOR FULL FEATURE DETAILS AND
USER INSTRUCTIONS, GO TO:
WAHOOFITNESS.COM/INSTRUCTIONS/SPEEDPLAY
重要通知 为确保安全,在装配和使用前,请仔细阅读本手册和所有安全信息. // 仅按本手册所载信息组装
Speedplay 踏板和夹板. // 请勿修改 Speedplay 踏板和夹板. // 所有说明均可在我们的网站上查看:
www.wahoofitness.com/instructions // 图像可能并不与最终产品完全对应. // 必须始终遵守以下说明,
以避免人身伤害,以及对设备和环境的物理损害。说明根据不正确使用产品而导致的危险程度或损坏等级进
行分类:危险:不遵守说明将导致死亡或重伤。警告:不遵守说明将导致死亡或重伤。注意:不遵守说明可能
导致人身伤害和/或对设备或环境的物理损害. // 警告:组装产品时,请遵循手册中提供的说明。
供货范围 A. 基板. 带 5-F 和 5-R 垫片 (2x) // B. 垫片包. 6-F 和 6-R 垫片 (2x)、额外垫片 (2x) // C. 夹板环带
(COMP 不包含)右 1/左 1 // D. 夹板盖* 右 1/左 1 // E. 保护板* 右 1/左 1 // F. 弹簧和外壳* 右 1/左 1 *产品已预
先 组 装 好 。安 装 前 ,请 拆 下 夹 板 盖 . // G. 螺丝包. 底板螺丝:短/黑色 (6x) 和长/银色 (6x)、保护板螺丝 (8x)
所需工具 6 毫米和 8 毫米内六角扳手 // #0 和 #2 十字螺丝刀
夹板安装 1. 选择最适合鞋底的底板垫片. 出厂时已将 5-F 和 5-R 垫片预先安装在基板上,但可以用 6-F 和
6-R 垫片代替。在 5-F/6-F 垫片和鞋底之间可能需要额外的垫片。注意:底板/垫片组合可能无法在鞋底形成“
完美”的贴合性,但是为了获得最佳效果,使用具有“最佳”贴合性的垫片非常重要. // 2. 使用底板螺丝将底
板拧到鞋子上. 底板螺钉有两种长度:短/黑色和长/银色. 请使用最短的螺丝,使其至少与鞋底的插槽完全啮
合五圈。设置所需的前后位置,然后拧紧底板螺丝。建议的拧紧扭矩:4 Nm. // 3. 将夹板环带环绕于底板. 夹
板环带标有“左”或“右”. 注意:COMP 踏板不提供夹板环带. // 4. 将保护板安装到弹簧和外壳上. 弹簧和外
壳标有“左”或“右”。保护板未标记。弹簧和外壳已预先装配到保护板上。如果其分离,请使用两个小标签
作为指南,将其轻轻地卡在一起. // 5. 使用保护板螺丝将组件拧到底板上. 使用“双 X 图案”安装保护板螺丝
(如下所示)。松散地啮合所有四个保护板螺丝(步骤:A 到 D)。设置所需的左右位置,然后拧紧保护板螺丝 (步
骤:E 至 H)。建议的拧紧扭矩:2.5 Nm. // 6. 调整限位螺丝以设置所需的浮动. 拧紧限位螺丝,以减少脚踏踏
板时足部经受的浮动量(“后跟运动”).外壳贴有标签“后跟进”和“后跟出”,用于指导应调整哪个限位螺丝.
首选浮动范围对于每位骑手都是独特的。如果您不确定自己的浮动偏好,从中等浮动开始,根据需要调节。注
意:调整浮动时,请勿拧松外壳上的限位螺丝,一旦其接触弹簧尖端,请勿进一步拧紧限位螺丝. // 7. 在保护
板的边缘安装夹板盖. 夹板盖标有“左”或“右”。抓住鞋子,用手掌对四个角各自施力,确保夹板盖已适当覆
盖保护板的边缘。当安装正确时,夹板盖应与夹板环带齐平。注意:如未能正确完成此步骤,可能会导致夹板
盖掉落. // 8. (可选)将少量“PTFE 干式润滑剂”涂抹在弹簧上的凹槽处,以减少卡入踏板所需的啮合力。
踏板安装 1. 清洁曲柄臂螺纹并涂抹少量润滑脂. 使用抹布或刷子去除旧润滑脂,然后再涂抹新润滑脂. //
2. 识别左右踏板“Wahoo”徽标从左向右显示,以帮助识别每个踏板(如下所示)。右踏板以顺时针方向安装
,左踏板以逆时针方向安装。安装或拧紧不当可能损坏您的踏板或曲柄. // 3. 将踏板拧到正确的曲柄臂上. 使
用 8mm 内六角扳手确保拧紧。钛主轴需要 6mm 扳手。建议的拧紧扭矩:30 Nm。
有关完整功能详情和用户说明,请前往:WAHOOFITNESS.COM/INSTRUCTIONS/SPEEDPLAY