EasyManua.ls Logo

Wahoo Aero User Manual

Wahoo Aero
17 pages
To Next Page IconTo Next Page
Page #1 background imageLoading...
Page #1 background image
Aero
Nano
SPEEDPLAY
advanced pedal system
QUICK START GUIDE
Zero
重要通知 为确保安全,在装配和使用前,请仔细阅读本手册和所有安全信息. // 仅按本手册所载信息组装
Speedplay 踏板和夹板. // 请勿修改 Speedplay 踏板和夹板. // 所有说明均可在我们的网站上查看:
www.wahoofitness.com/instructions // 图像可能并不与最终产品完全对应. // 须始遵守以下说明,
以避免人身伤害以及对设备和环境的物理损害。说明根据不正确使用产品而导致的危险程度或损坏等级进
行分类:危险不遵守说明将导致死亡或重伤。警告不遵守说明将导致死亡或重伤。注意:不遵守说明可能
导致人身伤害和/或对设备或环境的物理损害. // 警告:组装产品时,请遵循手册中提供的说明。
供货范围 A. 基板. 带 5-F 和 5-R 垫片 (2x) // B. 垫片包. 6-F 和 6-R 垫片 (2x)、外垫片 (2x) // C. 夹板环带
(COMP 不包含)右 1/左 1 // D. 夹板盖* 右 1/左 1 // E. 保护板* 右 1/左 1 // F. 弹簧和外壳* 右 1/左 1 *产品已预
,请 . // G. 螺丝包. 底板螺丝:短/黑色 (6x) 和长/银色 (6x)、护板螺丝 (8x)
所需工 6 毫米和 8 毫米内六角扳手 // #0 和 #2 十字螺丝刀
夹板安装 1. 选择最适合鞋底的底板垫片. 出厂时已将 5-F 和 5-R 垫片预先安装在基板上,但可以用 6-F 和
6-R 垫片代替。在 5-F/6-F 垫片和鞋底之间可能需要额外的垫片。意:底板/垫片组合可能无法在鞋底形成
完美”的贴合性,是为了获得最佳效果,使用具有“最佳”贴合性的垫片非常重要. // 2. 使用底板螺丝将底
板拧到鞋子上. 底板螺钉有两种长度:短/黑色和长/银色. 请使用最短的螺丝,使其至少与鞋底的插槽完全啮
合五圈。设置所需的前后位置然后拧紧底板螺丝。建议的拧紧扭矩:4 Nm. // 3. 将夹板环带环绕于底板. 夹
板环带标有“左“右. 注意:COMP 踏板不提供夹板环带. // 4. 将保护板安装到弹簧和外壳上. 弹簧和外
壳标有左”“右保护板未标记弹簧和外壳已预先装配到保护板上如果其分离,请使用两个小标签
作为指南,将其轻轻地卡在一起. // 5. 使用保护板螺丝将组件拧到底板上. 使“双 X 图案”安装保护板螺丝
(如下所示)。松散地啮合所有四个护板螺(步骤:A 到 D)。置所需的左右位置,后拧紧保护板螺丝 (步
骤:E 至 H)。建议的拧紧扭矩:2.5 Nm. // 6. 调整限位螺丝以设置所需的浮动. 拧紧限位螺丝,减少脚踏踏
板时足部经受的浮动量“后跟运动”).外壳贴有标签“后跟进”“后跟出”用于指导应调整哪个限位螺丝.
首选浮动范围对于每位骑手都是独特的。如果您不确定自己的浮动偏好,从中等浮动开始,据需要调节。
意:调整浮动时请勿拧松外壳上的限位螺丝一旦其接触弹簧尖端,请勿进一步拧紧限位螺丝. // 7. 在保
板的边缘安装夹板盖. 夹板盖标有“左”“右”抓住鞋子用手掌对四个角自施力确保夹板盖已适当覆
盖保护板的边缘。当安装正确时夹板盖应与夹板环带齐平。注意:如未能正确完成此步骤,可能会导致夹板
盖掉落. // 8. (可选少量PTFE 干式润滑剂”抹在弹簧上的凹槽处,以减少卡入踏板所需的啮合力。
踏板安装 1. 清洁曲柄臂螺纹并涂抹少量润滑脂. 使用抹布或刷子去除旧润滑脂,后再涂抹新润滑脂. //
2. 识别左右踏板Wahoo”徽标从左向右显示,以帮助识别每个踏板(如下所示)右踏板以顺时针方向安装
左踏板以逆时针方向安装。安装或拧紧不当可能损坏您的踏板或曲柄. // 3. 将踏板拧到正确的曲柄臂上. 使
用 8mm 内六角扳手确保拧紧。主轴需要 6mm 扳手。建议的拧紧扭矩:30 Nm。
有关完整功能详情和用户说明,请前往WAHOOFITNESS.COM/INSTRUCTIONS/SPEEDPLAY
Comp
Question and Answer IconNeed help?

Do you have a question about the Wahoo Aero and is the answer not in the manual?

Wahoo Aero Specifications

General IconGeneral
Resistance TypeElectromagnetic
Max Simulated Grade20%
MaterialSteel
TypeDirect Drive
ConnectivityBluetooth, ANT+

Summary

Important Notice

Box Contents

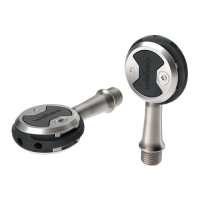
Lists all components included in the Speedplay pedal system package.

Cleat Installation

Tools Required

Lists necessary tools for cleat installation.

Choose Shims for Base Plate

Guide on selecting the correct shims for optimal shoe sole fit.

Screw Base Plate to Shoe

Instructions for attaching the base plate to the shoe with screws.

Fit Cleat Surround

How to fit the cleat surround around the base plate.

Fit Protector Plate to Spring & Housing

Attaching the protector plate to the spring and housing.

Screw Assembly to Base Plate

Securing the assembly to the base plate using screws.

Adjust Limit Screws for Float

Adjusting limit screws to set desired foot float or heel movement.

Fit Cleat Cover

How to properly fit the cleat cover over the protector plate edges.

Apply PTFE Dry Lube (Optional)

Optional step to apply dry lube to the spring for reduced engagement force.

Pedal Installation

Clean Crank Arm Threads & Apply Grease

Preparing crank arm threads and applying grease for pedal installation.

Identify Left and Right Pedals

How to distinguish between left and right Speedplay pedals.

Thread Pedals Onto Crank Arm

Instructions for threading pedals onto the correct crank arm.
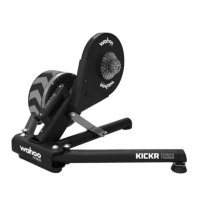
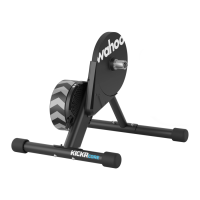
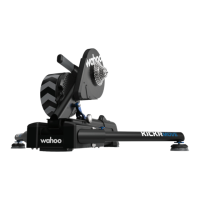
Related product manuals