Page 13;&(%$*4.8"4,7%<'*#$"&8#=%/7*,#*%4,77%>?@@@?@AA?BCDC1Item 57342
EF;6GHIJ6KFGLIMNFLMG6MFMO6 E6GPJ
I/*(,$"83%L8#$('4$"&8#
%K*,9%$.*%6MGLK6%LNJIKGFMG%EF;6GH%LM;IKNFGLIM%#*4$"&8%,$%$.*%+*3"88"83%&2%$."#%
5,8',7%"847'9"83%,77%$*Z$%'89*(%#'+.*,9"83#%$.*(*"8%+*2&(*%#*$%'/%&(%'#*%&2%$."#%/(&9'4$1
GI%JK6!6MG%E6KLIPE%LMkPKH-%
Q*,(%FMEL?,//(&W*9%#,2*$V%3&337*#%,89%.*,("83%/(&$*4$"&8%9'("83%&/*(,$"&81%%
Q*,(%.*,WV?9'$V%)&(X%37&W*#%).*8%.,897"83%#,)%+7,9*#1
QFKMLMRl%%GI%JK6!6MG%E6KLIPE%LMkPKH%;KIN%FOOLU6MGFT%IJ6KFGLIM-%
N,X*%#'(*%$.,$%$.*%G("33*(%"#%"8%$.*%&22?/&#"$"&8%,89%'8/7'3%$.*%$&&7%2(&5%"$#%
*7*4$("4,7%&'$7*$%+*2&(*%/*(2&(5"83%,8V%/(&4*9'(*%"8%$."#%#*4$"&81
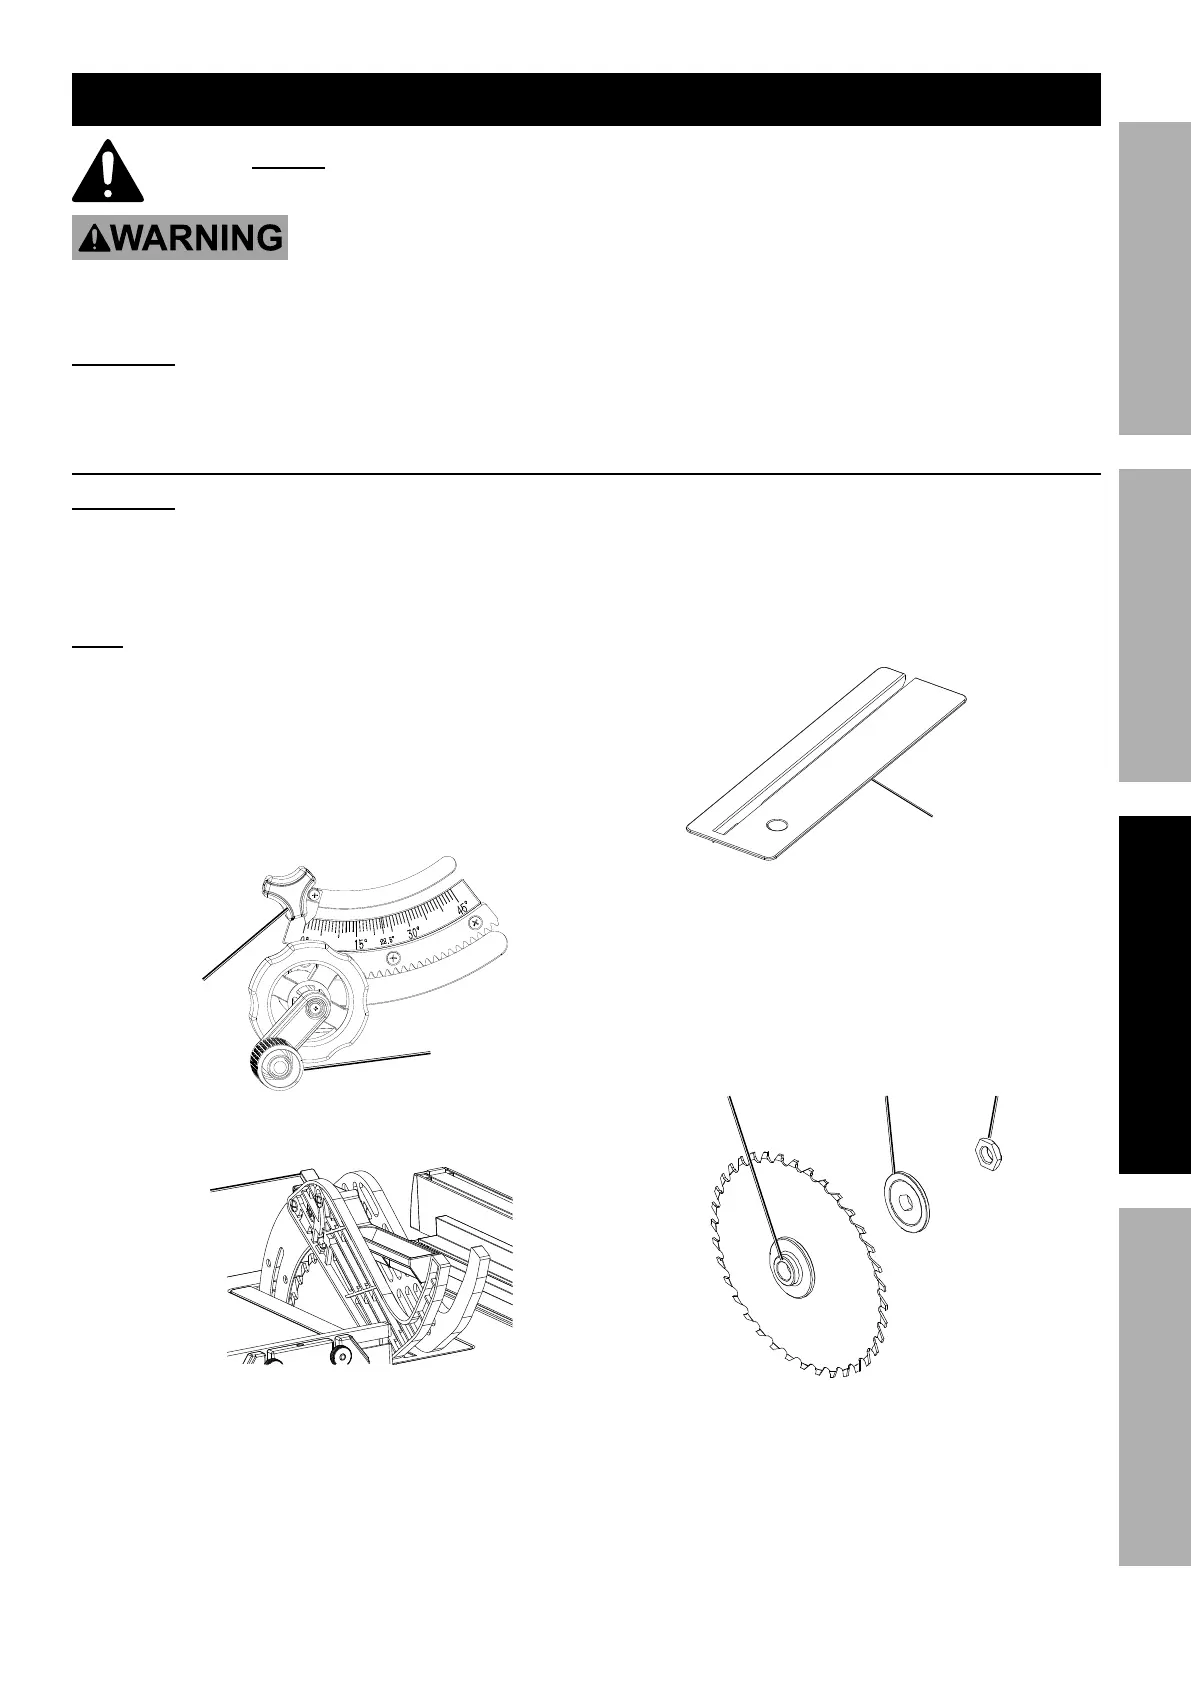
S7,9*%O.,83"83
QFKMLMRl%%GI%JK6!6MG%E6KLIPE%LMkPKH-%%N,X*%#'(*%$.,$%$.*%#,)%+7,9*%"#%"8#$,77*9%$&%(&$,$*%"8%$.*%
/(&/*(%9"(*4$"&81%U&%8&$%'#*%3("89"83%).**7#=%)"(*%+('#.*#=%&(%,+(,#"W*%).**7#%&8%,%$,+7*%#,)1%L5/(&/*(%
#,)%+7,9*%"8#$,77,$"&8%&(%'#*%&2%,44*##&("*#%8&$%(*4&55*89*9%5,V%4,'#*%#*("&'#%"8]'(V1%
Only use a 10″ saw blade with a 5/8″ diamond arbor, rated to at
7*,#$%g=bBf%KJN%,89%"8$*89*9%2&(%)&&94'$$"831%%
M&$*- Saw Blade sold separately.
1. Turn Power Switch off and unplug
the tool from its power source.
2. Loosen Lock Knob, then move Blade Height
Handle to 0°. Tighten Lock Lever.
3. Turn Blade Height Handle to lower
the Blade completely.
S7,9*%
_*"3.$%
_,897*
T&4X%
Y8&+
4. Raise Blade Guard Lock, then remove Blade Guard.
S7,9*%
R',(9%
T&4X
5. Remove Table Insert, pull up by using hole.
G,+7*%
L8#*($
6. Raise Blade completely, then move
Blade Height Handle to 15°.
7. Use two included wrenches, one to hold the
Inner Flange and the other to loosen the Blade Nut.
8. Remove Blade Nut, Outer Flange and Blade.
S7,9*%
M'$
I'$*(%
;7,83*%
L88*(%
;7,83*
9. Install new Blade with teeth pointing forward.
Replace Outer Flange and Blade Nut, then,
tighten Blade Nut. DO NOT overtighten.
10. Move Blade Height Handle to 0°. Lower
Saw blade completely, then replace
Table Insert and Blade Guard.
 Loading...