EasyManua.ls Logo

Watts Dead Level Series User Manual

Watts Dead Level Series
24 pages
To Next Page IconTo Next Page
Page #1 background imageLoading...
Page #1 background image
Instructions for Installing
Dead Level
®
Trench Drains
For Pre-Sloped Trench Drains
IS-WD-DL-Installation-USA
WARNING
!
Read this Manual BEFORE using this equipment.
Failure to read and follow all safety and use information
can result in death, serious personal injury, property
damage, or damage to the equipment.
Keep this Manual for future reference.
General Note: Please DO NOT separate channels from frames.
Channel and frame sections arrive to the jobsite preassembled in a specific
sequence to meet your project design requirements. They are not interchangeable
between sections and separating and reassembling them may cause installation
errors. If they accidentally become separated, please contact your Watts representative for technical
support with any questions.
1. Installation Diagram
1.1 Locate and save the installation diagram from the hardware box.
If you cannot find your installation diagram contact your Watts
representative for another copy.
2. Excavation
2.1 Excavate to allow a minimum 4" concrete pour below, and on both sides of
the trench drain and below a catch basin, if used.
Installation Guidelines
Question and Answer IconNeed help?

Do you have a question about the Watts Dead Level Series and is the answer not in the manual?

Watts Dead Level Series Specifications

General IconGeneral
BrandWatts
ModelDead Level Series
CategoryWater System
LanguageEnglish

Summary

Installation Guidelines

Installation Diagram

Locate and save the installation diagram from the hardware box.

Excavation

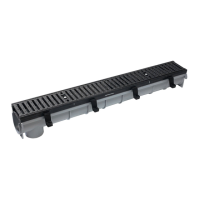
Excavate to allow a minimum 4" concrete pour below, and on both sides of the trench drain.

Catch Basins & Piping Connections

Details on setting catch basins and connecting discharge piping to the trench drain system.

Layout

Lay out trench drain sections according to labels and installation diagram, confirming flow direction.

Rebar Anchoring & Leveling of Sections

Secure frame sections to rebar using hex bolts and level to the desired grade.

Connecting Sections

Connect channel and frame sections using specified bolts and hardware.

Connecting Center Sections

Instructions for cutting and connecting center channel sections using the CA-M adapter.

Spacers

Details on using CA-F spacers for filling gaps in long runs and fitting channel tops.

Channel Retention Clips

Information on using optional channel retention clips to secure channels to rebar.

Corners/Tees

Guidelines for inverting and cutting corner/tee sections for proper connection.

Grate Installation

Install grates along the trench length and secure with provided bolts prior to concrete pour.

Concrete Pour

Check anchoring and alignment before pouring concrete, ensuring full fill and proper finish grade.

Final Inspection

After concrete cures, remove construction covers and retighten grate lockdowns.

Alternative Installations: Retro-Fit or Suspended

Steps for retro-fitting or suspending the trench drain system using 2x4 supports.

Related product manuals