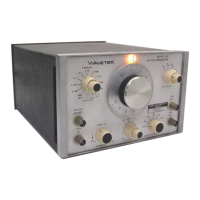
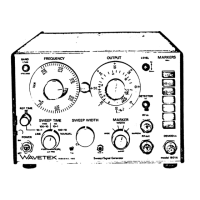
2.3
OPERATING
CONTROLS
The
operating controls
and electrical
connections for
the
Model
142 are shown
in
Figure
2-1.
The listing
below
discusses
each control
and its function.
1. Frequency
Range/Power
Switch
—
This
11
position
switch
selects the
generator frequency
range. The
extreme
counter-clockwise
position is the
power off
position.
2. Frequency
Dial
—
This is the
main frequency control.
The setting on this dial
multiplied
by
the frequency
range
setting
(above) equals the output
frequency of
the generator.
The
frequency
vernier
(3)
and the
symmetry
control
(11)
also
affect the generator
fre-
quency.
Note their effect
in the
listing
below.
3. Frequency
Vernier
—
This
control
allows
precision
control over
the
output frequency.
A
complete
turn
of this vernier
is
equivalent
to approximately one half
of the
smallest division
on the
main frequency
dial.
When
in
the full clockwise
position
(CAL), the
set-
tings on the
main dial
will be
accurate.
4.
Frequency
Index
—
The scribe line
indicates
the fre-
quency dial
setting.
The index
is illuminated
when
the
unit
is on.
5.
Waveform
Selector
—
This selects
the
waveform
that
appears at the
50f2
output
connector. The
waveforms
are
sine
\/
triangle
\
square
Hj
positive going
pulse
and
negative going
pulse.
6. Amplitude
Vernier
—
A vernier
control
of the
output
amplitude.
Maximum
clockwise
position
gives the full
output
amplitude of
30 V peak-to-peak
into
an
open
circuit
or 15 V
p-p
into
a 50L2 load,
except positive
and
negative
pulse
which are
7.5
V
zero-peak
ampli-
tude into
50J2 load.
Counter-clockwise
rotation
will
continuously
reduce
the
output
amplitude. The
con-
trol gives
a minimum of
20 dB variation
(10:
1
).
This
control
operates in
conjunction
with the
output
atten-
uator
(9).
For
maximum amplitude
output
this vernier
must be
full clockwise
and the
output
attenuator in
the
"0
dB” position.
7.
Sync
Out
—
This output
provides
a
square
or rectan-
gular
output
at
the
same frequency
of
the main
generator.
The
output amplitude
is approximately
2 V
p-p
into
50^2. The
phase relationship
between the
sync
output
and
the waveforms
from the
50^2 output
is
as shown in
Figure 2-3
8.
50f2 Out
—
This
connector provides
the selected
generator
output function. The
generator may oper-
ate into
an open circuit providing
30 V peak-to-peak
maximum, or into
a 500
load
providing a 15 V
peak-to-peak output.
9. Output Attenuator
—
Attenuates the
output from
0 dB
(15
V
p-p
500 max) to
—60
dB
(15
mV
p-p
into
500)
in six,
10 dB steps. The vernier
(6)
adds
an additional
—20
dB, thus,
a maximum of
—80
dB
(1.5
mV
p-p
into
500).
10.
DC Offset Control
—
This
coaxial switch
controls
the
amount of
dc or baseline offset
above
(-I-)
or
below
(—
)
signal ground. The larger
knob
controls
the polarity of
dc offset and the smaller
knob
controls
the
amount of offset.
11.
Symmetry Control
—
This controls the
time
sym-
metry between
the positive
and negative
portions
of
the
output
waveform. In the full
counter-clockwise
(detent)
position, the
control is
disabled and the
output waveform
has 1:1
symmetry
(50%
duty
cycle).
Rotating the
dial clockwise will vary
the
symmetry from
1:19 through
19:1. Note:
When the
symmetry
is off the NORM (detent)
position the
out-
put frequency
is divided
by approximately
a factor of
10. This allows
a minimum
pulse width
of 50 nano-
seconds.
12.
VCG (Voltage
Controlled Generator)
Input
—
This
connector allows
external control
of frequency.
With
0
volts
in, the
generator
output frequency is
deter-
mined by the
frequency range
selected
and the fre-
quency
dial
setting. A positive
VCG voltage will
increase
this
frequency,
and
a
negative
voltage
will
decrease
the frequency.
Input impedance
is
5 kJ2.
13. External
DC Offset
—
This connector provides exter-
nal
control
of
dc
level.
This control only operates
when
the dc offset switch is in the
0
position. Maxi-
mum range is ±15 V dc and sensitivity is approxi-
mately
—0.4
volts offset
per volt input.
2.4 INSTALLATION CHECKS
This paragraph outlines
a
quick checkout
procedure to
determine if
the instrument
is operating properly. Field
calibration and
checkout instructions are given in Section 4
to determine compliance with electrical
specifications. If
electrical deficiencies exist, refer
to the warranty on the
back of the title
page.
Use a Tektronix Model 454 oscilloscope
(or equivalent)
and a Monsanto Model
101A Counter-Timer (or equivalent)
when
performing these installation checks.
2-2
7/71
 Loading...