2
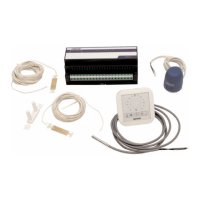
Number* Symbol Description
1 T1 Connection for temperature sensor, Outdoor temperature sensor
2 T2 Connection for temperature sensor, Flow, heating circuit 1
3 T3 Connection for temperature sensor, Return, heating circuit 1
4 T4 Connection for temperature sensor, Flow, heating circuit 2
5 T5 Connection for temperature sensor, Return, heating circuit 2
6 S1/C/S2 Servo motor, heating circuit 1
7 S3/C/S4 Servo motor, heating circuit 2
8 O1/GN Universal programmable input / output 1
9 O2/GN Universal programmable input / output 2
10 +U/A/B/GN ROXi bus
11 AO/GN Analog output 0-10V
12 PO PWM output (To be used with “GN” for analog output )
13 PI PWM input (To be used with “GN” for analog output)
14 VFR 1 Connection to voltage-free relay 1
15 VFR 2 Connection to voltage-free relay 2
16 P1/N/PE Connection to pump relay 1 (230V)
17 P2/N/PE Connection to pump relay 2 (230V)
18 L/N/PE Connection to 230V supply
19 A1 – A8 Actuator outputs 1-8 (for 1 or 2 PC of thermal acutator 24V 1W/PC)
20 - Internal connection between Control Unit(IV) and Extension Unit (V, VI)
21 A9 – A16 Actuator outputs 9-16 (for 1 PC of thermal acutator 24V 1W/PC)
22 A/B Connection to 24V voltage-free relay
23 C Connection to voltage-free relay C, AC 24-230V, 1A each
24 D Connection to voltage-free relay D AC 24-230V, 1A each
25 E Connection to voltage-free relay E AC 24-230V, 1A each
26 F Connection to voltage-free relay F AC 24-230V, 1A each
Installation and connection of the Wavin Sentio Control Unit and Extension Units may only be carried out
by an authorized installer.
* See page B
Ports CCU and EUs
2