Operating instructions, Piercing press, Weidmann Type MV5 Version: May 2019 Page 4
Check whether the spindle brake is applied; if not, apply it now
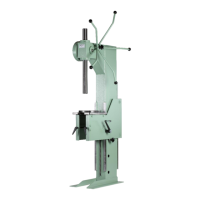
Use belts on the press head to secure the horizontal piercing press. See “Dimension Diagram” on Page
10
Lift the piercing press
Risk caused by gravitational force
Check belt for damage and carrying capacity. The weight of the piercing press Is set out in the
“Dimension diagram” on Page 10.
Suspend the belt from the crane hook in accordance with the instructions
Secure the belt in accordance with the “Dimension Diagram” on Page 10
Line the piercing press up slowly at the intended location
Risk caused by gravitational force / risk of tipping over
Set the bottom surface of the piercing press only on a base surface that is clean and even
Set up the piercing press where you can ensure the necessary free space is available
and the surface conditions are suitable for the heavy duty HSA stud anchors by Hilti
(see the “Dimension diagram” on Page 10).
Please note that there must also be enough ambient lighting to carry out the work.
Loosen the belt
Use heavy duty HSA M12 stud anchors by Hilti to secure the piercing press in the holes in the floor
drilled for this purpose (ensuring the condition of the surface is suitable).
Locate the rotary table in the indentation provided in the table plate
Risk caused by incorrect loading
For workpieces weighing more than 5 kg, use the following method to evaluate the handling
method:
www.suva.ch/88190.d. Use lifting gear if necessary.
Setting up
This operation may be undertaken by: users; third parties; mechanics
The following method must be used for setting up:
Check whether the table is located on the bearing pins; if not, move the table onto the pins
Check whether the 2 table handle bars are tightened; if not, tighten them now