Wichtige Information
Important Information
㛯㛯㛯
7
Im Notfall, falls der Antrieb der Markise versagt und ein Sturm
oder Unwetter droht, kann die Markise mit Hilfe von Seilen oder
Spanngurten behelfsmäßig eingefahren werden. Dazu wird jeweils
um die Mittelgelenke der Markisenarme ein Seil oder Spanngurt
gelegt und zusammengezogen bis die Markise fast geschlossen ist.
Zusätzlich müssen die Gelenkarme gegen Ausklappen am Marki-
sengestell gesichert werden. Das überhängende Tuch wird zusam-
mengerollt und an der Markise gesichert. Ziel ist es dem Wind
möglichst wenig Angriffsfläche zu bieten.
㛯㛯㛯
Neigungsverstellung
Die zulässigen Verstellbereiche:
Topas mit/ohne Dach* 5° bis 40°
Cap* 5° bis 40°
Semina 5° bis 40°
Cassita 5° bis 45°
I 2000/K 2000 5° bis 45°
Opal 2001, Opal Lux 5°
1
bis 40°
Opal Design, Opal Design Lux* 5°
1
bis 40°
* Bei motorbetriebenen Volant Plus 10°– 20° (abweichend vom
Standard).
1
Bei maximalen Markisenabmessungen kann die minimale
Neigung von 5° überschritten werden.
Wir empfehlen, alle Markisen in einer Schräge von mehr als 5°
einzustellen.
Zur einfachen Neigungsverstellung Markise ausfahren,
jeweiligen Arm leicht anheben und dadurch entlasten.
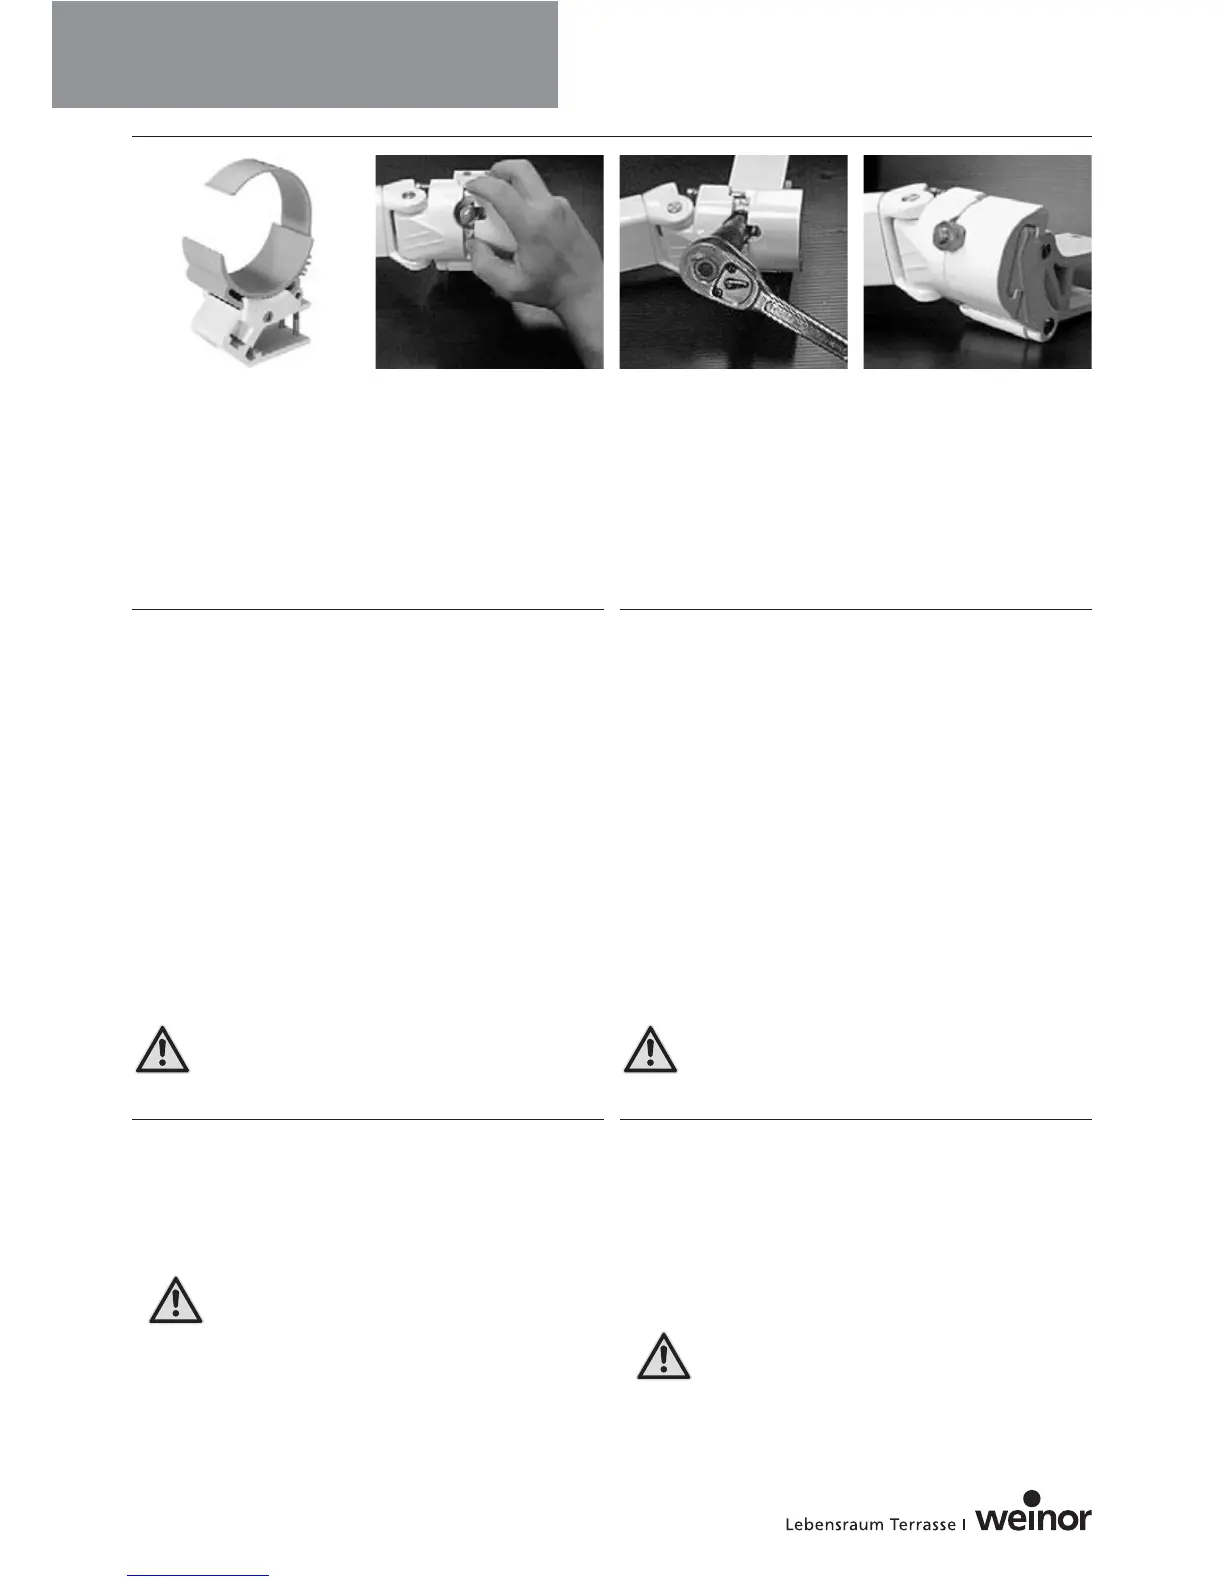
Bei Neigungsverstellung müssen die Gleitlager, wenn
vorhanden, analog eingestellt werden, da es sonst zu
Tuchbeschädigungen kommen kann (Pict 1).
Gleitlager müssen vom Fachhändler eingestellt werden.
㛯㛯㛯
Neigungsverstellung Typen I 2000, K 2000, Opal 2001, Opal Lux,
Opal Design, Opal Design Lux, Semina und Cap
• Schieber des Kippteils öffnen (Pict 2).
•
Mit Steckschlüssel (langer Zündkerzenschlüssel SW17) Klemmutter
(M10) drehen, dadurch wird die Neigung eingestellt (Pict 3).
Drehen in Uhrzeigersinn: Neigung wird flacher.
Drehen gegen Uhrzeigersinn: Neigung wird steiler.
Position an allen Armen gleich einstellen.
Die Klemmutter darf maximal bis 1 mm vor dem Ende der
Augenschraube herausgeschraubt werden (Pict 4).
In an emergency, if the awning's built-in drive fails and a gale or
storm is impending, then the awning can be retracted using ropes
or lashing belts as a makeshift solution. To do this, it is necessary to
wrap a rope or lashing belt around the centre joints of the awning
arms and then to tighten it until the awning is securely closed.
It is also necessary to secure the folding arms to the awning frame
to prevent them from swinging out. Roll up the overhanging cloth
and tie it to the awning. The aim of doing this is to provide as
small an area as possible for the wind to connect with.
㛯㛯㛯
Angle Adjustment Mechanism
Permissible Angle Adjustments (Pitch):
Topas with/without hood* 5° to 40°
Cap* 5° to 40°
Semina 5° to 40°
Cassita 5° to 45°
I 2000/K 2000 5° to 45°
Opal 2001, Opal Lux 5°
1
to 40°
Opal Design, Opal Design Lux* 5°
1
to 40°
* For motorised Valance Plus valances 10°– 20° (different from
standard values).
1
The inclination of Opal Design can be set infinitely from 5°– 40°.
With maximum dimensions, the minimum pitch of 5° can be
exceeded .
We recommend that you pitch all awnings at an angle of over 5°.
For simple angle adjustment, extend the awning and lift
each arm slightly to release.
If the angle adjustment mechanism is equipped with
sliding bearings, these must be adjusted accordingly in
order to prevent damage occurring to the cover (Pict. 1).
Always have the sliding bearings adjusted by a specialist dealer!
㛯㛯㛯
Angle adjustment mechanisms for types I 2000, K 2000,
Opal 2001, Opal Lux, Opal Design, Opal Design Lux, Semina
and Cap
• Open the slider on the tilting arm member (Pict 2).
• Using a box spanner (long spark plug type spanner SW17), turn
the clamping nut (M10) to adjust the pitch (Pict. 3).
If turned in a clockwise direction, the pitch will become
shallower.
If turned in an anti-clockwise direction, the pitch will become
deeper.
Set all arms to the same position.
Never unscrew the clamping nut further than 1 mm
before the end of the eyebol (Pict 4).
Pict 1 Pict 2 Pict 3 Pict 4
Gelenkarmmarkisen