Page 10
OPERATION (cont.)
Warning: Use all precautions required in the safety general manual before operating the
welder, reading carefully the risks linked to the welding process.
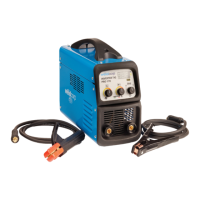
TIG LIFT
• Select the proper polarity (direct or reverse) in relation to the type of material to be welded
(for more information see the general part of the safety manual). Connect the plugs of the
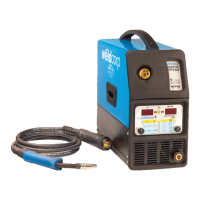
work clamp and the torch to the sockets of the machine (Fig 1, B and C) as function of the
polarity, rotating the attack in order to ensure a good grip.
• Connect the work clamp to the metal structure to be welded trying to establish a good
point of contact between the metal and the clamp, as close as possible to the area to be
welded.
• Connect the torch gas tube to the pressure reducer connected to the gas cylinder (for more
information consult the safety manual included in the packaging).
• Connect the power supply plug to the power outlet and turn on the welding machine by
placing the on I oft switch (Fig 1, D) to position I.
• Select the TIG welding (Fig 2 knob “MENU”).
• Turn the knob (Fig 2, “AMP”) in the position corresponding to the desired current .
• Regulate the cylinder gas ow with the pressure reducer and then open the torch valve.
• Use the torch to weld as in the following without a pause between the two phases:
• To stop welding, turn o the machine and close the gas valve