04/04
INSTR7022 1203 Whirlpool Water Products
8562176 Meriden CT, 06450
Model
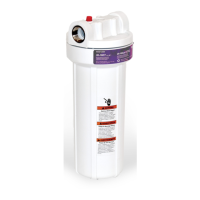
WHCF-DWHV
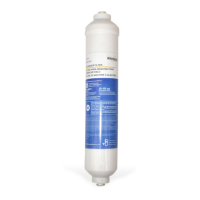
Filter Replacement:
The contaminants or other substances removed or reduced by
this water filter are not necessarily in all users’ water.
Filter life depends on local water conditions and the volume of
water used. We recommend you change the WHCF-GD05 fil-
ter every 6 months. However, it can be replaced earlier if there
is a drop in water pressure.
Do not use with water that is microbiologically unsafe or of unknown quali-
ty without adequate disinfection before or after the system.
Systems certified for Cyst reduction may be used on disinfected water
that may contain filterable cysts. EPA Establishment #070595-CT-001
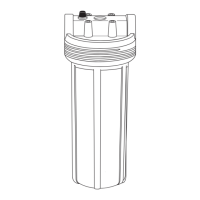
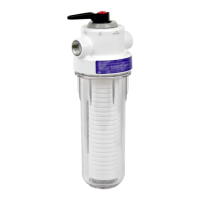
Filter Cartridge Replacement Instructions:
NOTE: Before changing cartridge, turn off or bypass incom-
ing water supply. Place a bucket under filter to catch the small
amount of water that will run out after housing removal.
1. Shut off water by turning valve on filter head to the “OFF” or
“BYPASS” position.
2. Unscrew housing and remove old cartridge. Wash housing
thoroughly with mild soap and water.
3. Insert new cartridge and re-install housing. Be sure cartridge is
seated in the housing before tightening onto head.
4. Use filter wrench to fully seat the cartridge. Tighten to make a
water tight seal.
5. Turn on water by turning valve on filter head to the “FILTER”
position. If any leaks appear, tighten housing as needed.
6. Flush system for five (5) minutes.
Troubleshooting Guide
Water Leaks at Fittings:
Tighten slightly more until leak stops.
Water leaks at connections:
Refer to section “Using Push-In Fittings.”
Push pipe in as far as it will go. If leaking continues, shut off
water at the incoming valve and remove water line by pushing
in on the connector collar while pulling the pipe away. Inspect
pipe for cracks and scratches. If pipe is cracked or scratched,
simply cut that portion away and reinsert pipe into fitting.
Accessories:
To order accessories, ask for the appropriate part number list-
ed below or contact the Help Line listed below:
WHCF-GRND Grounding kit for metallic piping
WHCF-B6 Bracket for pipe support
Help Line 1-866-245-9474
Monday Through Friday
8:00 a.m. to 9:00 p.m. EST
or write us at
Whirlpool Water Products
PO Box 765
Meriden, CT 06450
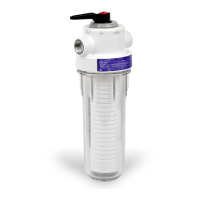
WHOLE HOUSE
PREFILTRATION
Standard System with Shut-Off Valve
Installation, Use & Care Guide
8562176/INSTR7022 1203
® Registered trademark/TM Trademark of Whirlpool, USA,
used under license.
© 2004 Whirlpool Corporation. All rights reserved.
TEFLON is a registered trademark of E.I. Dupont
® Marca registrada/TM Marca de comercio de Whirlpool, USA,
usado bajo licencia.
Todos los derechos reservados.
TEFLON es una marca registrada de E.I. Dupont
1 Year Limited Warranty
CUNO Incorporated warrants the original purchaser-consumer of its Product
that is free of defects in materials and workmanship. Any defect, malfunction, or
other failure of the Product to conform to this warranty will be remedied by
Warrantor in the manner provided below.
This Warranty, together with any warranties implied by law, shall be limited to a
duration of one (1) year from the original date of purchase by the consumer.
This Warranty does not apply to defects that result from abuse, misuse, alter-
ation or damage not caused by CUNO Incorporated.
THIS WARRANTY DOES NOT COVER, AND IS INTENDED TO EXCLUDE ANY
LIABILITY ON THE PART OF WARRANTOR, WHETHER UNDER THIS WAR-
RANTY OR UNDER ANY WARRANTY IMPLIED BY LAW, FOR ANY INDIRECT
OR CONSEQUENTIAL DAMAGES FOR BREACH HEREOF OR THEREOF.
Note: Some states prohibit limitations on the duration of implied warranties and
on the exclusion of indirect or consequential damages; and so the limitation on
implied warranties and on incidental and consequential damages may not be
applicable to you.
RESPONSIBILITY OF WARRANTOR
CUNO Incorporated’s responsibility under this warranty shall be to repair at its
expense, at no charge to the original purchaser-consumer any product that is
actually defective, malfunctioning or otherwise in violation of this warranty. If
CUNO Incorporated for any reason cannot repair a Product covered hereby
within two (2) weeks after receipt of the original purchaser-consumer’s notifica-
tion of a Warranty claim and the Product, then CUNO Incorporated’s responsi-
bility shall be, at its option, either to replace the defective Product with a compa-
rable new unit at no charge to the consumer or to refund the full purchase price.
CUNO Incorporated’s obligations of repair, replacement, or refund are condi-
tioned upon the return of the defective product to CUNO Incorporated.
If any Product hereby is actually defective within the terms of this Warranty, then
CUNO Incorporated will bear all the reasonable and proper shipping and mail-
ing charges actually incurred in the consumer’s return of the Product set forth
herein. If the Product proves not to be defective within the terms of this
Warranty, then all costs and expenses in connection with the processing of the
consumer’s claim hereunder shall be borne by the consumer.
RESPONSIBILITY OF THE CONSUMER
The original purchaser-consumer’s sole responsibility in the instance of a war-
ranty claim shall be to notify CUNO Incorporated of the defect, malfunction or
other manner in which the terms of this Warranty are violated.You may secure
performance or obligations hereunder by (in writing):
1. Identifying the Product involved (by model or serial number or other sufficient
description that will allow Warrantor to determine which product is defective).
2. Specifying where, when and from whom the Product was purchased.
3. Describing the nature of the defect, malfunction or other violation of this
Warranty.
4. Return the Product, with the above information to:
CUNO Incorporated, 400 Research Parkway, Meriden, CT 06450, U.S.A.
THIS WARRANTY GIVES YOU SPECIFIC LEGAL RIGHTS, AND YOU MAY
ALSO HAVE OTHER RIGHTS, WHICH VARY FROM STATE TO STATE.
To Release
Tubing
Push in grey
collet to
release tubing.
With collet
held, pull
tubing straight out.
To Attach
Tubing
Push tubing in as
far as it will go.
Tubing must be
inserted past o-ring
and hit backstop.
Pull tube to ensure it is secured.
6. Cut pipe and clean ends of pipe. Ensure there are no burrs,
sharp edges or deep scratches.
7. Referring to “Using Push-In
Fittings” section, insert pipe
into filter head fitting making
sure end of pipe is firmly seat-
ed to backstop. Connect pipe
from water supply to "IN" port.
(See Figure 4.)
8. Repeat Step 7 for the pipe leading from the “OUT” port to
the house. It may be necessary to carefully spread pipe apart
in order to connect pipes. Keep filter head horizontal.
9. Lubricate housing o-ring with water. Firmly screw housing,
with filter inside, to filter head. Tighten with wrench to seal
properly.
10. Turn filter head
valve to "FILTER"
mode (see Figure
5) and slowly turn
on main water sup-
ply and check for
leaks. Run water for
5 minutes with an
open faucet to flush
out air.
5. Install Whirlpool Grounding Kit WHCF-GRND (see Figure 3)
in metal water piping systems.
IMPORTANT: Metal water piping systems are required to be
connected to the electrical ground. To maintain the ground
connection, obtain kit WHCF-GRND by contacting location
where filter head was purchased.Ground Kit Installation:
a. Install one ground clamp on the incoming metal water pipe
section and one on the outgoing metal water pipe section. Be
sure that the filter head, fittings and valves are between the
two ground clamps.
b. Connect the ground wire to the two ground clamps, using
the wire screw terminal on each grounding clamp. Tighten
securely.
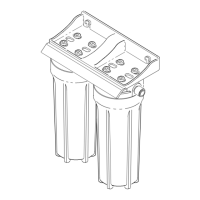
Installation Instructions:
For Use With Cold Water Only
Tools and Parts Needed:
* MNPT - Male Nominal Pipe Thread
1. Shut off main water supply. Drain water from water lines.
2. Remove clear housing from filter head and set aside.
3. Wrap Teflon
®
tape (2 1/2 wraps) around the 3/4” MNPT x 3/4”
fitting for copper pipe in a clockwise direction
(see Figure 1) and firmly assemble into filter head.
Do not use pipe sealant (dope),
as solvents in some types of
pipe dope may cause damage
to plastic fittings. Do not over-
tighten, overtightening can
cause damage to filter head.
4. Calculate proper spacing of
components (approximately 3/4"
of existing pipe inserts into each
fitting). (See Figure 2.)