EasyManua.ls Logo

Whirlpool WHES18 - User Manual

Whirlpool WHES18
24 pages
Print Icon
To Next Page IconTo Next Page
Loading...
PRODUCT REGISTRATION
AND WARRANTY EXTENSION
Please register your product on
whirlpoolwatersolutions.com
See warranty page for
extended warranty details.
How to install, operate
and maintain your Demand
Controlled Water Softener
Model WHES18
7385281 (Rev. C 2/3/21)
Manufactured and warranted by
Water Channel Partners
1890 Woodlane Drive
Woodbury, MN 55125
System tested and certified by NSF International
against NSF/ANSI Standard 44
for hardness reduction and efficiency,
and certified to NSF/ANSI Standard 372.
®
If you have any questions or concerns when
installing, operating or maintaining your water
softener, call our toll free number:
1-866-986-3223
or visit whirlpoolwatersolutions.com
When you call, please be prepared to provide
the model and serial number of your product,
found on the rating decal, typically located on
the rim below the salt lid.
Installation and Operation Manual
CLICK ANYWHERE on THIS PAGE to RETURN to WHIRLPOOL WATER SOFTENERS & CONDITIONERS at
InspectApedia.com
Question and Answer IconNeed help?

Do you have a question about the Whirlpool WHES18 and is the answer not in the manual?

Summary

Dimensions

Specifications & Performance Claims

Water Softener Safety

Before You Start

Essential preparation steps and safety considerations before beginning installation or operation.

Inspect Shipment

Water Conditioning Information

Details on water quality factors like iron and sediment affecting softener performance.

Installation Requirements

Location Requirements

Criteria for selecting an optimal and safe installation location for the water softener.

Plumbing Codes

Adherence to national, state, and local plumbing codes for installation.

Air Gap Requirements

Specific requirements for drain hose air gaps to prevent backflow.

Valve Drain Requirements

Instructions and options for connecting the valve drain hose.

Inlet; Outlet Plumbing Options

Guidance on different types of pipe and bypass valve configurations for connections.

Installation Instructions

Typical Installation

Overview of the standard installation process and connection points.

Turn Off Water Supply

Procedure for safely shutting off the main water supply before installation.

Install the Brine Tank Overflow Elbow

Step-by-step guide for installing the overflow elbow in the brine tank.

Move the Water Softener into Place

Instructions for positioning the unit, including weight warnings.

Grounding Information

Essential grounding procedures for installations on metal plumbing.

Complete Inlet and Outlet Plumbing

Detailed instructions for connecting the water inlet and outlet pipes.

Install Valve Drain Hose

Steps for correctly installing and securing the valve drain hose.

Install Salt Storage Tank Overflow Hose

Procedure for connecting the overflow hose to the salt storage tank.

Test for Leaks

Steps to check for water leaks after completing plumbing connections.

Add Water and Salt to the Salt Storage Tank

Instructions for filling the salt tank with water and salt.

Plug in the Power Supply

Guidance on connecting the power supply to the unit.

Sanitize the Water Softener; Sanitize After Service

Procedure for sanitizing the softener before or after service.

Programming the Water Softener

Clean Reminder

Understanding the 'CLEAn' indicator and how to reset it.

Set Time of Day

Instructions for setting the current time on the softener's control panel.

Set Water Hardness Number

How to input the water hardness level for optimal performance.

Set Recharge (Regeneration) Time

Configuring the preferred time for the automatic regeneration cycle.

Start a Recharge

Manual initiation of the regeneration cycle for cleaning and testing.

Customizing Features; Options

Recharge Now

Initiating an immediate regeneration cycle using the RECHARGE button.

Recharge Tonight

Scheduling an immediate recharge to occur at the next preset time.

Salt Efficiency

Enabling a feature for increased salt efficiency, potentially more frequent recharges.

Maximum Days Between Regenerations

Setting a manual limit for the number of days between automatic regenerations.

12 or 24 Hour Clock

Option to switch the display between 12-hour and 24-hour time formats.

Routine Maintenance

Power Outage Memory

How the system retains settings during power interruptions.

Water Softener Cleanser

Recommended procedure for using the water softener cleanser.

Adding Salt

Guidance on checking and refilling the salt storage tank with appropriate salt.

Breaking a Salt Bridge

Identifying and resolving salt bridging issues in the brine tank.

Cleaning the Nozzle & Venturi

Procedure for cleaning the nozzle and venturi for optimal brine draw.

Troubleshooting

Automatic Electronic Diagnostics

Understanding error codes displayed by the unit's self-diagnostic system.

Manual Advance Diagnostics

Using diagnostic modes to check valve operation and system cycles.

Resetting to Factory Defaults

Procedure to reset all settings to their original factory default values.

Manual Advance Regeneration Check

Detailed steps to manually cycle through regeneration to verify function.

Water Softener Exploded View

Water Softener Parts List

Valve Exploded View

Valve Parts List

Warranty Information

Extend Your Warranty

Information on extending the factory warranty using specific cleaner.

Water Softener Warranty Details

Details of the one-year full and limited warranties for the water softener.

Overview

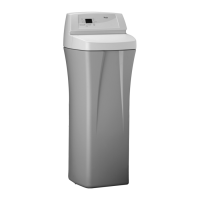
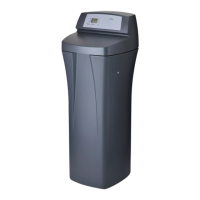
The Whirlpool Model WHES18 is a demand-controlled water softener designed to reduce water hardness and improve water quality in residential settings. It operates on 24 V DC electrical power, supplied by a direct plug-in power supply, and is intended for installation in a dry location with a nominal 120 V, 60 Hz household outlet. The system is tested and certified by NSF International against NSF/ANSI Standard 44 for hardness reduction and efficiency, and certified to NSF/ANSI Standard 372.

Function Description:

The primary function of the WHES18 water softener is to remove hardness minerals (like calcium and magnesium) from water through an ion exchange process. It features a demand-initiated regeneration (D.I.R.) system, which means it regenerates based on actual water usage, optimizing salt and water consumption. This design aims to minimize the amount of regenerant brine and water used in its operation, contributing to its efficiency rating. The softener is also capable of reducing moderate amounts of clear water iron, with a specified capacity for up to 3 ppm. For every 1 ppm of ferrous (clear water) iron, users are advised to add 5 grains to their hardness setting to compensate. However, it does not remove ferric (red water) iron, bacterial iron, organically bound iron, or colloidal iron. It also does not remove sediment, for which an upstream sediment filter is recommended.

Important Technical Specifications:

  • Model Code: LE18
  • Rated Softening Capacity:
    • 7,600 grains @ 1.8 lbs. salt dose
    • 11,000 grains @ 3.1 lbs. salt dose
    • 18,500 grains @ 10.8 lbs. salt dose
  • Rated Efficiency (Minimum Salt Dose): 4,100 grains/pound of salt @ 1.8 lbs.
  • Water Used During Regeneration (Minimum Salt Dose): 3.0 gal. / 1,000 grains
  • Total Water Used Per Regeneration (Maximum Salt Dose): 26.4 gallons
  • Rated Service Flow Rate: 7.0 gpm
  • Amount of High Capacity Ion Exchange Resin: 0.64 cu. ft.
  • Pressure Drop at Rated Service Flow: 9.5 psig
  • Water Supply Max. Hardness: 65 gpg
  • Water Supply Max. Clear Water Iron: 3 ppm* (Note: State of Wisconsin requires additional treatment if clear water iron exceeds 5 ppm.)
  • Water Pressure Limits: 20 - 125 psi (minimum / maximum)
  • Water Temperature Limits: 40 - 120 °F (minimum / maximum)
  • Minimum Water Supply Flow Rate: 3 gpm
  • Intermittent Flow @ 15 PSI: 9.0 gpm** (Note: Does not represent maximum service flow rate for capacity/efficiency determination; continuous operation at higher flow rates may affect performance.)
  • Maximum Drain Flow Rate: 2.0 gpm
  • Salt Storage Capacity: 125 lbs.
  • Dimensions:
    • Width: 21-1/4" (top), 14-1/2" (base)
    • Depth: 23"
    • Height: 30-1/4"
  • Electrical Power: 24 V DC from a 120 V, 60 Hz household outlet.

Usage Features:

  • Installation Flexibility: The softener can be installed with either a single bypass valve (included) or a 3-valve bypass system (parts not included), allowing for water shut-off to the softener for maintenance while maintaining water supply to the house. It should be installed close to the main water supply inlet, upstream of all other plumbing connections except outside water pipes, and between the water inlet and water heater.
  • Demand-Controlled Regeneration: The system automatically initiates regeneration based on water usage, which is more efficient than timed regenerations.
  • Variable Salt Dose: The electronic controls select the appropriate salt dose at regeneration time based on the amount needed, further optimizing salt usage.
  • Programming: Users can set the present time, water hardness number (with adjustments for clear water iron or potassium chloride use), and recharge (regeneration) time.
  • Recharge Now/Tonight: The RECHARGE button allows for immediate regeneration or scheduling an extra regeneration for the next preset recharge time.
  • Salt Efficiency Feature: This feature, when ON, ensures the softener operates at salt efficiencies of 4000 grains per pound of salt or higher, potentially leading to more frequent recharges with smaller salt dosages and less water. In California, this feature must be ON.
  • Maximum Days Between Regenerations: While the softener typically operates in an automatic mode for optimal efficiency, users can set a maximum number of days (1 to 15) between regenerations. This can be useful for specific water conditions, such as clear water iron, to keep the resin bed clean.
  • 12 or 24 Hour Clock: The display can be set to either 12-hour (AM/PM) or 24-hour time format.
  • Clean Reminder: A "CLEAn" reminder flashes on the display every four months, prompting users to use Whirlpool® WHE-WSC Water Softener Cleanser.

Maintenance Features:

  • Salt Level Monitoring: Users are advised to check the salt storage level frequently, especially until a refilling routine is established, and to refill when less than 1/4 full. Recommended salts include nugget, pellet, or coarse solar salts with less than 1% impurities.
  • Salt Bridge Breaking: Instructions are provided for identifying and breaking salt "bridges" that can form in the brine tank due to high humidity or incorrect salt type, which can prevent proper brine formation and lead to hard water.
  • Nozzle & Venturi Cleaning: Regular cleaning of the nozzle and venturi is crucial for proper softener operation, as these components create the suction needed to move brine. The manual provides detailed steps for disassembling, cleaning, and reassembling these parts.
  • Water Softener Cleanser: The manufacturer recommends using Whirlpool® WHE-WSC Water Softener Cleanser every four months to maintain performance and address taste, odor, or discoloration issues.
  • Power Outage Memory: The electronic control retains settings for several hours during a power outage. While the display will be blank and regeneration will not occur, settings like hardness and recharge time do not require resetting unless a change is desired. The clock may need to be reset.
  • Product Registration and Warranty Extension: Users are encouraged to register their product on whirlpoolwatersolutions.com. The standard one-year full warranty on parts and labor can be extended to five years by consistently using Whirlpool® WHE-WSC Water Softener Cleanser as directed (one bottle every four months) and retaining proof of purchase.
  • Troubleshooting and Diagnostics: The softener includes automatic electronic diagnostics that display error codes for malfunctions. Manual advance diagnostics allow users to cycle through regeneration stages to check valve operation, brine tank fill, brine draw, and flow rates, aiding in problem identification.
  • Factory Reset: Instructions are provided to reset the electronic controller to its factory default settings if needed.

Whirlpool WHES18 Specifications

General IconGeneral
BrandWhirlpool
ModelWHES18
CategoryWater Dispenser
LanguageEnglish

Related product manuals