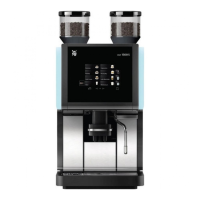
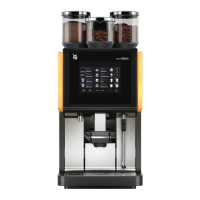
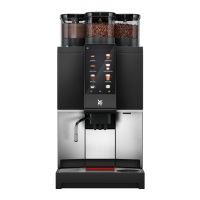
A
Water tank cover G Steam nozzle control panel with light ring
(white/red)
B
Removable water tank
G1
Steam generation
C
Cup warmer / Cup tray
G2
Preheat steam
D
Control panel
G3
Steam nozzle off
D1
Button to pour out a cup
D1.1 Built-in operating light (white/
red/blue)
G4
Output hot water
D2
Preparation of 2 espressos
D2.1 Built-in operating light (white/
red)
H Steam nozzle
E
Strainer holder I Drip tray grid
F
Strainer J Collection tray for drip water
F1
1 cup strainer K Floater
F2
2 cup strainer L On/off button
F3
Strainer pad M Measuring spoon/compactor
Meaning of light rings
Red light: White light: Blue light:
Heating mode
Heating mode for milk
frother
Standby mode
Tank empty
Flashing white
Descaling
Descaling alarm
Flashing blue and
white
Cool-down phase
after milk frothing
Flashing red
Sleep Mode
> 30 min.
Getting started
Before using for the first time, clean all the accessories with warm water and gentle washing-up liquid
and dry.
Then rinse as follows:
1. Connect the device to a mains socket (1).
2. Take off the cover (A) and remove the water tank (B) (2).
3. Fill the water tank with drinking water at room temperature to the MAX marking and replace it on
the device. The tank must be correctly positioned. Replace the lid.
4. If you want to have an Espresso please assembly the collection tray for drip water first to ensure
that the right distance between the cup and the portafilter is given. Therefore remove the drip
tray grid (I) and take the collection tray for drip water (J) out of the device. Remove th drip tray
bracket, turn it upside down and put it back in the recess. Put the collection tray for drip water (J)
on the drip tray bracket and attach the drip tray grid (I). The collection tray for drip water (J) does
not have to be assembeled for cappuccino cups.
5. Make sure that the selector switch (G) is set to the O position (G3 ->
).
6. Press the On/Off button (L ->
) to switch the device on. The device runs self-diagnostics.
7. The cup selection buttons (D1/D2 ->
) light up red, which means that the device is heating
up: when the light rings switch from red to white, the device is ready to use.
8. Place a vessel with a capacity of at least 100 ml underneath the hot water/steam outlet (H).
9. Adjust the hot water output knob (G4 ->
) and allow approx. 100 ml water to run out; then reset
the knob to G3 =
.
10. Repeat steps 5-8 until the water tank is empty.
11. Then prepare 1-2 espressos or 1-2 cappuccinos. Do not drink them.
Carry out steps 1-7 of the chapter on “Preparing espresso”.
Permanent device settings:
This machine has various default settings for water hardness, coffee temperature and volume of water
per cup. These settings can be adjusted individually. Proceed as follows to access the programme menu
for permanent settings:
Activating the programme menu:
Proceed as follows to access the programme menu for water hardness and coffee temperature:
1. On/Off button ->
2. The knob ->
is in Position 0
3. Press and hold the 1-cup button ->
and 2-cup button -> at the same time
4. Now press the On/Off button ->
5. The 1-cup button -> lights blue and the 2-cup button -> lights red.
Note: If you do not press any buttons for 10 seconds, the device automatically exits programme menu
and starts the heating phase.
Setting the water hardness
Water hardness levels vary by region, so you should find out what yours is before adjusting the device.
The water hardness level corresponds to the following machine settings:
 Loading...