Do you have a question about the Work Sharp PRECISION ADJUST and is the answer not in the manual?
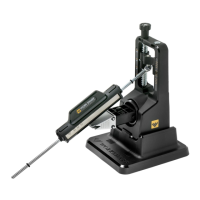
Overview of the sharpener's components and initial assembly steps for setup.
Guidance on selecting the appropriate sharpening angle based on knife type and use.
Instructions for securing the knife and selecting the abrasive grit for sharpening.
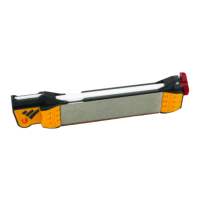
Using the coarse grit diamond plate to shape the knife edge and create a burr.
Using the fine grit diamond plate for sharpening with 8-10 strokes per side.
Using the fine ceramic stone to hone the sharpened edge and remove the burr.
Guidance on properly clamping the knife and positioning the sharpener for optimal results.
Advice on using light pressure, light strokes, and creating micro-bevels for keen edges.
Guidance on edge choices, re-sharpening, bench mounting, and abrasive replacement.
Information on O-ring adjustment, avoiding surface scratching, and safe storage practices.
Details on the sharpener's 3-year warranty coverage, excluding abrasives.
Provides contact details for assistance, service, and warranty registration.
| Adjustable Sharpening Guide | Yes |
|---|---|
| Base Material | Plastic |
| Sharpening Method | Manual |
| Angle Adjustment | Yes |
| Clamp | Yes |
| Category | Knife Sharpener |
| Sharpening Angle Range | 15° to 30° |
| Abrasive Grits | 320, 600 |
| Material | Plastic |
| Included Accessories | angle guide |
| Compatibility | Knives |