4
QTY
1
1
1
1
1
1
1
1
1
1
1
1
1
1
1
1
1
1
1
KEY
1
2
3
4
5
*6
7
8
9
31600 SERIES
18910-4040
18910-4040
N/A
N/A
18911-7030
18912-3040
18915-9002
18916-0040
18916-0040
18916-0025
18916-0025
18920-9043
N/A
N/A
30648-1000
18914-6340
18914-6340
N/A
N/A
DESCRIPTION
Upper Housing XXXXX-0092
XXXXX-0094
XXXXX-0292
XXXXX-0294
Valve Kit
Diaphragm Kit
Lower Housing Kit
Pressure Switch XXXXX-0092
XXXXX-0094
XXXXX-0292
XXXXX-0294
Service Kit
Motor Kit 12V EMC COMP
24V EMC COMP
Slide Clips
Pumphead Assy. XXXXX-0092
XXXXX-0094
XXXXX-0292
XXXXX-0294
31620 SERIES
18910-4040
18910-4040
N/A
N/A
18911-7030
18912-3040
18915-9002
18916-0040
18916-0040
18916-0025
18916-0025
18920-9043
N/A
N/A
30648-1000
18914-6340
18914-6340
N/A
N/A
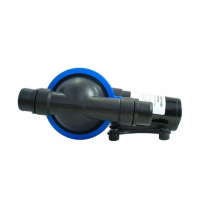
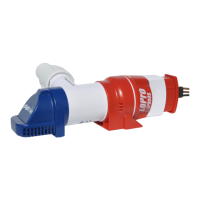
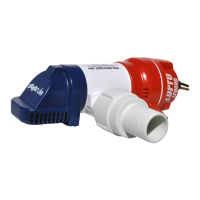
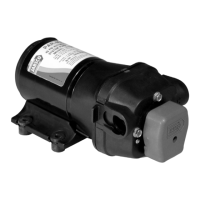
PARTS LIST - Reference image on page 3
DISASSEMBLE
Pressure Switch (5)
1. Disconnect power to pump and open a faucet or valve to
relieve system pressure.
2. Remove Rubber Boot, then remove the two visible Pressure
Switch Screws located on each side of the Pressure Switch (5).
Upper Housing (1)
3. Slide Port Clip (8) back and unplug from Tank Plumbing.
4. Loosen but DO NOT remove the four Pump Head Screws and
carefully remove Upper Housing Assembly (1).
5. Remove Check Valve (2) and inspect for debris.
Check Valve Assembly (2) Follow Steps 1, 3 & 4
6. Inspect Check Valve (2) and O-Ring
Lower Housing (4) Follow Step 1, 3 & 4
7. Remove Rubber Plugs on housing (4-A) to access Allen Screw.
8. Rotate Lower Housing (4), so access notch is aligned with Cam
Bearing Set Screw (4-C), loosen set screw with a 1/8” Allen
Wrench and slide pump head off motor shaft.
Diaphragm (3-B)
9. Loosen four cam piston screws with Phillips head screw driver
and pull apart cam (4-B) from Inner Pistons (3-A). (Both pistons
(3-A & C) should be replaced when a new Diaphragm (3-B) is
installed.)
Motor (7) Follow steps 1, 3, 4, 7, & 8
REASSEMBLE
Diaphragm (3-B)
1. Insert Outer Pistons (3-C) into Lower Housing (4-A) by bending
pistons at center fold.
2. Placing the Diaphragm (3-B) (flatter side of Diaphragm facing
the motor) on the Lower housing (4-A). Press each Inner
Piston (3-A) through the Diaphragm and Lower Housing (4A)
into Outer Piston (3-C). Hex stem of Inner Pistons (3-A) must
be aligned into hex holes in Outer Pistons (3-C). Tighten
cam piston screws partially, center piston in diaphragm, and
tighten screws securely (18 in. lbs. torque). Also, the Outer
Pistons (3-C) must be aligned with alignment slots on Cam As-
sembly (4-B) making sure screw holes align in cam assembly,
otherwise diaphragm will leak.
Cam Bearing (4-B)
3. Place Cam Bearing (4-B) over Inner Pistons (3-C) and tight-
en down with four Phillips Head Screws. (18 in. lbs. torque)
Lower Housing (4) to Motor (7)
Coat motor shaft with grease prior to installing Cam Bearing (4-B).
4. When installing the Lower Housing (4), rotate access notch to
align with Cam Bearing Set Screw (4-C).
5. Attach Cam Bearing (4-B) to motor shaft indentation with Cam
Bearing Set Screw (4-C). (35 in. lbs. torque)
6. Reinsert new Notch Plugs.
Check Valve (2)
7. Place Ferrules (Rubber Cones) in the Upper Housing (1) coned
side first.
8. Properly seat O-Ring in Check Valve (2) and insert Check Valve
(2) into the Upper Housing (1).
Upper Housing (1)
9. Place Upper Housing (1) on top of the Lower Housing (4-A)
and tighten
Hex Bolts (30 in. lbs. torque) through the Upper Housing (1)
to the Motor.
 Loading...