EasyManua.ls Logo

Yaesu FTDX101МР - User Manual

Yaesu FTDX101МР
2 pages
Print Icon
To Next Page IconTo Next Page
Loading...
Information for Customers Operating Transceiver
in the UK on 5MHz (60m) and 70MHz* (4m)
Thank you very much for purchasing this YAESU HF transceiver.
The Transceivers listed in this notice are congured at the factory with the WRC-15 5MHz (60m) allocation as shown
below as “B2”.
When your Transceiver is operated in the UK, the 5MHz (60m) and 70MHz* (4m) conguration needs to be changed to
“C2” as shown below before using the transceiver for the rst time.
WRC-15 5MHz (60m) Band Frequency Range
Factory Default Conguration
B2
UK 5MHz (60m) and 70MHz* (4m) Band Frequency Range
Selectable Conguration
C2
5.351500 MHz - 5.366500 MHz
5.250000 MHz - 5.406500 MHz
70.000000 MHz - 70.499999 MHz*
* The 70MHz band is only available for the FTDX101MP, FTDX101D and FTDX10.
FTDX101MP / FTDX101D
1. Turn the transceiver OFF.
2. Press and hold in the
[
FUNC
]
and
[
MODE
]
buttons while
turning the transceiver ON.
The green LED Indicator will blink with intervals of 0.5 sec
(0.5 sec ON, 0.5 sec OFF).
3. Press and release the
[
MODE
]
button, and the Green LED
Indicator will now blink with interval of 1 sec (1 sec ON, 1
sec OFF).
4.
Press and hold in the
[
MODE
]
button, and the radio will re-
start automatically. Once restarted the change of 5 MHz
frequency configuration will have been completed suc-
cessfully.
Power Switch
FUNC Button
LED IndicatorMODE Button
FTDX10
1. Turn the transceiver OFF.
2. Press and hold in the
[
FINE
]
and
[
MODE
]
buttons while
turning the transceiver ON.
The green LED Indicator will blink with intervals of 0.5 sec
(0.5 sec ON, 0.5 sec OFF).
3. Press and release the
[
FUNC
]
knob, and the Green LED
Indicator will now blink with interval of 1 sec (1 sec ON, 1
sec OFF).
4.
Press and hold in the
[
FUNC
]
knob, and the radio will re-
start automatically. Once restarted the change of 5 MHz
frequency configuration will have been completed suc-
cessfully.
Power Switch
FINE ButtonFUNC Knob
LED Indicator MODE Button
Question and Answer IconNeed help?

Do you have a question about the Yaesu FTDX101МР and is the answer not in the manual?

Overview

This document provides instructions for configuring Yaesu HF transceivers for operation in the UK on the 5MHz (60m) and 70MHz (4m) bands. It outlines the process for changing the factory default frequency configuration ("B2") to the UK-specific configuration ("C2"). The instructions are categorized by transceiver model, including FTDX101MP/FTDX101D, FTDX10, FTDX5000/FTDX3000/FTDX1200, FT-891, and FT-991A.

Function Description:

The primary function of this document is to guide users through a critical setup procedure for their Yaesu HF transceivers. It addresses the need to adapt the transceiver's frequency allocation to comply with UK regulations for specific amateur radio bands. By following these instructions, users can enable their transceivers to operate within the legally permitted frequency ranges in the UK, specifically for the 5MHz (60m) and 70MHz (4m) bands. The document ensures that the transceivers, which are initially configured with a WRC-15 5MHz (60m) allocation ("B2"), are correctly updated to the UK 5MHz (60m) and 70MHz (4m) band frequency range ("C2"). This configuration change is essential for legal and proper operation within the UK.

For the FTDX101MP, FTDX101D, and FTDX10 models, the 70MHz band is explicitly noted as being available only after this configuration change. The FT-991A, being an HF and VHF/UHF transceiver, also requires this configuration change to enable correct repeater coverage and shifts for UK operation, as its default ARS UHF repeater frequency coverage and shifts differ from normal UK usage.

Usage Features:

The instructions are presented in a clear, step-by-step format, making them easy to follow for users of various technical proficiencies. Each model or series of models has its own dedicated set of instructions, ensuring accuracy and preventing confusion.

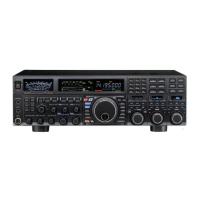
For the FTDX101MP / FTDX101D models, the process involves:

  1. Turning the transceiver OFF.
  2. Pressing and holding the [FUNC] and [MODE] buttons while turning the transceiver ON. This action initiates a blinking green LED indicator (0.5 sec ON, 0.5 sec OFF), signaling entry into the configuration mode.
  3. Pressing and releasing the [MODE] button, which changes the LED indicator's blinking interval to 1 sec ON, 1 sec OFF, confirming the next step in the process.
  4. Pressing and holding the [MODE] button again, which causes the radio to restart automatically. Upon restart, the 5MHz frequency configuration change is successfully completed.

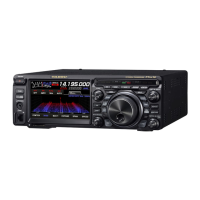
For the FTDX10 model, the procedure is similar but uses different buttons:

  1. Turning the transceiver OFF.
  2. Pressing and holding the [FINE] and [MODE] buttons while turning the transceiver ON, leading to the same blinking green LED indicator (0.5 sec ON, 0.5 sec OFF).
  3. Pressing and releasing the [FUNC] knob, which changes the LED indicator's blinking interval to 1 sec ON, 1 sec OFF.
  4. Pressing and holding the [FUNC] knob again, which restarts the radio and completes the 5MHz frequency configuration change.

For the FTDX5000 / FTDX3000 / FTDX1200 series, the steps are:

  1. Turning the transceiver OFF.
  2. Pressing and holding the [MENU] and [C.S] buttons while turning the transceiver ON, resulting in the blinking green LED indicator (0.5 sec ON, 0.5 sec OFF).
  3. Pressing and releasing the [MENU] button, which changes the LED indicator's blinking interval to 1 sec ON, 1 sec OFF.
  4. Pressing and holding the [MENU] button again, which restarts the radio and completes the 5MHz frequency configuration change.

For the FT-891 model, the steps are:

  1. Turning the transceiver OFF.
  2. Pressing and holding the [F] and [QMB] buttons while turning the transceiver ON, leading to the blinking green LED indicator (0.5 sec ON, 0.5 sec OFF).
  3. Pressing and releasing the [F] button, which changes the LED indicator's blinking interval to 1 sec ON, 1 sec OFF.
  4. Pressing and holding the [F] button again, which restarts the radio and completes the 5MHz frequency configuration change.

For the FT-991A model, the steps are:

  1. Turning the transceiver OFF.
  2. Pressing and holding the [F] and [MODE] buttons while turning the transceiver ON, resulting in the blinking green LED indicator (0.5 sec ON, 0.5 sec OFF).
  3. Pressing and releasing the [MODE] button, which changes the LED indicator's blinking interval to 1 sec ON, 1 sec OFF.
  4. Pressing and holding the [MODE] button again, which restarts the radio and completes the 5MHz frequency configuration change.

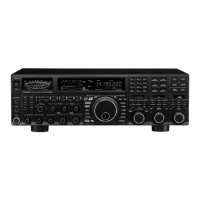
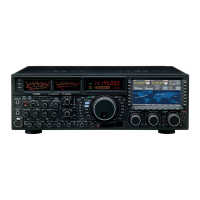
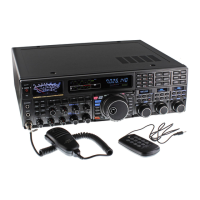
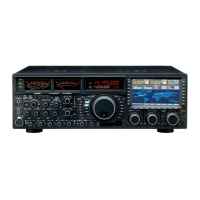
The document also includes visual aids, such as diagrams of the transceivers with relevant buttons highlighted, to assist users in locating the correct controls for each step. This enhances the clarity and ease of use of the instructions. The blinking LED indicators serve as visual cues, guiding the user through the different stages of the configuration process and confirming successful execution of each step.

Maintenance Features:

While the document primarily focuses on initial setup and configuration, it includes crucial "Caution" notes that serve as maintenance features by informing users about potential data loss and how to mitigate it.

The first caution highlights that changing the 5MHz and 70MHz band frequencies according to these procedures will delete all saved data, including Menu and Memory settings. This is a critical piece of information for users, as it prompts them to take preventative action. To address this, the document advises users to back up their registered data or make a written note of it before applying the setting change. This proactive measure helps users preserve their personalized settings and avoid the inconvenience of reconfiguring everything from scratch after the frequency update.

The second caution clarifies that the current 5MHz and 70MHz band frequency range setting (B2 or C2) is NOT changed, even when executing the "Full Reset" procedure to factory defaults as described in the Operating Manual. This is an important maintenance detail because it informs users that a full reset will not revert the frequency configuration to its original factory default if it has already been changed to C2. This prevents users from inadvertently undoing the UK-specific configuration through a general reset, ensuring that the transceiver remains compliant with UK regulations without requiring repeated reconfiguration. This distinction is vital for maintaining the correct operational parameters of the device in the long term.

In summary, the document provides comprehensive, model-specific instructions for a critical configuration change, enhanced by user-friendly steps and visual aids, and includes important maintenance advisories to prevent data loss and ensure persistent compliance with UK amateur radio regulations.

Yaesu FTDX101МР Specifications

General IconGeneral
TypeHF/50MHz Transceiver
Receiver TypeTriple Conversion Superheterodyne
Supply Voltage13.8 V DC ±15%
ModesSSB, CW, AM, FM
IF Filter3 kHz
DisplayTouchscreen

Related product manuals