Do you have a question about the Yamaha DTX400K and is the answer not in the manual?
Details on specifications subject to change and important notices regarding product usage.
Information on battery usage, safety, and environmental considerations for the product.
Warning against unauthorized modifications to the unit that could void FCC authorization.
Guidance on using high-quality shielded cables and following installation instructions.
Information on FCC Part 15 compliance and measures to eliminate interference.
Covers power supply, water exposure, fire hazards, and handling abnormalities.
Instructions for safe assembly, component handling, and instrument placement.
Advice on handling, cleaning, and environmental conditions for optimal performance.
Notes on copyright of musical data and illustrations within the manual.
Information regarding optional external pads and where to find updates.
Overview of the Owner's Manual sections: Setup, Basic, Advanced, and Reference.
Details on the MIDI Reference Manual content and how to access it.
Four initial steps to get started with your electronic drum kit.
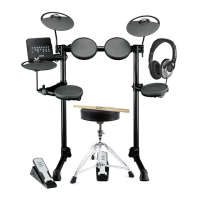
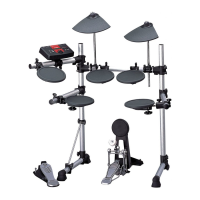
List and illustration of all parts included with the DTX400K model.
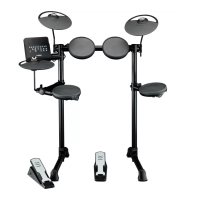
List and illustration of all parts included with the DTX430K model.
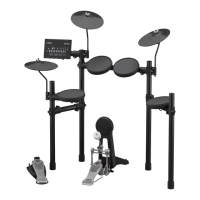
List and illustration of all parts included with the DTX450K model.
Overview of the assembly process, including safety precautions and required assistance.
Step-by-step instructions for attaching tom parts and the left arm to the rack.
Detailed steps for mounting the drum module onto the rack assembly.
Instructions for attaching tom parts and the snare pad for DTX400K.
Instructions for attaching the snare pad for DTX430K and DTX450K models.
Steps to attach the hi-hat holder to the rack for specific models.
Instructions for mounting the cymbal holders onto the first/second tom part.
Procedure for attaching the hi-hat and adjusting its stopper pin position.
Steps to assemble the cymbal and hi-hat pads onto their respective holders.
Instructions for rotating and securing the tom pads to the rack.
Detailed steps for assembling the kick pad and connecting it to the foot pedal.
Guidance on correctly positioning the hi-hat controller and kick drum components.
Adjusting the position and angle of pads and drum module for playability.
Instructions for connecting all drum pads to the drum module using snake cables.
Steps to connect the power adapter and ensure safe power delivery.
How to connect audio output devices like headphones or speakers.
Instructions for connecting an external music player for practice.
Procedure for powering the drum module on and off correctly.
Explanation of the auto power-off feature and how to disable it.
How to reset the drum module to its original factory settings.
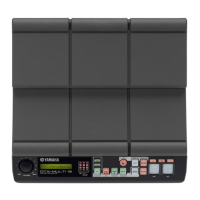
Identification of the drum module's main components and their functions.
Detailed explanation of each button on the drum module's control panel.
Description of the terminals and jacks on the left side of the drum module.
Description of the trigger input and output jacks on the right side.
How to select and audition the 10 preset drum kits.
How to adjust pad sensitivity for different playing styles.
Explanation of different sounds produced by striking the snare pad.
How to produce open, closed, and splash sounds with the hi-hat.
How to select songs and adjust their playback volume.
How to adjust the volume of drum parts when they are muted.
Instructions for setting loop start and end points for song playback.
How to start, stop, and adjust the volume of the built-in metronome.
How to check the current tempo using number button lights.
How to hear the current tempo spoken aloud.
Methods for adjusting tempo: buttons, direct input, and tap tempo.
Overview of metronome settings available in Menu Mode.
Introduction to the various training modes for rhythm and pattern practice.
General steps for activating and using any training mode.
Explanation of the scoring system used in certain training modes.
Training mode to improve timing accuracy using metronome or songs.
Training mode that requires accurate timing for sounds to be produced.
Training mode where the metronome is muted for specific measures.
Training mode that adjusts tempo based on user's timing accuracy.
Practice rhythms change every two measures, testing timing and rhythm selection.
Jamming mode where users play along with patterns, striking any pad.
Practice patterns adapt to user's speed/strength; allows adding fills.
How to mute individual drum or instrument parts within practice patterns.
Pads only produce sound when timing precisely matches the practice pattern.
How to mute individual drum or instrument parts within practice patterns.
Training mode to mute drum or song parts to focus practice.
Methods for muting drum parts via buttons or pads, and non-drum parts via buttons.
Play drums wildly for a set time to achieve the highest score.
Overview of Menu Mode for setting drum module parameters and functions.
Step-by-step guide on how to navigate and select parameters in Menu Mode.
How to set one of eight patterns for the metronome.
How to set the metronome length from 1 to 9 beats.
How to select the metronome sound (click, cowbell, spoken count).
How to set the lighting pattern for number buttons during metronome use.
How to change the drum sounds assigned to individual pads.
How to adjust the volume level for individual pads.
How to adjust the stereo panning position for individual pads.
Configuring the module to produce a kick sound from the hi-hat controller.
How to select reverb effects to add ambience to the kit sounds.
Determines if the internal tone generator responds to pads or songs.
How to set the MIDI note number output for each pad.
Simulating clutch position changes to affect open hi-hat decay.
Adjusting sensitivity for detecting hi-hat foot splashes.
Adjusting the position for switching hi-hat from open to closed.
Adjusting the velocity of foot-close sounds produced using the hi-hat controller.
Adjusting velocity of kick sounds from hi-hat controller (requires Double Bass Drum 'On').
Selecting a velocity curve to determine sound response to strike intensity.
Adjusting parameter to prevent spurious signals from vibration between pads.
Specifying the type of snare pad connected to the drum module.
Specifying types of hi-hat controller and kick pedals connected.
Setting gain level for trigger signals to adjust sound output from light drumming.
Setting the minimum strike strength required to trigger a sound.
Setting the practice timer duration for various training modes.
Setting the difficulty level for Tempo Up/Down, Change Up, and Pad Gate training.
Setting to allow sounds even if timing is slightly off (Tempo Up/Down, Change Up, Pad Gate).
Setting the time for practice patterns to return to start in Groove Tracker.
Selecting which pads advance the practice drum pattern in Groove Tracker.
Setting how much the pattern advances per strike in Groove Tracker.
Setting pad groups for pattern matching in Pad Gate training.
Setting the timer duration for Fast Blast training sessions.
Preventing the drum module from automatically changing kits when selecting songs.
Adjusting the volume level for voice guidance prompts.
Setting the time until the Auto Power-Off function activates or disabling it.
Setting the output mode for the PHONES/OUTPUT jack (Stereo or Mono).
Restoring a specific kit's default settings.
Restoring a specific song's default settings.
Restoring parameters to the settings from the last power-on.
Restoring all parameters to their original factory default settings.
Instructions for adding accessories like KP65 Kick Pad and HH65 Hi-hat Controller.
Connecting the drum module via USB for MIDI data exchange and computer use.
Steps to diagnose and resolve issues with no sound or low volume from pads.
Resolving issues with hi-hat sounds, velocity, and overall volume balance.
Addresses double triggering, crosstalk, skipped sounds, and common settings questions.
A list of all 10 preset drum kits with their assigned pad numbers and names.
A list of the 10 built-in practice songs with descriptions.
A comprehensive list of all available drum and percussion voices with their numbers.
Explanation of drum score notation and examples for practice songs.
Technical specifications of the drum module, including polyphony, voices, and connections.
Details on guarantee service for customers in the European Economic Area and Switzerland.
| Type | Electronic |
|---|---|
| Product color | Black |