Operation
36
4. After the first 10 hours:
Operate the engine normally.
EMU27104
Pre-operation checks
WARNING
EWM00081
If any item in the pre-operation check is
not working properly, have it inspected
and repaired before operating the out-
board motor. Otherwise an accident could
occur.
CAUTION:
ECM00120
Do not start the engine out of water. Over-
heating and serious engine damage can
occur.
EMU31801
Fuel
● Check to be sure you have plenty of fuel for
your trip.
● Make sure there are no fuel leaks or gaso-
line fumes.
● Check fuel line connections to be sure they
are tight.
● Check the water in the fuel filter with the wa-
ter separator warning device. Place the re-
mote control lever in neutral and turn the
main switch to “”(on). If the buzzer
sounds and the water separator-warning in-
dicator blinks, consult your Yamaha dealer
immediately.
EMU31710
Controls
● Check throttle, shift, and steering for proper
operation before starting the engine.
● The controls should work smoothly, without
binding or unusual free play.
● Look for loose or damaged connections.
EMU31721
Stop switches
● Confirm that turning the main switch to the
“” (off) position stops the engine.
● Confirm that removing the clip from the en-
gine shut-off switch stops the engine.
● Confirm that the engine cannot be started
with the clip removed from the engine shut-
off switch.
EMU27150
Engine
● Check the engine and engine mounting.
● Look for loose or damaged fasteners.
● Check the propeller for damage.
● Check that the battery is in good condition
and the battery connections are secure.
EMU31341
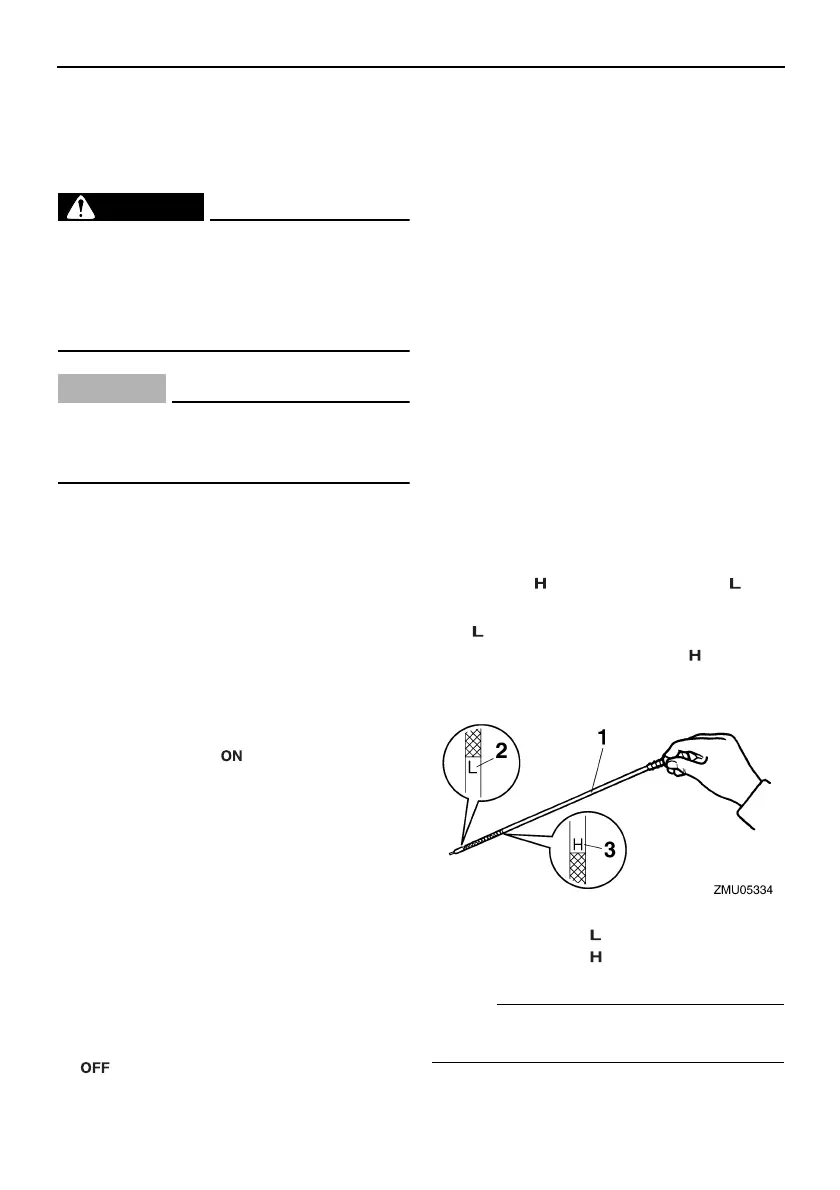
Checking the engine oil level
1. Put the outboard motor in an upright po-
sition (not tilted).
2. Remove oil dipstick and wipe it clean.
3. Completely insert the dipstick and re-
move it again.
4. Check the oil level using the dipstick to be
sure the level falls between the upper lev-
el mark “” and lower level mark “” . Fill
with oil if it is below the lower level mark
“”, or drain to the specified level if it is
above the upper level mark “” .
NOTE:
Be sure to completely insert the dipstick into
the dipstick guide.
1. Oil dipstick
2. Lower level mark “”
3. Upper level mark “”
U6P272E0.book Page 36 Friday, March 16, 2007 1:22 PM



 To Next Page