EasyManua.ls Logo

Yamaha MG166C - User Manual

Yamaha MG166C
29 pages
Print Icon
To Next Page IconTo Next Page
Loading...
EN
DE
FR
ES
EnglishDeutschFrançaisEspañol
Features
Input Channels...................................................................page 12
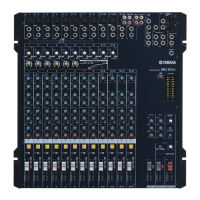
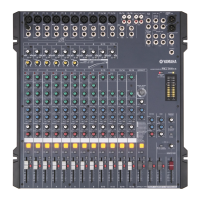
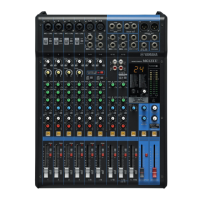
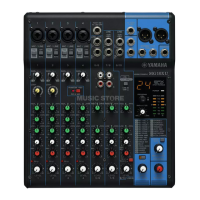
With up to 16 (MG166CX/MG166C: 10) mic/line inputs or up to four
stereo inputs, the MG mixer can simultaneously connect to a wide
range of devices: microphones, line-level devices, stereo
synthesizers, and more.
Compression......................................................................page 10
Compression increases the overall level without introducing
distortion by compressing excessive peaks in the signals from
microphones and guitars.
AUX Sends and Stereo AUX Return.................................page 16
You can use the AUX SEND jack to feed the signal sent to an
external signal processor, and then return the processed stereo
signal through the RETURN jack.
High-quality digital effects (MG166CX)....................pages 15, 19
With digital effects built in, the MG166CX can deliver a wide range
of sound variations all by itself.
Caractéristiques
Canaux d’entrée.................................................................page 48
Avec 16 entrées micro/ligne (MG166CX/MG166C: 10) ou quatre
entrées stéréo maximum, la console de mixage MG peut connecter
simultanément une grande variété d’appareils : micros, appareils
de ligne, synthétiseurs stéréo, etc.
Compression......................................................................page 46
La compression augmente le niveau général sans engendrer de
distorsion en comprimant les pics excessifs des signaux des
micros et des guitares.
Envois AUX et retour AUX stéréo.....................................page 52
Vous pouvez utiliser la prise jack AUX SEND pour envoyer le signal
vers une unité de traitement de signaux externes, puis pour
renvoyer le signal stéréo traité via la prise jack RETURN.
Effets numériques de qualité supérieure (MG166CX)
...pages 51, 55
Grâce aux effets numériques intégrés, la console MG166CX peut
proposer de nombreuses variations de sons.
Funktionen
Eingangskanäle..................................................................Seite 30
Mit bis zu 16 Mikrofon-/Line-Eingängen (MG166CX/MG166C: 10)
oder bis zu vier Stereoeingängen können viele Geräte gleichzeitig
am MG-Mischpult angeschlossen werden: Mikrofone, Geräte mit
Leitungspegel, Stereo-Synthesizer uvm.
Kompression......................................................................Seite 28
Kompression erhöht den Durchschnittspegel, ohne Verzerrung
hinzuzufügen, indem übermäßige Pegelspitzen der Signale von
Mikrofonen oder Gitarren komprimiert werden.
AUX Sends und Stereo AUX Return.................................Seite 34
Von der AUX SEND-Buchse können Sie das Signal einzeln an
einen externen Signalprozessor führen, und das verarbeitete
Stereosignal über die RETURN-Buchse zurück in das Pult führen.
Hochwertige Digitaleffekte (MG166CX)....................Seiten 33, 37
Mit den eingebauten digitalen Effekten kann das MG166CX aus
sich heraus eine Reihe von Klangvariationen liefern.
Características
Canales de entrada.........................................................página 66
Con un máximo de 16 entradas de micrófono/línea
(MG166CX/MG166C: 10) o cuatro entradas estereofónicas, la
mezcladora MG puede conectarse simultáneamente con una gran
variedad de dispositivos: micrófonos, dispositivos de nivel de línea,
sintetizadores estereofónicos, etc.
Compresión.....................................................................página 64
La compresión aumenta el nivel general sin causar distorsión,
mediante la compresión del exceso de picos en las señales de los
micrófonos y guitarras.
Envíos AUX y retorno AUX estereofónico....................página 70
Puede utilizar la toma AUX SEND para introducir la señal enviada
en un procesador de señales externo y luego devolver la señal
estereofónica procesada a través de la toma RETURN (retorno).
Efectos digitales de alta calidad (MG166CX)........páginas 69, 73
Gracias a sus efectos digitales incorporados, la mezcladora
MG166CX puede producir por sí misma una amplia gama de
variaciones de sonido.
Owner’s Manual
Bedienungsanleitung
Mode d’emploi
Manual de instrucciones

Other manuals for Yamaha MG166C

Questions and Answers

Summary

Features

Input Channels

Connects microphones, line-level devices, and stereo synthesizers to the mixer.

Compression

Increases overall level by compressing signal peaks without distortion.

AUX Sends and Stereo AUX Return

Routes signals to external processors and returns processed stereo signals.

High-quality digital effects (MG166 CX)

Built-in digital effects for versatile sound variations on the MG166CX model.

Precautions

Warning Guidelines

Essential safety guidelines to prevent injury, damage, fire, or hazards from electrical shock.

Caution Guidelines

Basic precautions to prevent physical injury or damage to the device or property.

Connections

Device Connection Procedures

Steps for connecting the mixer to other devices, including power on/off sequence.

Handling Cautions

Safe Operation Practices

Advice on operating the mixer safely, including avoiding gaps and volume levels.

Introduction

Mixer Overview

Introduction to the MG206C/MG166CX/MG166C mixing console and its features.

Mixer Basics

Quick Guide

A quick step-by-step guide to getting sound to the speakers.

Making the Most of Your Mixer

Balanced vs. Unbalanced Lines

Explains the difference between balanced and unbalanced audio connections and their noise rejection properties.

EQ and Frequency

EQ Usage and Frequency Facts

Guidance on using equalization (EQ) effectively and understanding instrument frequency ranges.

Ambience and Modulation Effects

Reverb and Delay Effects

Using reverb and delay effects to add ambience and create grooves.

Reference

Setup

Guides through the initial setup and connection of the mixing console.

Front & Rear Panels

Channel Control Section Overview

Details the controls and functions of the monaural and stereo input channels.

Input Jacks and Controls

MIC and LINE Input Jacks

Describes the types and configurations of microphone and line input jacks.

Channel Bus Assignments

AUX, EFFECT, PAN, and ON Switches

Explains controls for sending signals to buses, panning, and channel activation.

Digital Effects

Effect Controls and Assignment

Details the FOOT SW, PROGRAM, PARAMETER, AUX, ON switches and assignment switches.

Master Control Section

Rear Panel Connections

Overview of rear panel connections for both MG206C and MG166CX/MG166C models.

Output and Control Jacks

SEND, GROUP, REC OUT, STEREO OUT Jacks

Describes various output jacks for sending signals to recorders, amplifiers, and other devices.

Master SEND and Monitor Controls

Master SEND Controls (AUX, EFFECT)

Adjusts signal levels sent to AUX and EFFECT buses.

Digital Effect Program List

Effect Programs and Parameters

Lists all 16 digital effect programs, their parameters, and descriptions.

Jack List

Input;Output Jack Configurations

Details polarity and connector configurations for various input and output jacks.

Troubleshooting

Power and Sound Issues

Solutions for common problems like no power, no sound, or distorted/noisy sound.

Effect and Monitoring Issues

Troubleshooting tips for effects not applying, clarity, and monitor signal output.

Electrical Specifications

Frequency Response, Distortion, and Noise

Technical specifications covering frequency response, THD+N, hum, and noise levels.

Input Specifications

MIC, LINE, and ST Input Details

Detailed input impedance, sensitivity, nominal level, and clipping for various input types.

Output Specifications

Output Levels and Connector Types

Specifications for output levels and connector configurations for various outputs.

Electrical Specifications (MG166 CX;MG166 C)

Frequency Response and Distortion (MG166 CX;MG166 C)

Technical specs for frequency response, THD+N, hum, and noise for MG166CX/MG166C.

Input Specifications (MG166 CX;MG166 C)

MIC, LINE, and ST Input Details (MG166 CX;MG166 C)

Input specs for MIC and LINE inputs on MG166CX/MG166C, including impedance and sensitivity.

Dimensional Diagrams

Mixer Dimensions

Provides detailed dimensional drawings of the MG206C/MG166CX/MG166C mixer.

Rack Mounting

Rack Space Requirements

Information on the 12U rack space required for mounting the MG mixer.

Block Diagram and Level Diagram (MG206 C)

Signal Flow and Level Considerations

Illustrates the signal path and relevant signal levels within the MG206C mixer.

Block Diagram and Level Diagram (MG166 CX;MG166 C)

Signal Flow and Level Considerations (MG166 CX;MG166 C)

Illustrates the signal path and relevant signal levels for the MG166CX/MG166C mixer.

Contact Information

Yamaha Representatives Worldwide

Lists contact details for Yamaha representatives and authorized distributors globally.

Overview

The Yamaha MG206C, MG166CX, and MG166C are mixing consoles designed for a wide range of usage environments. These mixers combine ease of operation with support for various applications, with the MG166CX model featuring high-quality built-in digital effects for enhanced sound variations.

Function Description

The MG mixers offer a comprehensive set of features for audio mixing and processing.

Input Channels: The MG206C provides up to 16 mic/line inputs and four stereo inputs, allowing for simultaneous connection of various devices such as microphones, line-level devices, and stereo synthesizers. The MG166CX and MG166C models offer 10 mic/line inputs and four stereo inputs. Each monaural input channel includes balanced XLR-type microphone input jacks (Pin 1: Ground; Pin 2: Hot; Pin 3: Cold) and balanced TRS phone-jack line inputs (Tip: Hot; Ring: Cold; Sleeve: Ground), which can also accommodate unbalanced phone plugs. Stereo channels feature unbalanced phone-jack stereo line inputs and unbalanced stereo RCA pin jacks. It's important to note that on channels with multiple input jack options, only one type of jack can be used at a time.

Insert Jacks: These TRS phone jacks (Tip = send/out; Ring = return/in; Sleeve = ground) allow for the insertion of external signal-processing devices between the equalizer and fader of the corresponding monaural input channel. This is ideal for connecting graphic equalizers, compressors, or noise filters. A special insert cable is required for this connection. The signal output from the INSERT jacks is reverse-phased, which is generally not an issue with effect units but should be considered for other devices to avoid phase conflict and potential sound degradation or cancellation.

Gain Control: The GAIN control adjusts the input signal level. For optimal signal-to-noise ratio and dynamic range, the gain should be set so that the PEAK indicator flashes only occasionally on the highest input transients. The adjustment range for MIC input is -60 to -16, and for LINE input, it's -34 to +10.

High-Pass Filter (HPF): The /80 switch toggles the HPF on or off. When activated, the HPF cuts frequencies below 80 Hz, helping to eliminate unwanted low-frequency noise. This filter does not apply to the line inputs of stereo input channels.

Compression (MG166CX/MG166C): The COMP control adjusts the amount of compression applied to the channel. Turning the knob to the right increases the compression ratio, while the output gain is automatically adjusted. This results in smoother, more even dynamics by attenuating louder signals and boosting the overall level. However, excessive compression should be avoided to prevent feedback.

Peak Indicator: The PEAK indicator lights red when the post-EQ signal level reaches 3 dB below clipping. For XLR-equipped stereo input channels, it detects both post-EQ and post-mic-amp peak levels.

Equalizer (HIGH, MID, LOW): This three-band equalizer adjusts the high, mid, and low frequency bands of the channel. Setting the knob to the center position provides a flat response. Turning the knob right boosts the band, while turning it left attenuates the band. Monaural channels have MID frequency controls to adjust the midrange frequency band, with a default of 2.5 kHz at the center position, adjustable from 250 Hz to 5 kHz.

AUX/EFFECT Control: These controls adjust the signal level sent to the AUX and EFFECT SEND jacks. The pre-fader send option is suitable for monitor systems, while the post-fader option is best for external signal processors. On the MG166CX, the Master SEND control (EFFECT) does not affect the level sent to the internal digital effect processor.

ON Switch: This switch turns the channel signal on or off, sending it to the faders and buses.

PFL (Pre-Fader Listen) Switch: This switch sends the channel's pre-fader signal to the PFL bus, allowing monitoring through headphones and the MONITOR OUT jacks.

Group Switches (1-2, 3-4): These switches assign the channel's signal to the GROUP 1/2 or GROUP 3/4 buses.

ST Switch: This switch assigns the channel's signal to the STEREO L/R bus.

Channel Fader: Adjusts the level of the channel signal. These faders should be set to minimum when not in use to reduce noise.

Digital Effects (MG166CX only): The MG166CX features 16 high-quality digital effects, including various reverbs, echoes, chorus, flanger, phaser, auto wah, and distortion.

  • FOOT SWITCH Jack: Allows connection of an optional Yamaha FC5 foot switch to toggle digital effects ON/OFF.
  • PROGRAM Dial: Selects one of the 16 internal effects.
  • PARAMETER Control: Adjusts specific parameters (depth, speed, etc.) for the selected effect. The last used value for each effect type is saved and restored when switching effects.
  • AUX Control: Adjusts the level of the signal sent from the internal digital effect unit to the AUX buses.
  • ON Switch: Activates or deactivates the internal effect. It lights orange when on.
  • PFL Switch: Sends the effect signal to the PFL bus for monitoring.
  • 1-2 / 3-4 / ST Switches: Assign the effect signal to the GROUP 1/2, GROUP 3/4, or STEREO L/R buses, respectively.
  • EFFECT RTN Fader: Adjusts the signal level sent from the internal digital effect unit to the STEREO bus.

Master Control Section:

  • SEND Jacks (AUX, EFFECT): TRS phone jacks output signals from the AUX/EFFECT buses.
  • GROUP OUT Jacks (1-4): TRS phone jacks output GROUP 1/2 and 3/4 signals, suitable for multi-track recorders or external mixers.
  • REC OUT (L, R) Jacks: RCA pin jacks for connecting to an external recorder, outputting the same signal as STEREO OUT. The STEREO OUT Master fader does not affect this output.
  • 2TR IN Jacks: RCA pin jacks for stereo sound sources like CD players. The 2TR IN switch directs the signal to MONITOR or STEREO L/R buses, and the 2TR IN control adjusts its level.
  • RETURN L (MONO), R Jacks: Unbalanced phone-jack type line inputs for external effect devices. Signals can be sent to STEREO L/R, AUX1, and AUX2 buses. If only the L (MONO) jack is used, the signal is recognized as monaural and sent to both L and R.
  • STEREO OUT (L, R) Jacks: XLR-type and TRS phone-type balanced output jacks for connecting to power amplifiers or recording devices.
  • MONITOR OUT Jacks: TRS phone-type output jacks for monitor speakers, outputting the same signal as the PHONES jack.
  • PHONES Jack: TRS phone-type output jack for headphones, mirroring the MONITOR OUT signal.
  • PHANTOM +48 V Switch: Supplies +48V phantom power to all XLR mic input jacks for condenser microphones.
  • POWER Indicator: Lights when the mixer is ON.
  • Level Meter: LED meter displaying signal levels, with "0" corresponding to nominal output and PEAK indicating clipping.
  • RETURN Controls (AUX1, AUX2, STEREO): Adjusts the level of signals received at the RETURN jacks to the AUX1, AUX2, and STEREO L/R buses.
  • MONITOR/PHONES Controls: Selects the signal source (STEREO L/R, GROUP 1/2, or GROUP 3/4) for the MONITOR OUT and PHONES jacks, and adjusts their output level.
  • GROUP 1-2 / 3-4 Faders: Adjusts the signal level sent to the GROUP OUT 1/2 and 3/4 jacks.
  • ST Switch: Sends GROUP 1/2 or 3/4 signals to the STEREO L/R bus.
  • STEREO OUT Master Fader: Adjusts the signal level sent to the STEREO OUT jacks.

Usage Features

Getting Sound to the Speakers:

  1. Ensure the mixer's power switch is in the STANDBY position and all level controls (STEREO OUT Master fader, Channel faders, GAIN controls) are turned all the way down. Equalizer and PAN/BAL controls should be at their center positions.
  2. Turn off all other external devices before connecting microphones, instruments, and speakers. Electric guitars and basses should be connected via an intermediary device (direct box, preamp, or amp simulator) to avoid degraded sound and noise.
  3. To prevent speaker damage, power up devices in the following order: Peripheral devices → MG mixer → power amps (or powered speakers). Reverse this order when powering off. If using condenser microphones, turn on the MG mixer's phantom power switch before powering on power amps.
  4. Adjust channel GAIN controls so that PEAK indicators flash briefly on the highest peak levels. For accurate level meter readings, turn on the channel PFL switch and adjust GAIN so the meter occasionally rises above "0." PFL outputs pre-fader signals to headphones.
  5. Turn on the ON and ST switches for each channel in use.
  6. Set the STEREO OUT Master fader to the "0" position.
  7. Set Channel faders for initial balance, then adjust overall volume with the STEREO OUT Master fader. To view STEREO L/R bus levels on the meter, turn off PFL and set MONITOR switch to STEREO. Lower Channel faders if PEAK indicators frequently light to avoid distortion.

Making the Most of Your Mixer:

  • Balanced vs. Unbalanced Lines: Balanced lines are superior for noise rejection, especially over long cable runs, due to their ability to cancel electromagnetic noise. Unbalanced lines are acceptable for short runs in noise-free environments. Microphone cables almost always use balanced lines because microphone output signals are very small and susceptible to noise.
  • Signal Levels and the Decibel (dB): The decibel is a logarithmic unit for sound measurement. "0 dBu" equals 0.775 volts. Mixers handle a wide range of signal levels, requiring careful matching of input and output levels. Nominal levels are typically +4 dBu for professional gear and -7.8 dBu (-10 dBV) for home-use audio gear. Microphone levels vary widely.
  • To EQ or Not to EQ: "Less is better" for EQ. Use boost sparingly and with caution. Proper EQ can eliminate interference and improve sound definition. Bad EQ, especially excessive boost, can sound terrible.
    • Cut for a Cleaner Mix: Cutting low frequencies on cymbals or pianos can create more "spacious" mixes and better definition for other instruments. Cutting high frequencies on kick drums and bass guitars can create space without compromising character. Use your ears to determine appropriate cuts.
    • Boost with Caution: Boost only in small increments for good mixes. A tiny midrange boost can add vocal presence, and a touch of high boost can add "air." If the mix isn't clear, try cutting frequencies that clutter it rather than boosting. Excessive boost adds gain, increasing noise and potential overloading.
  • Ambience Effects (MG166CX): Reverb and delay can refine mixes.
    • Reverb and Delay Time: Optimum reverb time depends on music tempo and density; longer for ballads, shorter for up-tempo. Delay times can create "grooves," e.g., dotted eighth notes for vocals.
    • Reverb Tone: Different reverb programs have varying "reverb tone." Avoid excessive high-frequency reverb that sounds unnatural or interferes with other mix parts. Choose a program that provides depth without sacrificing clarity.
    • Reverb Level: Start with reverb level all the way down and gradually increase until you just hear the difference. More than this usually becomes a "special effect."
  • Modulation Effects (MG166CX): Phasing, Chorus, and Flanging work by "time-shifting" a portion of the audio signal and mixing it back with the direct signal, controlled by an LFO.
    • Phasing: Small time shifts cause phase differences, leading to cancellation and reinforcement at certain frequencies, creating a shimmering sound.
    • Chorus and Flanging: Signals are delayed by milliseconds, with delay time modulated by an LFO. This creates a harmonically rich swirling or swishing sound. Flanging uses longer delay times and feedback than chorus, which uses a more complex delay structure. Chorus thickens sound, while flanging creates "other-worldly" effects.
  • Compression: Limiting can produce a smooth, unified sound without excessive peaks or distortion. It's useful for "taming" vocals with wide dynamic range or for bass guitar. Too much compression can cause feedback. The MG compressor simplifies this by automatically adjusting parameters with a single control.

Maintenance Features

General Handling:

  • Always turn off the power for all devices and set all volume levels to minimum before connecting or disconnecting devices.
  • When powering on an audio system, turn on the power amplifier LAST to avoid speaker damage. When powering off, turn off the power amplifier FIRST.
  • Avoid inserting fingers or foreign objects into device gaps or openings. If this happens, immediately turn off power, unplug the cord, and have the device inspected by qualified Yamaha service personnel.
  • Avoid prolonged use at high or uncomfortable volume levels, as this can cause permanent hearing loss. Consult a physician if you experience hearing loss or ringing in the ears.
  • Do not rest weight on the device or place heavy objects on it. Avoid excessive force on buttons, switches, or connectors.

Power Supply/Power Cord:

  • Use only the specified voltage and the included power adaptor (PA-30 or Yamaha-recommended equivalent).
  • Keep the power cord away from heat sources, and avoid bending, damaging, or placing heavy objects on it.
  • Unplug the electric plug from the outlet when the device is not in use for extended periods or during electrical storms.
  • Always hold the plug itself, not the cord, when removing it from the device or outlet.
  • Maintain at least 50 cm distance between the AC power adaptor and the device to avoid unwanted noise.
  • Do not cover or wrap the AC power adaptor with cloth or blanket.

Location:

  • Remove all connected cables before moving the device.
  • Ensure the AC outlet is easily accessible. In case of trouble, immediately turn off the power switch and unplug the device. Unplug the power cord from the wall outlet if not using the product for a long time, as trace current still flows even in STANDBY.
  • If rack-mounting, leave the back of the rack open and ensure at least 10 cm clearance from walls. If mounted with heat-generating devices like power amplifiers, maintain adequate gaps or install ventilation panels to prevent overheating, which can cause damage or fire.
  • Avoid setting equalizer controls and faders to maximum, as this can cause feedback and speaker damage.
  • Protect the device from excessive dust, vibrations, extreme cold or heat (direct sunlight, near heaters, in a car) to prevent panel disfiguration or internal component damage.
  • Do not place the device in an unstable position where it might fall.
  • Do not block ventilation holes (bottom/rear) to prevent overheating. Do not place the device on its side or upside down.
  • Avoid using the device near TVs, radios, stereo equipment, mobile phones, or other electric devices, as this may cause noise in both the mixer and adjacent devices.

Troubleshooting:

  • No Power: Check if the power adaptor is properly plugged into the AC wall outlet and the mixer.
  • No Sound: Verify correct connections for microphones, external devices, and speakers. Ensure ON and ST switches are ON for active channels. Check GAIN controls, Channel faders, STEREO OUT Master fader, and GROUP fader levels. Confirm MONITOR and 2TR IN switch settings. Check speaker cables for proper connection or shorts. If issues persist, contact Yamaha service.
  • Faint, Distorted, or Noisy Sound: Check GAIN controls, Channel faders, STEREO OUT Master fader, and GROUP fader levels. Ensure only one type of jack (XLR or phone, phone or RCA) is used per channel. Verify input signal levels from connected devices. Check if effects are applied appropriately. Ensure microphones are connected to MIC input jacks and PHANTOM +48 V switch is ON for condenser microphones.
  • No Effect Applied (MG166CX): Check that the EFFECT control on each channel is correctly adjusted. Ensure the internal effect unit's ON switch is ON. Verify that the EFFECT PARAMETER control and EFFECT RTN fader are correctly adjusted.
  • Spoken Words Unclear: Ensure /80 switches are ON. Adjust equalizers (HIGH, MID, LOW) on each channel.
  • Monitor Signal Output to Speakers: Connect a powered speaker to AUX 1, 2, or 3 jack (MG206C) or AUX1 or 2 jack (MG166CX/MG166C). Turn PRE switch ON for each channel. Adjust output signal using AUX controls and Master SEND control.
  • Level Meter Not Showing Output: Check if PFL switches for unused channels are ON.

Component Deterioration: The performance of components with moving contacts (switches, volume controls, connectors) can deteriorate over time. Consult qualified Yamaha service personnel for replacing defective components.

Heat Generation: The MG mixer may heat up by as much as 15 to 20°C while powered on, which is normal. Panel temperature may exceed 50°C in ambient temperatures higher than 30°C, so use caution to prevent burns.

Yamaha MG166C Specifications

General IconGeneral
Channels16
Mic Inputs10
Stereo Line Inputs4
Buses4
Phantom Power+48V
Sub Groups4
EQ Bands3-band
EffectsNo internal effects
Frequency Response20 Hz - 20 kHz
Power SupplyAC 100V-240V, 50/60 Hz

Related product manuals