Do you have a question about the Yamaha MR1242 and is the answer not in the manual?
Keep the unit away from high temperatures, humidity, dust, and vibration to prevent damage.
Handle the unit with care to avoid damage from strong physical shocks.
Do not open the case; refer repairs to qualified personnel to preserve warranty.
Always turn power OFF before connecting or disconnecting cables to prevent equipment damage.
Grip cables by the connector, not the cord, when plugging or unplugging.
Clean the unit with a soft, dry cloth; avoid solvents like benzine or thinner.
Ensure the power supply voltage matches your local AC mains supply.
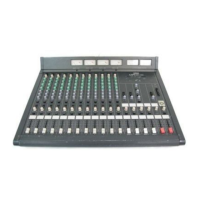
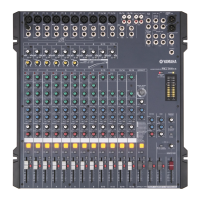
Detailed explanation of controls and indicators on the input channels of the mixer.
Selects between rear-panel LO-Z/HI-Z inputs or the TAPE input jack for signal reception.
Attenuates the input signal by 20 dB to prevent overloading and increase input range.
Adjusts the input sensitivity of each channel for optimal level matching.
Lights when the post-EQ signal is 3 dB below the clipping level.
Controls HIGH, MID, and LOW frequencies for tonal adjustment with a sweepable mid.
Determine signal levels sent to AUX 1 and AUX 2 mixing busses for effects or monitoring.
Manages AUX 3 signal path, allowing for separate tape monitor mix creation.
Assigns channel signals to group busses 1-2 or 3-4 and pans between them.
Pans the channel signal between corresponding group busses or the stereo buss.
Allows independent monitoring of selected channels via the console's monitor system.
Designated areas above faders for easy channel labeling and identification.
Main level control for each input channel, affecting signal sent to group busses.
Adjusts overall AUX send levels and allows monitoring via CUE switches.
Assigns AUX return signals to group or stereo busses.
Pans the signal from each group across the master stereo buss.
Allows independent monitoring of selected group signals.
Adjusts the overall level of group mix signals sent to outputs and the stereo buss.
Selects and controls monitor output sources like CUE, AUX 3, and stereo buss.
Adjusts cue signal level and indicates when cue switches are active.
Delivers the selected monitor signal to headphones for monitoring.
Includes talkback microphone connector, level control, ON switch, and assignment switches.
Independently adjust the level of left and right stereo buss signals to outputs.
Six meters display signal levels on groups, AUX, and stereo busses with PEAK LEDs.
General layout of connectors and controls found on the rear panel of the console.
Turns the console power ON and OFF; VU meter illumination indicates status.
Details the LO-Z XLR and HI-Z 1/4" phone jack inputs for connecting various audio sources.
TAPE input for line-level sources; INSERT jack for external signal processing.
+4 dB jacks for AUX mixes and stereo returns, used for effects and signal routing.
Jacks for group processing, cascading consoles, and main group outputs.
Direct inputs to stereo busses and main stereo outputs for stereo signal flow.
Activates +48V phantom power to LO-Z/HI-Z inputs for condenser microphones.
Shows input channels routed via group busses to the stereo buss.
Illustrates signal flow for AUX sends 1, 2, and 3, noting signal derivation points.
Depicts the routing of AUX return signals to group and stereo busses.
Shows the signal flow for cue and monitor signals, including AUX 3 buss usage.
Guidance on connecting microphones and instruments using LO-Z and HI-Z inputs.
Advice on connecting console outputs to amplifiers, recorders, and other gear.
Step-by-step guide to setting input sensitivity using PAD and GAIN controls for optimal levels.
Tips on applying the 3-band EQ for tonal shaping and sound enhancement.
Illustrates a typical multitrack recording setup using the MR-series console.
Demonstrates a live sound setup using the MR-series console for PA systems.
Specifies the total harmonic distortion level for the console's output.
Details the frequency range and deviation of the console's audio output.
Quantifies the residual output noise and equivalent input noise levels.
Lists the maximum voltage gain values for various input and output paths.
Specifies the crosstalk levels between adjacent channels and input/output paths.
Defines the operational range of the input channel gain control.
Details the 0/20 dB attenuation provided by the input channel pad switch.
Lists the frequency bands and types (shelving/peaking) for the 3-band EQ.
Describes the six VU meters, their calibration, and PEAK LED indicators.
Explains that CLIP LEDs light up when post-EQ signal is 3dB below clipping.
Details when the peak indicator LEDs on the VU meters turn on.
States that +48 V DC phantom power is applied to balanced inputs.
Matches local AC mains voltage and frequency in the area of sale.
Lists the power consumption in Watts for each MR model.
Provides the physical dimensions (Width x Height x Depth) for each MR model.
Lists the net weight in kilograms and pounds for each MR model.
Table detailing input terminals, impedance, sensitivity, levels, and connector types.
Table detailing output terminals, impedance, levels, and connector types.
Explanations for internal jumpers affecting AUX and Group CUE settings.
| Channels | 12 |
|---|---|
| Type | Analog |
| Inputs - Mic Preamps | 4 x XLR |
| Inputs - Other | 2 |
| Outputs - Main | 2 (Stereo) |
| EQ Bands | 3-band |
| Phantom Power | Yes |
| Microphone Inputs | 4 |
| Outputs | Main |