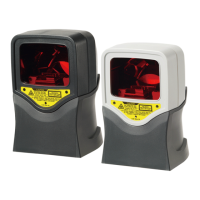
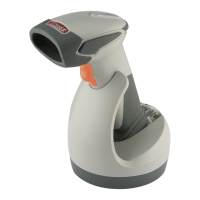
The Dual-Laser Omnidirectional Vertical Scanner is an advanced presentation scanner designed for efficient and hands-free barcode scanning in various applications. It incorporates dual laser diodes to enhance scanning power, broaden the scan angle, and intensify the scan pattern across the scan field. This state-of-the-art technology allows it to deliver a comprehensive 32-line scan pattern, cycling at 2400 scans per second. The scanner is also equipped with Z-SCAN technology, an innovative ASIC hardware decode protocol that provides real-time decoding, effectively shortening customer transaction time.
Function Description:
The primary function of this device is to read barcodes quickly and accurately. Its omnidirectional scan field facilitates hands-free scanning of barcodes on products of many different shapes, making it suitable for high-throughput environments like point-of-sale (POS) systems. The scanner can operate in either sweep or presentation mode. In sweep mode, items are moved through the scan volume (left to right, right to left, top to bottom, bottom to top, etc.), which is ideal for reducing product handling. In presentation mode, the product is moved toward the scan window until the barcode is read, suitable for situations where counter-top space is at a premium.
The scanner is programmable, allowing users to customize various parameters to suit specific needs. This includes setting the communication interface type (RS-232, Keyboard, USB), adjusting beep tones, configuring sleep mode timings, setting same-code delay times, and enabling/disabling the decoding of numerous code types. More advanced settings, such as headers and trailers, can also be configured. The device can be controlled from a POS system via the RS-232C interface using single-byte commands for functions like enabling/disabling the scanner, power-up re-initialization, and entering/exiting sleep mode. It also supports connection to an Electronic Article Surveillance (EAS) system for deactivation purposes.
Usage Features:
The scanner is designed for ease of use and integration into existing systems. It powers on automatically when connected to a power source and turns off when power is removed, as there is no dedicated on/off switch. An LED indicator provides visual feedback on the scanner's operating status:
- Off: No power supplied.
- Steady blue light: Scanner is on and ready to scan.
- One red flash: A barcode has been successfully decoded.
- Steady red light: A barcode has been successfully decoded, but the object has not been removed from the scan window.
- Flashing blue light: Scanner is in sleep mode.
- Steady red/blue light: Indicates a motor or laser failure, prompting a periodic beep and requiring repair.
- Alternate flashing red and blue light: Detects failing power, suggesting a check of the power supply.
Audible feedback is provided through beeps:
- One beep: Barcode successfully decoded.
- Four beeps in series: Scanner passed power-on self-test and is operating properly.
- Two beeps (low-high): Scanner entered programming mode.
- Two beeps (same tone): Scanner returned from programming to normal mode.
- Continuous tone: Failure indication, requiring repair.
The beep volume can be adjusted by pressing and holding the push button for about 5 seconds, cycling through loud, medium, and low levels. This setting is saved in volatile memory and will reset on power-down unless permanently configured using the Programming Guide.
The scanner features a sleep mode to conserve energy. After a period of inactivity, the laser automatically turns off, followed by the motor, and the scanner enters sleep mode, indicated by a blinking blue status LED. It can be woken up by presenting an object close to the scan window or by pressing the push button. A motion sensor detects activity up to about 50mm (2 inches) from the scan window, depending on ambient light.
Mounting options include using the included mounting plate or a custom bracket for back mounting. The mounting holes on the back are threaded for M4 x 0.7 machine screws to a depth of 5.0 mm. When mounting, it's important to ensure the scanner is installed away from direct sunlight, as high levels of ambient light can reduce its effectiveness. The interface cable supports both direct power from the host machine and external power via the supplied AC adapter, with the recommendation to use the adapter if the POS system's power supply is not sufficiently robust.
Maintenance Features:
The scanner is designed for long-term, trouble-free operation with minimal maintenance. The primary maintenance task is occasional cleaning of the scan window to remove dirt and fingerprints. This should be done with a soft, lint-free cloth and a non-abrasive cleaner to prevent scratching. The scan window can be cleaned while the scanner is running.
The standard interface cable is designed to be field replaceable. To replace the cable:
- Ensure the computer system's power is off, and disconnect the power adapter if used.
- Disconnect the old scanner cable from the computer system.
- Remove the screws holding the mounting plate and disengage it.
- Press the small tab on the connector where the old cable is attached and pull to remove it.
- Insert the new connecting cable into the slot in the mounting plate.
- Insert the 8-pin modular plug of the power link cable into the “host” connector on the back of the scanner until it clicks.
- Mate the scanner and the mounting plate, ensuring the tab on the underside engages and no cables are pinched.
- Replace the mounting plate screws.
- Plug the new cable into the host.
- If a power adapter is used, plug it into the jack on the interface cable.
In case of troubleshooting, the manual provides diagnostic tips for common issues such as the scanner being on but not reading barcodes (e.g., dirty window, disabled barcode type, host disabled scanner), the motor not rotating (sleep mode, scanning safeguard circuit failure), or barcodes being read but not accepted by the POS system (e.g., incorrect communication cable/settings, unsupported data format). For motor or laser failures, the unit should be returned for repair.