The Zodiac Vortex-Pro Robotic Pool Cleaner is an advanced device designed to automate the cleaning of swimming pools. This owner's manual provides comprehensive instructions for its assembly, operation, programming, and maintenance, ensuring optimal performance and longevity of the cleaner.
Function Description
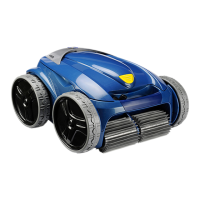
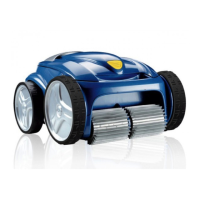
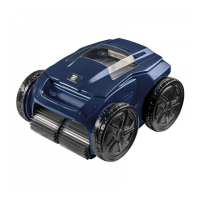
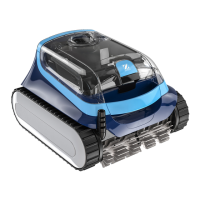
The Vortex-Pro Robotic Pool Cleaner is a double-insulated electrical appliance that operates independently to clean pool floors, walls, and waterlines. It is equipped with a powerful suction system and brushes that work together to remove debris, dirt, and microscopic algae from the pool surface. The cleaner is designed for use in permanently-installed pools and is not suitable for storable pools.
The cleaner features variable programming for cleaning cycles, allowing users to customize the cleaning duration and areas to be cleaned. It can be programmed to run daily for up to seven days, making it ideal for maintaining pool cleanliness even when away on holidays. A safety feature automatically stops the cleaner if it is powered on but not submerged in water, and for pools with a beach area, it is programmed to drive back into the pool if the impeller is out of the water.
The control box serves as the central interface for operating and programming the cleaner. It displays the current day and time, allows for programming cleaning cycles, and shows the remaining time for a selected cycle. The cleaner also includes a "Lift System" for easy removal from the pool, guiding the cleaner to the edge and up to the waterline.
Usage Features
- Submerging the Cleaner: To begin operation, the cleaner must be submerged vertically in the pool to release any trapped air. The floating cable should be spread out over the pool without kinks or coils, with enough length to reach the farthest point in the pool. The control box should be placed at least 3.5 meters from the edge of the pool and connected to an RCD-protected power outlet.
- Starting a Cleaning Cycle: Users can select the cleaning surface (Floor Only, Floor and Walls, or Waterline only for VX55 4WD) and, for the VX55 4WD model, choose the pool shape (Rectangular or Freeform) and cleaning intensity (Intensive or High Intensity). Once settings are chosen, pressing the "START/STOP" button initiates the cleaning cycle. The display shows the remaining cleaning time.
- Stopping and Removing from the Pool: The cleaner can be stopped at any time or at the end of a cycle using the "Lift System" button on the control box. This system guides the cleaner to the pool edge and up to the waterline for easy retrieval. The cleaner should always be removed by its handle, never by the floating cable, as it becomes heavier when filled with water.
- Remote Control Operation (VX55 4WD only): The VX55 4WD model includes a handheld remote control for piloting the cleaner. The remote control is factory-synchronized with the control box and allows directional movement of the cleaner in the water.
- Programming Cleaning Cycles: The control box allows programming of up to seven cleaning cycles. Users can set the desired cleaning surface, intensity, and duration for each day of the week. The control box displays the current day and time, which can be adjusted. Default cleaning times for Floor Only (1 hour 30 minutes) and Floor and Walls (2 hours 30 minutes) can be modified in 30-minute increments. Waterline cleaning time is variable.
- Canceling Cleaning Cycles: Individual programmed cycles or all programs can be canceled through the control box interface.
Maintenance Features
- Cleaning the Filter Canister: The filter canister should be cleaned after each use to maintain optimal performance. This involves pushing a quick-release button, opening the filter assembly, separating the canister from its support, and rinsing all components with water or a hose to remove debris.
- Cord Tangling Prevention: To prevent cord tangling, especially during automatic timer cycles, the floating cable should be spread out over the pool without kinks or coils. It is recommended to place only enough cable in the water to reach the farthest point of the pool.
- Replacing Brushes: The cleaner is fitted with PVC brushes that have "wear" indicators. Brushes should be replaced when a wear indicator is reached or every two years, whichever comes first, to ensure effective cleaning. The process involves lifting the cleaner to a vertical position, separating the brush edges, undoing tabs, removing worn brushes, and then installing new brush mats by threading tabs through slots and cutting them at the guides.
- Replacing Tyres: The tyres should be replaced when worn. This involves pulling the old tyre's lip from the wheel, removing the tyre, and then positioning the new tyre on the wheel, ensuring the word "INSIDE" faces the cleaner's body. One side of the tyre is pushed onto the wheel, fitting the rib into the groove, and then the rest of the tyre is worked onto the wheel.
- Troubleshooting: The manual provides detailed troubleshooting guides for various issues. For the VX40 cleaner, an information LED flashes in specific sequences to indicate malfunctions. For VX45 4WD, VX50 4WD, and VX55 4WD models, a status screen displays error codes and operating hours for more detailed diagnostics. Common problems like the cleaner not submerging, not climbing walls, or cable tangling are addressed with solutions.
- Storing the Cleaner: After each cycle, the cleaner should be removed from the pool, cleaned with slightly soapy water, rinsed, and stored out of direct sunlight or inclement weather. For VX50 4WD and VX55 4WD models, it is recommended to store the cleaner on its caddy for drying. The floating cable should be disconnected from the control box, protective cap replaced, and any coils or tangles removed before coiling it loosely for storage.