Page | 2
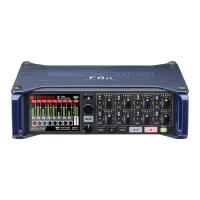
9. Slate Tone Key – press once to play slate tone for 1 second, press and hold to play slate tone until
disabled. Slate tone is useful when monitoring audio and it gives a fixed sound.
10. LED level meter – shows the audio metering above each live channel
11. Status Indicator – shows if the channel is in normal track select mode (red) or PFL mode (orange). If
in PFL mode, the status lights of all other tracks will shut off.
12. PFL (Pre-fade Listen) - Next to each input select buttons are a smaller PFL button, which stands
for pre-fade-listen. Pressing one of these gives you the input sound for that particular channel.
This is useful, for example, if you are listening to a mix of various inputs and your boom op
signals that they want to hear only their audio. The red channel light turns amber when the PFL
buttons are pressed.
13. Track knob – turning the dials under each track increases (Turned to right) or decreases (turned to
left) the recording volume of the track.
14. MENU - accesses menu options
15. Headphone volume – turning the dial increases (Turned to right) or decreases (turned to left) the
headphone volume.
Note: this does not change the recording volume of the track(s) used.
16. |◀◀ - If on home screen goes back through files.
17. Stop – When recording press stop to stop the recording and save as a new file. During playback
press Stop to end playback early.
18. ▶▶| - If on home screen goes forward through files.
19. Play/pause – When recording pauses the current recording and places a mark on the clip. This does
not stop the recording and therefore does not create a new file. This can trap people in having a
massive file instead of multiple for each recording. During playback press to play or pause the
current audio file.
20. Record – press to record. Light is solid red when recording.
21. Power button – Turns on/off the Zoom, this function is disabled while recording.
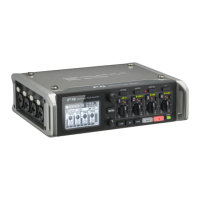
1. Sub out – send an output to a subwoofer
2. USB – The zoom can connect to a computer for data transfer via USB. The USB is not able to power
the zoom like in other recorders. USB options can be set in the menu.
3. RTN Input 5/6 – Input from a DSLR or equivalent.
4. Headphone Jack - needs ¼ inch adapter for regular headphones.
5. Main out 1 and 2 – the main line outputs. Can output to a more detailed mixer system or monitor.
6. DC in - Cable should be provided for V-Lok power or USB hub power. Note: do not use the zoom
without external power, the batteries inside the zoom are for the internal clock and timecode.