Do you have a question about the Zoom F8n and is the answer not in the manual?
Explains symbols indicating danger, warnings, and mandatory actions.
Covers safe use of AC adapters, batteries, and mic handling.
Addresses operating environment, cleaning, interference, and breakdown.
Details the main functionalities and specifications of the F8n.
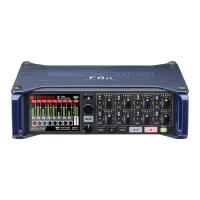
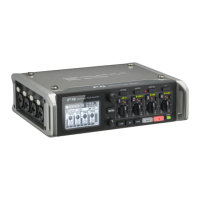
Identifies buttons, knobs, and displays on the front of the device.
Details the rear panel connectors and their functions.
Describes the ports on the left and right sides of the recorder.
Explains the pinouts for XLR, TRS, and TA-3 connectors.
Instructions for connecting dynamic and condenser microphones via XLR.
Guidance for connecting keyboards and mixers via TRS.
Procedure for attaching and detaching ZOOM mic capsules.
Illustrates setups for filming and concert recording.
Explains the elements displayed on the main Home Screen.
Details the representation and function of level meters on the display.
Instructions for installing batteries and connecting power sources.
Steps for inserting and ejecting SD cards for recording.
Procedures for powering the unit on and off.
How to configure the device's date, time, and date format.
Steps to prevent the device from turning off automatically.
Configuring the device to recognize the power supply type.
Independent configuration of file formats for SD card slots.
Choosing inputs and creating stereo pairs for recording.
Fine-tuning input signals for optimal recording levels.
Steps for starting, pausing, and stopping recordings.
Configuring the audio sampling rate for recordings.
Defining the bit depth for WAV audio files.
Adjusting the bit rate for MP3 audio files.
Capturing audio at different levels simultaneously for backup.
Capturing audio before pressing the record button.
Setting the limit for individual recording files.
Managing how total recording time is displayed.
Understanding how recordings are organized on SD cards.
Shortcut for marking and moving failed recordings.
Adding descriptive notes as metadata to recordings.
Configuring how scenes are named automatically or manually.
Customizing scene names using user input or dates.
Defining conditions for resetting take numbers.
Customizing the naming convention for recorded takes.
Assigning custom names to individual tracks.
Manually adjusting the number for the next recorded take.
Basic steps for playback and navigation.
Adjusting volume and panning during playback.
Using SOLO mode to listen to individual tracks.
Setting playback to play one, all, repeat one, or repeat all.
Navigating and viewing files, folders, and takes.
Procedures for creating new folders and renaming them.
Choosing folders for playback or recording destination.
Viewing and jumping to marks within takes for playback.
Transferring takes to other cards or folders.
Removing unwanted data from the SD card.
Clearing deleted files and false takes.
Explains WAV and MP3 metadata formats.
Modifying notes, scene names, take names, and track names.
Generating CSV reports of recording data.
Diagram illustrating signal paths through the device.
Balancing volumes for monitoring input signals.
Assigning functions to track knobs for trim, fader, or pan.
Controlling the volume of the stereo mix tracks.
Previewing input signals for specific tracks.
Selecting Mic, Line, or USB as the input signal source.
Adjusting monitoring volume on the PFL screen.
Using the high-pass filter to reduce unwanted noise.
Setting parameters to prevent input signal distortion.
Flipping the phase of input signals to correct mic positioning issues.
Enabling and setting voltage for condenser microphones.
Providing power for compatible microphones via MIC/LINE jack.
Correcting timing differences in input signals.
Converting mid-side mic input to stereo signal.
Controlling stereo width for mid-side microphones.
Automatically attenuating inactive mic inputs.
Converting ambisonic A-format to B-format signals.
Configuring mic orientation for ambisonic recording.
Setting signal types sent to the headphone output.
Adjusting volume for device alerts via headphones.
Customizing how the headphone volume knob behaves.
Enhancing headphone output to reduce interference.
Turning off unused outputs to save power.
Configuring default output levels for main and sub outputs.
Directly adjusting MAIN OUT and SUB OUT levels.
Correcting timing differences for external devices.
Protecting connected devices with an output limiter.
Selecting prefader or postfader signals for main outputs.
Selecting prefader or postfader signals for sub outputs.
Explains the purpose and use of timecode for synchronization.
Configuring timecode modes, output, and synchronization.
Configuring how timecode is set at startup.
Calibrating timecode precision after power cycles.
Introduction to built-in mic and tone for comments and synchronization.
Instructions for using the built-in mic for notes.
Procedures for generating slate tones for synchronization.
Connecting the F8n as an SD card reader.
Connecting the F8n to computers/iOS devices as an audio interface.
Using computer for recording backup alongside SD cards.
Illustrates signal flow for stereo mix and multi-track modes.
Configuring loopback and mixing inputs for audio interface use.
Steps to connect the FRC-8 to the F8n.
Configuring the FRC-8 for different keyboard languages.
Defining how faders and knobs operate relative to parameter values.
Customizing the FRC-8's user keys with specific functions.
Configuring power settings for the FRC-8.
Supplying power to the FRC-8 from the F8n.
Adjusting the brightness of the FRC-8's LEDs.
Procedures for checking and updating the FRC-8 firmware.
Adjusting the size of the timecode display on the Home Screen.
Customizing how level meters are displayed.
Adjusting the brightness of the front panel LEDs.
Configuring display brightness and backlight settings.
Setting how marks are added when pausing recordings/playback.
Viewing SD card size and free space.
Performing quick or full tests on SD cards.
Preparing SD cards for use with the F8n.
Accessing a list of available shortcut functions.
Saving and restoring device settings.
Resetting the device to factory default configurations.
Viewing the current firmware version of the F8n.
Instructions for updating the F8n's firmware.
Solutions for common operational problems and errors.
Technical diagrams illustrating internal signal flow and connections.
Comprehensive list of metadata tags and their explanations.
Quick reference for operational shortcuts.
Technical details and performance metrics of the F8n.
| Product color | Black, Blue |
|---|---|
| XLR in | Yes |
| Interface | XLR/TRS |
| Headphone outputs | 1 |
| USB 2.0 ports quantity | USB 2.0 ports have a data transmission speed of 480 Mbps, and are backwards compatible with USB 1.1 ports. You can connect all kinds of peripheral devices to them. |
| Microphone input impedance | 2000 Ω |
| Sample rate | 192 kHz |
| Audio quality | 24 bit |
| Frequency range | 10 - 80000 Hz |
| Weight | 1000 g |
|---|---|
| Dimensions (WxDxH) | 178.2 x 140.3 x 54.3 mm |