EasyManua.ls Logo

3M Versaflo TR-300+ - User Manual

3M Versaflo TR-300+
2 pages
Print Icon
To Next Page IconTo Next Page
Loading...
Below is a summary of steps to follow each time a 3M™ Versaflo™ TR-300+ Powered Air Purifying Respirator (PAPR) is worn.
1. Push button to confirm
battery charge – 5 bars = 80-
100%.
2. Confirm battery pack is
secure-tug battery pack to con-
firm.
3. Confirm colored NIOSH filter is
visible in window. Turn on PAPR –
push blue button.
4. Confirm battery status, filter,
and airflow lights are “green”.
5. Confirm airflow is sufficient.
Bottom of ball at or above
minimum flow mark specified for
environment.
6. Align pins and insert breathing
tube into PAPR air outlet, turn
connector 1/4 turn clockwise.
Confirm connection by tugging
lightly on connection next to
outlet.
7. Inspect hood for tears, holes.
Connect breathing tube and hood/
headcover.
8. Don PAPR per workplace
procedures.
WARNING
!
This product is part of a system that helps reduce exposures to certain airborne contaminants. Before use, the wearer must read
and understand the User Instructions. Follow all local regulations. In the U.S., a written respiratory protection program must be
implemented meeting all the requirements of 29CFR1910.134, including training, fit testing and medical evaluation. In Canada,
CSA standard Z94.4 requirements must be met and/or requirements of the applicable jurisdiction, as appropriate. Misuse may
result in injury, sickness or death. For correct use, consult supervisor and User Instructions, or call 3M Technical Service in USA
at 1-800-243-4630 and in Canada at 1-800-267-4414.
Quick Start Guide: TR-300+
NOTE: This sheet supplements, but does not replace, User Instructions. Always read and follow User Instructions.

Other manuals for 3M Versaflo TR-300+

Question and Answer IconNeed help?

Do you have a question about the 3M Versaflo TR-300+ and is the answer not in the manual?

Summary

3 M Versaflo TR-300+ Quick Start Guide

Important Safety Warning

Critical safety information regarding system use, regulations, and potential misuse.

PAPR Preparation and Usage Steps

Summary of steps for preparing, operating, and wearing the PAPR system.

Summary

3 M Versaflo TR-300+ Quick Start Guide

Important Safety Warning

Critical safety information regarding system use, regulations, and potential misuse.

PAPR Preparation and Usage Steps

Summary of steps for preparing, operating, and wearing the PAPR system.

Overview

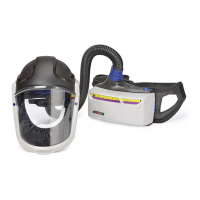
The 3M™ Versaflo™ TR-300+ Powered Air Purifying Respirator (PAPR) is a personal protective device designed to reduce exposure to airborne contaminants in various work environments. It operates as a system, providing filtered air to the wearer, thereby enhancing respiratory protection. The device is intended for occupational use and requires adherence to specific user instructions and local regulations, including established respiratory protection programs in the U.S. (29CFR1910.134) and Canada (CSA standard Z94.4). Misuse of the PAPR system can lead to injury, sickness, or even death, emphasizing the importance of proper training, fit testing, and medical evaluation before use.

Function Description

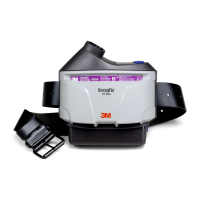
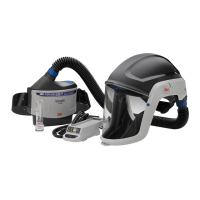
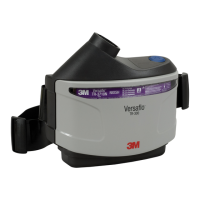
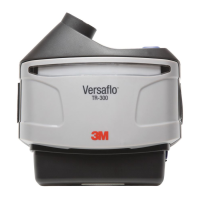
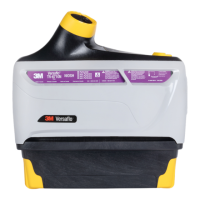
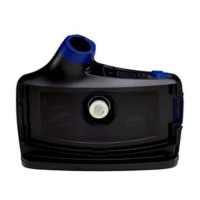
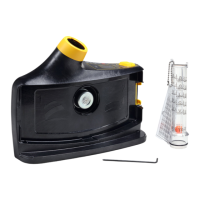
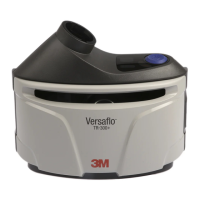
The core function of the TR-300+ PAPR system is to deliver a continuous flow of filtered air to a headgear, such as a hood or headcover, worn by the user. This positive pressure inside the headgear helps prevent contaminants from entering the breathing zone. The system comprises several key components: a motor/blower unit, a battery pack, a breathing tube, a High Efficiency (HE) filter, and a headgear.

The motor/blower unit houses the fan that draws ambient air through the HE filter. The HE filter is crucial for removing airborne particulates, ensuring that only clean air is supplied to the user. The battery pack powers the motor/blower unit, providing portability and allowing the user to move freely within the work area. The breathing tube connects the filtered air outlet of the motor/blower unit to the headgear, channeling the clean air to the user's face. The headgear, which can be a hood or headcover, creates a sealed environment around the user's head, maintaining the positive pressure and protecting against contaminants.

The system incorporates visual indicators to provide real-time feedback on its operational status. These include lights for battery status, filter condition, and airflow. A "green" light typically indicates optimal performance for these parameters, while other indicators might signal a need for attention or maintenance. The device also features a flow check mechanism, allowing users to verify that the airflow is sufficient for their environment before entering a contaminated area. This involves an airflow indicator with a floating ball that must reach or exceed a minimum flow mark.

Usage Features

Before each use, a series of checks and assembly steps are required to ensure the TR-300+ PAPR system is functioning correctly and safely.

Pre-Use Inspection and Assembly:

  1. Battery Charge Confirmation: The user must push a button on the battery pack to confirm its charge level. A full charge is indicated by 5 bars, representing 80-100% capacity. This ensures the device will operate for the duration of the work period.
  2. Battery Pack Security: The battery pack needs to be securely attached to the bottom of the motor/blower unit. A distinct click confirms proper engagement, and a gentle tug on the battery pack verifies its secure connection.
  3. Filter Visibility and PAPR Activation: The colored NIOSH filter must be visible in the filter window, confirming its correct placement. The PAPR is then turned on by pushing the blue button, initiating the airflow.
  4. Status Light Confirmation: After activation, the user must confirm that the battery status, filter, and airflow lights are all "green," indicating proper operation of these critical components.
  5. Airflow Sufficiency Check: An airflow indicator is inserted into the outlet of the motor/blower unit. The device is run for 15 to 30 seconds, and the bottom of a floating ball within the indicator must be at or above the minimum flow mark specified for the environment. Insufficient airflow means the respirator system should not be used until evaluated and repaired.
  6. Breathing Tube Connection: The breathing tube is aligned with pins and inserted into the PAPR air outlet. A quarter-turn clockwise secures the connection. A light tug confirms the connection is firm.
  7. Headgear Inspection and Connection: The hood or headcover must be inspected for any tears or holes. The breathing tube is then connected to the headgear by pushing the slotted end into the connector until it snaps into place.

Donning the PAPR System:

  1. Belt/Backpack Attachment: The PAPR unit is attached to the wearer using a belt or backpack, ensuring comfortable and secure positioning.
  2. Headgear Adjustment: The headgear is pulled over the head and adjusted for a secure fit. The face seal must be positioned under the chin, and it's critical that facial hair does not interfere with the face seal to maintain its effectiveness.

Post-Use Procedures:

  1. Exit Work Area: The user must exit the contaminated work area before turning off or removing the PAPR.
  2. PAPR Deactivation: The motor/blower unit is turned off by pressing and holding the blue on/off button.
  3. Removal: The PAPR system is removed according to workplace procedures, ensuring the user is not exposed to contaminants on the unit during removal.
  4. Cleaning: The PAPR system must be cleaned following the employer's established practices.
  5. Battery Charging: The battery should be charged as needed to prepare for the next use.

Maintenance Features

Regular inspection and maintenance are vital for the continued effectiveness and safety of the TR-300+ PAPR system.

Component Inspection:

  • Motor/Blower: Inspect for cracks, holes, or damage to the user interface panel.
  • Battery Pack: Confirm the battery pack case is intact.
  • Breathing Tube: Examine for tears, holes, or cracks. Bend the tube to verify its flexibility. Ensure the o-rings at both ends of the breathing tube are present and intact.
  • High Efficiency (HE) Filter: Inspect the filter and gasket for dirt, tears, cuts, distortion, or indentations. Replace the HE filter if any damage is noted or suspected. The HE filter should not be stored long-term in the motor/blower unit.
  • Headgear: Inspect the hood or headcover for tears, cuts, loose stitching, cracks, discoloration, or other signs of damage.

Filter Management:

The HE filter is a critical component that requires careful handling and timely replacement. It must be correctly installed with its label visible in the cover window. The system's "green" light for the filter status indicates proper function, but regular visual inspection for damage is also necessary.

Battery Management:

The battery pack's charge level is a key operational parameter. Users are required to confirm sufficient charge before each use. Post-use, the battery should be charged as needed to ensure it's ready for subsequent operations.

Cleaning and Storage:

After each use, the PAPR system must be cleaned according to workplace procedures to prevent the buildup of contaminants. Proper storage is also important to protect the components from damage and maintain their integrity.

Troubleshooting and Repair:

If any parts are missing or damaged, they must be replaced only with genuine 3M TR-300+ replacement parts. If the airflow is insufficient during the flow check, the respirator system must not be used until it has been evaluated and repaired. For any questions or issues, users are advised to consult their supervisor or contact 3M Technical Service.

3M Versaflo TR-300+ Specifications

General IconGeneral
Product TypePowered Air Purifying Respirator (PAPR)
Intrinsically SafeNo
Battery TypeLithium-ion
Airflow170 L/min (6 CFM)
Filter TypeParticulate
Product SeriesVersaflo

Related product manuals