16 S P I R I T
IT
F L O W- X INS T R U C T I O N M A N U A L | I M/ F L O W X - EN
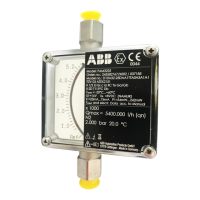
Bracket to Rittal Component Shelf (bottom mounting)
The other two solutions, we provide, are based on the Rittal
Component Shelf (7119.140).
The Bracket will be mounted to the shelf using the slots on the
bracket and the slots on the Component Shelf.
M4x8 Screw with a flat head (maximum of 3 mm)
M4 Nut
M4 Washer with a large outer diameter (minimum of 10 mm)
Figure 5-14 Mounting Bracket to Rittal Component Shelf
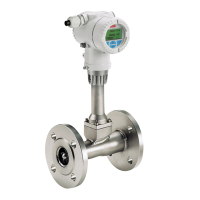
Shelf - 19 inch Frame Installation
By using the Rittal Component Shelf it is possible to easily install
the Flow-X/Cs into a 19”inch (swing) frame.
Figure 5-15 Installation of Flow-X/C Bracket on to a 19 inch (swing)
frame
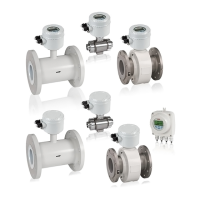
Position
The height that is needed for the installation is (in U):
Vertical Flow-X/Cs
1U + (6U * Flow-X/P rows)
(e.g. 1 Flow-X/C; 1U+6U=7U)
Horizontal Flow-X/Cs
1U + (4U * Flow-X/P rows)
(e.g. 2 Flow-X/C; 1U+8U=9U)
It is possible to place three vertical Flow-X/Cs next to each other
and only one horizontal Flow-X/C on a shelf.
The precise dimensions can be found on page 45.
Shelf - Door Installation
Flow-X/Cs can be installed into the door of the standard
cabinets of Rittal (TS, CM and AE). The only width of the cabinet
door that is usable is 800 mm.
Figure 5-16 Installation of Flow-X/C Bracket on to a cabinet door
The door should have the 25 mm mounting profiles on which the
Rittal Door Profiles can be mounted. To attach the Rittal Shelf to
these profiles you also need two Rittal Adapters (7246.010).
Rittal Door Profiles: