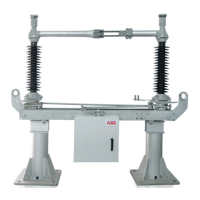
Mounting steps (continued) :
26. If necessary, correct the contact of all contact fingers on the operated pole by adjusting operating
rod (71) and check by means of test operation
27. Tighten lock nuts on operating rod (left-, right-hand thread) Figure 60, Figure 61
28. Correct the contact of the contact fingers on the coupled poles by adjusting coupling rods (15)
and check by means of test operation
29. Check distance between contact finger (20) and stop (21). The distance on one pole of 3-pole
group must not be more than 5 mm Figure 64
30. Tighten lock nuts on coupling rods (15) (left-, fight-hand thread!). Caution : This mounting step
is not applicable if the earthing switch is mounted on individual disconnector poles
31. Tighten locking screw in earthing-switch lever (19) and secure with lock nut Figure 58, figure
59
32. Drill hole through T-type clamp (329) and earthing - switch shaft (73) ( 12 mm - H12)
Figure 54 (Detail 2)
33. Grease bore hole with silicone grease and drive home stainless clamp sleeve
34. Set earthing switch to the ON position
35. Loosen bolts (340) on the T-type clamp and re-tighten Figure 54, so that contact fingers (20)
are uniformly up against earthing contact (18)
36. Treat contact finger (20) and earthing contact (18)
37. For rated voltages 245 ... 300 kV : Mount support for tubular contact arm (23)
38. In case of mechanical interlocking : Next step : Chapter 15 : Mounting of Mechanical
Interlocking
39. Next step : Chapter 16 : Commissioni g
A
A
A
A
A
A
A
Æ
n
65/113
1HDB 050016-YN-A