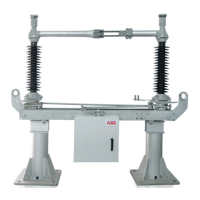
11.2 Separate Mounting
In case of separate mounting of the operating mechanism for the disconnector, the mounting steps are
dependent on measurement m3 of operating shaft (43) A Figure 22, Figure 23 and a possible lateral
offset of operating mechanism and disconnector A Figure 25 :
Separate mounting if measurement m3 < 6 m
Separate mounting if measurement m3 = 6 ... 12 m
Separate mounting laterally offset with measurement m1 (max. 4 m)
Note : Make sure that the operating mechanism is in the ON position (as-delivered state). If the
operating mechanism is in the OFF position, set it to the ON position using the emergency hand crank
(39). the disconnector pole must be in the ON position.
Note : If a manual operating mechanism is envisaged for the disconnector, ensure when mounting that
there is sufficient clearance for the operating lever (367) of the operating mechanism A Figure 21.
Mounting steps :
1. Unpack operating mechanism (75)
2. In case of rated voltage 245 ... 300 kV and mechanical interlocking to earthing switch on contact
side (KS):Mount operating mechanism and pivot bearing (42) on the spacers supplied (U = 150
mm)
3. Mount pivot bearing (42) on the disconnector base (2) A Figure 21
4. If operating mechanism laterally offset : Mount pivot bearing (42) in the envisaged position
5. If measurement m3 = 6 ... 12 m : Mount additional pivot bearing in the envisaged positions.
6. Insert operating shaft (43) through the pivot bearing A Figure 21
7. If measurement m3 = 6 ... 12 m : Insert individual parts of the operating shaft (43) through the
pivot bearings
8. Vertically align operating mechanism by operating shaft (43) and mount
9. Calculate required length of operating shaft A Figure 22, Figure 23.
10. Remove operating shaft again and suitable shorten
11. After shortening, coat intersection surface with the paint supplied
12. Grease thrust bearing (330), inside, and collared bush (331), outside, with silicone grease
A Figure 21
13. Repeat mounting steps 6, and 7., threading thrust bearing (330) and collared bush (331) in the
correct sequence onto the operating shaft A Figure 21
14. If measurement m3 = 6 ... 12 m : Connect individual parts of operating shaft to coupling parts
(334, 335) A Figure 21
15. Tighten operating mechanism and all pivot bearings
16. Connect shaft end of operating mechanism and operating shaft to coupling parts (334, 335)
A Figure 21
17. Operating lever (74) on the upper end of operating shaft (43) A Figure 26, Figure 27
18. If operating mechanism laterally offset : Calculate required length of operating rod (83) and
suitable shorten operating rod A Figure 25 (Detail)
19. If operating mechanism laterally offset : Connect operating rod (83) to operating lever (74) and
coupling lever (3) of disconnector A Figure 25
20. If operating mechanism laterally offset : Drill hole through operating rod (83) ( Æ 13 mm — H12)
A Figure 25 (Detail)
21. If operating mechanism laterally offset : Grease bore hole with silicone grease and drive home
stainless clamp sleeve (152) A Figure 25 (Detail)
22. Next step : A Chapter 12 : Mounting of coupling of disconnectors.
26/113
1HDB 050016-YN-A