ᆅჾ
ۉጱྃഗ
֪
INTRO
TRIP UNIT
LOCKS ACCESSORIES TESTS APPENDIX
3.2-02
ୟഗ
BREAKER
NF1:ဣଚگუഘୟഗ
ࠬጎዃ၄ሞଇ߲ࣂࡆฉLj߲ጎዃፌܠሎႹ๑ᆩෙ߲ٲ
٫ྺ!4!!9!nn!ڦࠬDŽ!4/6Džăጎዃኻీሞୟ
ഗڦᅎۯևتᇀ!EJTDPOOFDUFEDŽDž࿋ዃྜඇٗ
؏ฉָူ้๑ᆩă
!
සࡕᄲౚࢇጎዃժҾጎࠬǖ
2/ඓԍୟഗڦᅎۯևتᇀ!EJTDPOOFDUFEDŽDž࿋
ዃྜඇٗ؏ฉָူă
3/!ࣂࡆၠࢫླྀ؏ዐă
4/!Ҿጎࠬă
සࡕᄲٶۨጎዃLjሶথൽူࠬժዘႎჽ؏๕ࣂࡆLj
ᅜՍഄీࠕዘႎ๑ᆩăࠬጎዃౚࢇ้Ljᅜ࠲Կࡋோă
๑ᆩࠬۨࣂࡆ้Ljփᄲഽႜჽࣂࡆă
ᅃዖࠀీLj๑ᆩࢽፌܠᅜҾጎ! 3! ߲ۨጎዃLj߲
ۨጎዃሞୟഗتᇀ! UFTUDŽ֪Dž! EJTDPOOFDUFE
DŽDž࿋ዃۼۨୟഗDŽ!4/7Džăౚࢇ้Lj݆
ᅜۉഘݛ๕ۯݛ๕Կࢇୟഗă
ཞ้ᄺ݆থৎᄩդ٪ݣ࿋ዃă
؏ሃጎዃᅃዖሞ߾Ҿጎڦăኄዖጎዃᆩᇀ๑
ᆩଇ߲! Spojt! ሃଇ߲Qspgbmvy! ሃDŽփీ
ᆩDžă
ᅜڇ܀ࠔசժሞ၄ׇҾጎă࠲ᇀሃڦҾጎݛ๕ຫ
Lj൩֖Ԩ֩ڼ!5!বă
සࡕᄲౚࢇጎዃժۨ؏ǖ
2/ඓԍୟഗڦᅎۯևتᇀUFTUDŽ֪Dž!
EJTDPOOFDUFEDŽDž࿋ዃྜඇٗ؏ฉָူă
3/!ൽူժ٪ݣᄩդăDŽሞഄ٪ݣ࿋ዃዐDž
4/!Ӏొ้ኍݛၠገᅃ߲ଇ߲ሃժൽူሃă
සࡕᄲٶۨጎዃLjሶዘႎ֭ሃժഄӀຩ้ኍݛၠ
ገăසࡕᄲٶۨጎዃLjଇ߲ሃۼĐՂႷđ၄ă
࠲ᇀጎዃڦҾጎݛ๕ຫLj൩֖Ԩ֩ڼ!5!বă
߁ຎ
௬ӱ؏ۉમྪஏ
TABLES FRONT FASCIACASSETTECABLESNETWORK
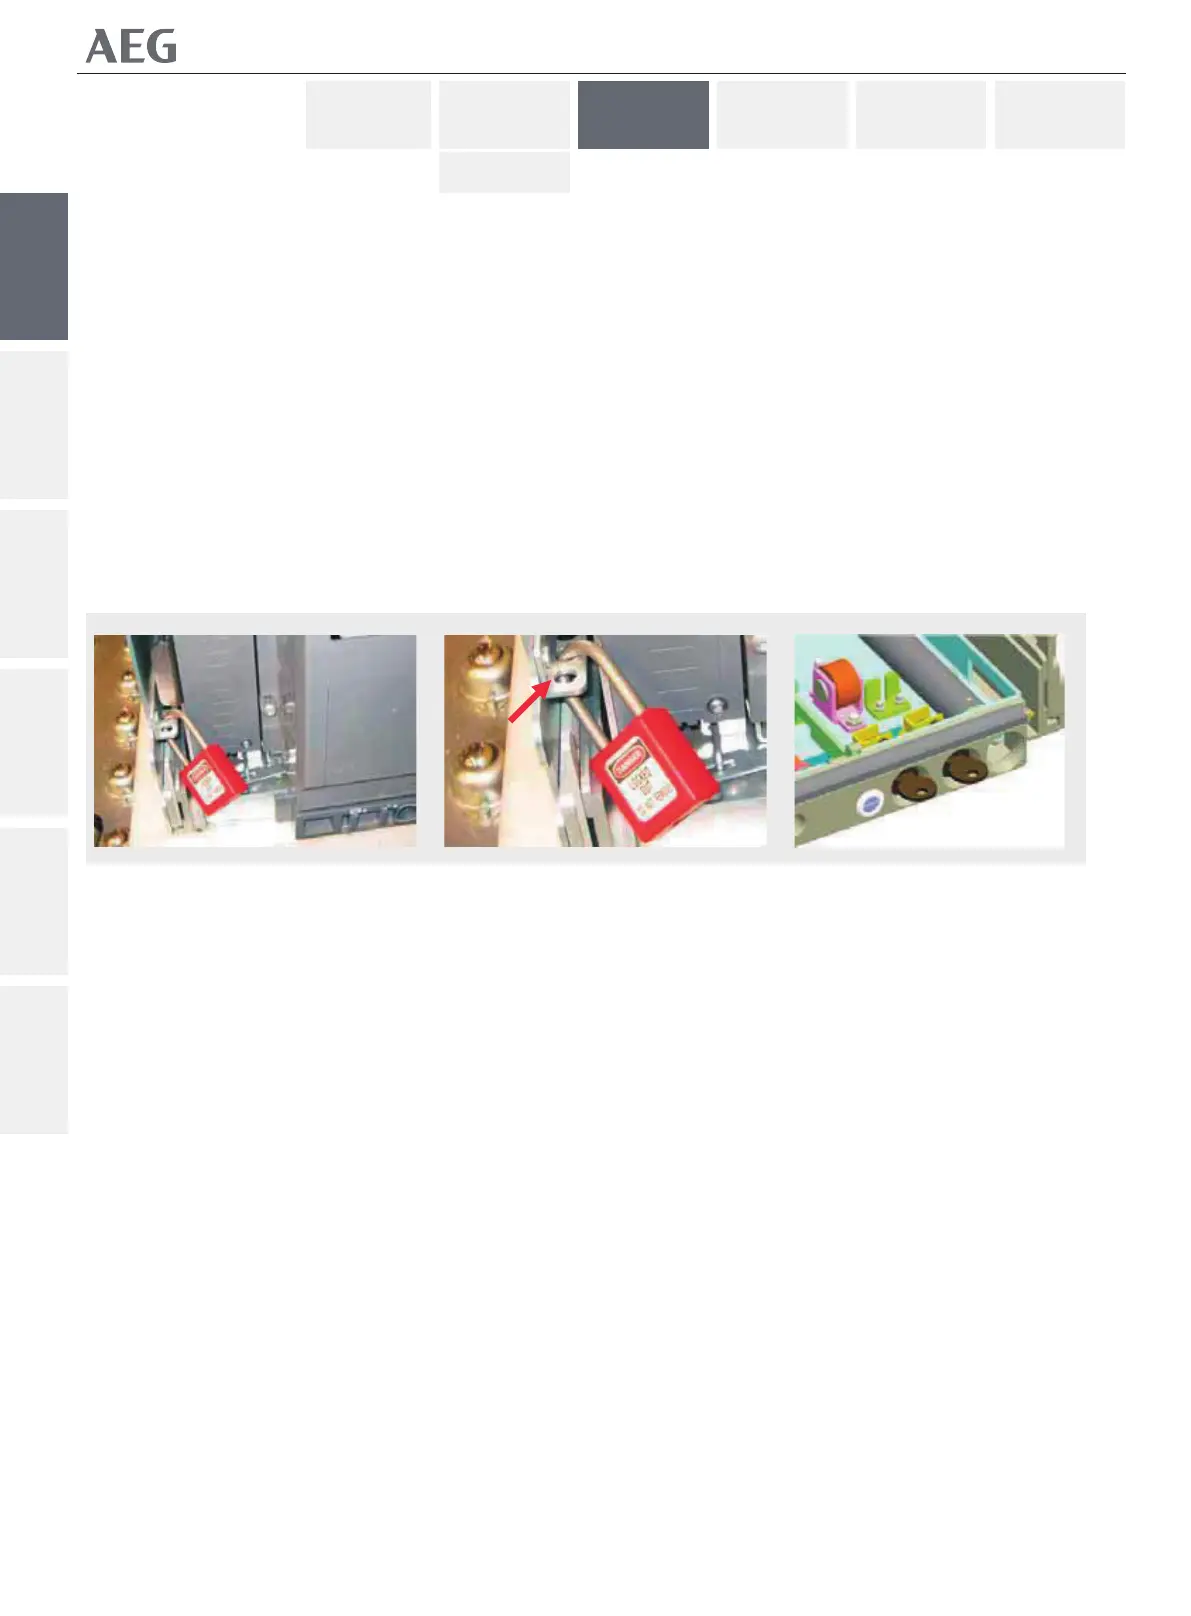
GENERAL
padlocking device is present on both slides and each can
accept up to three padlocks with a hasp dimension of 3 to 8
mm (see Fig. 3.5). It can only be used when the breaker's
mobile porƟon is in DISCONNECTED posiƟon and fully
removed from the casseƩe.
To engage the device and place padlocks :
1. Ensure that the breaker's mobile porƟon is in
DISCONNECTED posiƟon an is fully removed from the
casseƩe.
2. Push the slides back into the casseƩe.
3. Place padlocks.
To disengage the locking feature, simply remove the padlocks
and re-extend the drawout slides to allow their use again.
The cabinet d oor can be closed with the padlocking feature
engaged.
Do not aƩempt to forcefully extend the slides
whilst padlocked.
CasseƩe Security Keylocking
An opƟonal feature allowing the user to place up to 2 locks
that each can lock the breaker in TEST or DISCONNECTED
posiƟon (see Fig. 3.6). It is not possible to close the breaker,
either electrically or manually whilst the lock's are engaged.
Access to the racking handle storage locaƟon is also
prevented.
The casseƩe keylocking device is a factory mounted
accessory. The device allows the uses of two Ronis or two
Profalux keylocks (cannot be mixed).
The locks can be bought separately and mounted in the Įeld.
For instrucƟons on how to install the keylocks, see secƟon 4 of
this manual.
To engage the device and lock the casseƩe :
1. Ensure that the breaker's mobile porƟon is in TEST or
DISCONNECTED posiƟon and is fully removed from the
casseƩe.
2. Remove and store the Racking Handle. (In it's storage
locaƟon)
3. Rotate one or both keys anƟclockwise and remove the
key's).
To disengage the locking feature, simply reinsert the key and
rotate it clockwise. Both keys MMUST be present to disengage
the locking feature.
For instrucƟons on how to install this device see secƟon 4 of
this manual.
؏Ҿඇሃ
A
4/6B
Gjh/4/6B
4/6B
Gjh/4/6B
4/7
Gjh/4/7