Do you have a question about the Alarm.Com Knowledge Base ADC-VC826 and is the answer not in the manual?
Complete steps prior to final installation: connect camera, wait for internet connection, and add to account via app or web.
Reset camera to factory defaults by holding the reset button while reconnecting power for 10 seconds.
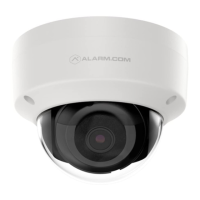
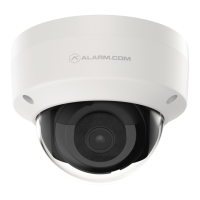
This document provides an installation guide for the Indoor/Outdoor Dome (ADC-VC826) camera, detailing the necessary steps for setup, adding the camera to an Alarm.com account, and troubleshooting common issues.
The ADC-VC826 is an indoor/outdoor dome camera designed for integration with the Alarm.com security system. It captures video footage, which can be accessed and managed through an Alarm.com account. The camera supports both Power-Over-Ethernet (PoE) for simplified installation and a traditional AC/DC power adapter for non-PoE connections. Its primary function is to provide video surveillance, enhancing the security and monitoring capabilities of a property. The camera's lens angle is manually adjustable, allowing users to customize the field of view to suit their specific monitoring needs during installation.
Before beginning the installation, users should ensure they have all the necessary components and information. The pre-setup checklist includes the ADC-VC826 camera itself, an AC/DC power adapter (if not using PoE), a broadband internet connection with a router, a computer or mobile device with internet access, an Ethernet/Cat5 cable, and the login credentials for the Alarm.com account where the camera will be added.
The process of adding the camera to an Alarm.com account involves several key steps. First, the camera must be connected to the router using an Ethernet cable. If the Ethernet connection does not provide power (i.e., it's not a PoE connection), the optional AC power adapter (sold separately) should be connected to the camera and plugged into a non-switched outlet. After connecting the power and network, users need to wait a few minutes for the camera to establish an internet connection.
Once connected, the camera can be added to the Alarm.com account. This can be done through the MobileTech app, the Customer app Video Installation Wizard, or by navigating to www.alarm.com/addcamera in a web browser. When using a web browser or the customer app, the customer's username and password will be required. The system will then guide the user through on-screen instructions to complete the addition and setup of the video device. For more detailed information on this process, users can refer to the "Enroll the video device to the customer account" resource.
After the camera is successfully enrolled in the account, it should be powered down before being installed in its final location. The installation should utilize the included hardware. For users seeking additional mounting options, information on compatible mounting brackets can be found in the resource "Which mounting brackets are compatible with the ADC-VC826 Indoor/Outdoor Dome Camera?". It is crucial to manually adjust the camera's lens angle during installation to ensure it covers the desired area effectively.
The document also highlights that for a comprehensive understanding of the camera's features, users can consult the "Indoor/Outdoor Dome (ADC-VC826) - Data Sheet."
Troubleshooting is an important aspect of maintaining the camera's functionality. If users encounter issues connecting the camera to their Alarm.com account, the first step is to power cycle the camera and attempt the connection again. Power cycling involves disconnecting and reconnecting the camera from its power source.
If the connection issues persist after power cycling, the camera can be reset to its factory defaults. This process involves using the Reset button, which is located under the camera cover. To perform a factory reset, follow these steps:
For any further questions or support, users are directed to visit www.alarm.com/supportcenter. Additionally, Alarm.com offers an "Academy" with training resources. Users can enroll in the "Video as a Service 201" training course for more in-depth information. Details on how to access Academy Training are available through the "How can I access Academy Training?" resource. These resources provide valuable information for both initial setup and ongoing maintenance, ensuring users can effectively manage their ADC-VC826 camera.
| Image Sensor | 1/2.7" CMOS |
|---|---|
| Frame Rate | Up to 30fps |
| Two-Way Audio | Yes |
| Camera Type | Indoor/Outdoor |
| Resolution | 1920x1080 |
| Lens | 2.8mm |
| Connectivity | Wi-Fi (802.11 b/g/n) |
| Operating Temperature | -4°F – 122°F (-20°C – 50°C) |
| Weather Resistance | IP65 |
| Motion Detection | Yes |
| Compatibility | Alarm.com |