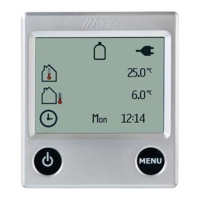
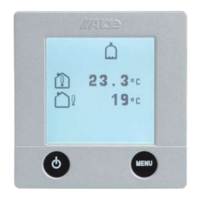
10. Temperature
This symbol shows the indoor temperature
at intervals of 0,5 °C.
This symbol shows the temperature outside in
intervals of 1°C. Note an external temperature sensor
must be added to utilise this function.
11. Using the lower menu
1 Press the button with the arrow
until the symbol for the bottom
menu row ashes.
2 Light the menu row up by
pressing the +/On button. The
bottom row of symbols lights up.
3 To deactivate the bottom menu
row press the -/Off button
when the symbols ash. Note
that the bottom row cannot be
deactivated without some other
function being activated.
In the bottom menu row, you can do things like setting the clock, remote connection, night temperature, autostart of
heater. In order to use the bottom menu row, you have to activate it as follows:
12. Clock
1 Press the button with the arrow
until the clock symbol ashes.
2 Press the +/On button. Day
ashes. Use the +/On or the -/Off
button to set the day of the week.
3 Step through the time information
with the arrow button. Hour
ashes. Use the +/On or the -/Off
button to set the full hour.
To set the clock, you rst need to activate the lower menu icons (see item 11).
4 Then step to the minute informa-
tion with the arrow button. Minute
ashes. Use the +/On and the
-/Off buttons to set the minutes.
5 Press Store and the time that
your have set is stored.
The example displays Tuesday
08.35
If the current to the panel is
interrupted and the battery
backup is not connected, the
clock has to be reset.
GB
Week days: 0-7
1 = Monday,
7 = Sunday
0 = Full week (Start/Stop
time only)
Hours: 0-23
Minutes: 0-59
ashes ashes
ashes
ashes
ashes
ashes
ashes