GB
IRE
00800 34 99 67 53
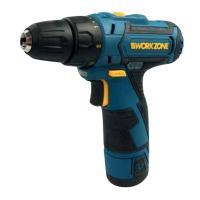
Inserting tools
1. To clamp in one of the drill bits
11
or the magnetic bit holder
12
in the quick-
action drill chuck
1
, turn it counterclockwise (see fig. D). This will open the
quick-action drill chuck.
2. Select
• the suitable drill bit and insert it in the quick-action drill chuck.
• the magnetic bit holder and insert it with the hexagonal side forward in the
quick-action drill chuck.
3. Turn the quick-action drill chuck clockwise until tight (see fig. D).
4. Once you have inserted the magnetic bit holder, insert a suitable bit
13
.
Removing tools
1. Turn the quick-action drill chuck counterclockwise (see fig. D).
2. Take the tool out of the quick-action drill chuck and store it properly in the plastic case.
Screwing and drilling
1. If you would like to drill or screw into soft wood, mark the applicable area.
2. Mount the rechargeable battery
7
on the cordless drill so that the contacts of the
rechargeable battery extend into the cordless drill. The rechargeable battery must
lock into the cordless drill
3. Insert a drill bit
11
or the magnetic bit holder
12
with the desired bit
13
(see chapter “Inserting tools”).
4. Turn the torque adjustment ring
2
• to the
symbol (drilling) if you would like to drill into wood, plastic or metal.
Do not use this setting when screwing.
• to the desired torque if you would like to screw:
Low torque: small screws and sensitive materials.
High torque: large screws and robust materials.
The torque adjustment ring will then audibly lock into place.
5. Use the gear switch
3
to select 1st or 2nd gear. Do not push the On/Off switch
8
and the gear switch simultaneously to avoid damaging the cordless drill.
Speed 1: 0 to 400 rpm
Speed 2: 0 to 1300 rpm
Speed 1 is suitable for screwing and drilling a large bore diameter.
Speed 2 is suitable for drilling a small bore diameter.