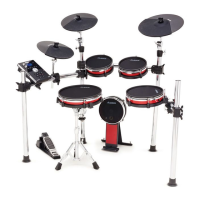
d) Identify Crash Cymbal Pad and assemble spring
collar by inserting screw end of spring collar
through bottom of cymbal. Screw top piece of
collar onto threading.
e )Attach Crash Cymbal to Cymbal Boom by inserting
Cymbal Boom’s splined L-Mount into base of
Crash Cymbal spring collar. Tighten using straight-
blade screwdriver.
f
)
Position Crash Cymbal at a comfortable height and
angle. Firmly tighten all wing nuts.
Note: For players who prefer a softer feel and quieter
p e r f ormance, the DM Pro Kit includes a Rubb e r
Cymbal Mat that can be attached to the top surface of
the Crash Cymbal.
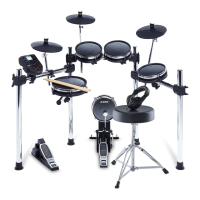
Attach Ride Cymbal
a) Choose a Hardware Clamp and loosen large wing nut until clamp’s large opening
releases. Attach clamp to top of Right Upright Tu b e. Make sure that the clamp’s larg e
wing nut is facing you. Tighten large wing nut.
b) Loosen small wing nut and hex nut on Hardware Clamp until small opening is released.
c) Identify Ride Cymbal Pad and attach to Cymbal Boom by inserting Cymbal Boom’s
tube end into bottom of Ride Cymbal. Tighten drum
key bolt.
d) Attach Cymbal Boom to Hardware Clamp by inserting
Cymbal Boom’s splined L-Mount into the smaller
opening of the Hardware Clamp. Close the clamp
and evenly tighten the hex nut and wing nut, providing
equal pressure on both sides of Cymbal Boom.
e ) Position Ride Cymbal at a comfortable height and
angle. Firmly tighten all wing nuts.
Note: For players who prefer a softer feel and quieter
p e r f ormance, the DM Pro Kit includes a Rubber Cymbal
Mat that can be attached to the top surface of the Ride
Cymbal.
Attach DM Pro Rack Mounting Tray
a) Choose the last remaining Hardware Clamp and loosen large wing nut until clamp’s
l a r ge opening releases. Attach clamp to middle of Right Side Tu b e. Make sure
that the clamp’s large wing nut is facing you. Tighten large wing nut.
b) Loosen small wing nut and hex nut on Hardware Clamp.
c) Attach Rack Tray by inserting mounting tube into the smaller opening of the
Hardware Clamp. Evenly tighten the hex nut and wing nut, providing equal pressure
on both sides of Mounting Tr a y ’s mounting tube.
d ) Position Mounting Tray at a comfortable height and angle. Firmly tighten all wing nuts.
DM Pro Kit Setup Guide 9